

bmp01
-
Posts
857 -
Joined
-
Last visited
Content Type
Profiles
Forums
Classifieds
Tip Site Directory
Blogs
Articles
News
Arborist Reviews
Arbtalk Knot Guide
Gallery
Store
Freelancers directory
Everything posted by bmp01
-
Make the assumption engine speed is the same. Chain speed is faster by the ratio of diameters.... Then accept that in reality the engine cant necessariy provide enough torque to keep engine speed the same. But you'll have an overall gain in chain speed. Slight narrower kerf will help keep engine speed up.
-
And what about the outside diameter ?
-
Sounds like we are on different wavelengths. ... ? The teeth, left hand and right hand are separate items attached to their drive links on opposite sides of the drive link...
-
Trailoftears - do you have the 2 rim sprickets to hand, the 7 tooth 0.325 and the 7 tooth 3/8 lopro ?what can you tell us about the outside diameters?
-
Cutter is attached to the drive link though, making the drive link thinner moves the cutter towards centreline of the chain ... small difference to kerf but still .....
-
And watch out for the bar mount detail - I think the MS250 has 3005 mount type and MS261 has the 3003 type. Or put it another way the bar in this kit will a 'cock in a sock' fit on the MS250 bar studs, you'd need spacer to locate it properly. Please do check this, I'm not 100% sure.
-
Top marks for sticking with it, don't expect you'd get a better understanding with dealer investigation. Think you've shown the engine is sound now - it's not capable of random behaviour.
-
I dont see how an internal engine fault can come and go so I'm gonna say there's a fault in the in the pull start mech too ? Don't suppose you've changed starter cord in both saws have you ? Just thinking dodgy cord might be bunching up to be too big diameter to go through the hole in the starter mech ? Quick diagnostic test and get a friend to help... Pull it over until you get a hard to turn over event, and while keeping tension on the cord remove the plug. Does it suddenly free up ???
-
Got 2 x 25 L of apple juice and 6 L of pear juice in the fermenting barrels. All left to go the natural way so fingers crossed we dont end up with vinegar. Only planned to do 25 L, which is kind of a days playing for me, but I added drain plates to the press which helped productivity so felt it needed a second go to confirm inprovement. Does get a bit much after a while though.
-
Poor starting with Husqvarna 550 xp (mk1) Puzzled.
bmp01 replied to David Dobedoe's topic in Chainsaws
Yes. And have a look at the plug and see if its sopping wet, likely from what you say. That bit of info will point you in a better direction for how to start it consistantly from cold .... maybe you pull it over on choke for 2 or 3 pulls only, irrespective of whether it coughs or not.... -
Dunno, although OP's here asking - so maybe it's safe to assume splitting and remaking chains is not a regular past time other wise he'd have just got on with it ? I guessed Cessna just wants to buy the right length chain with possibility to return the too short one. But I really dont know.... "Wreaking it" poor choice of wording on my part, soz.
-
Nah, kind of you to say, but I doubt it. I'm just a tight git and don't like wreaking stuff.
-
Just to add, my head gets in a spin sometimes, trying to not double count half a link at the ends, take care.
-
I think you could do it without breaking your 56 link chain, but you'll need to do some counting ! Put the chain on the bar only. Mark the bar with a pen right next to a rivet on top and bottom rail, count the number of drive links between marks. Take the chain off the bar and wrap it around the drive sprocket and a suitable distance up the bar, ie past the two marks you made earlier. Count number of links between marks, add to previous number, job done. See pictures. Might need an extra person or cable ties or something to hold the chain while count.

-
Ok.
-
I'll take your word for it. But as a general rule that wont be true. There will be a reason the 0.043 cut slower in that instance be that chain sharpness (inc raker height) or type of chain, chain tension, bar condition, etc, etc. If the power head has enough omph to run both chains at the same chain speed they will cut at same speed, give or take. In reality the thicker chain will have lower chain speed due to extra drag and cut slower as a result.
-
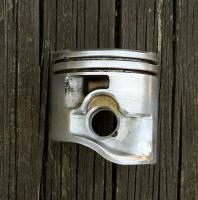
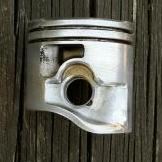
Exactly ! Surprise, shock, dispair.... Tiny click noise (rod becoming detatched I suspect) followed by several small things dropping on the floor, (saw was on its side while fiddling with piston circlip).Thought it was buggered at that point. But collected up all the rollers I could find, quick count up and a few sums later it worked out that side by side the rollers would wrap around the crankpin leaving 1mm gap. That'll do ! Cleaning followed by grease on rollers and crankpin.... 2 mins of sweaty palm stuff and the rod popped back into place. Found there was only one orientation of rod and crank where it would come apart so parked in safe position and retired for a break. Actually not too hard to put back together once all the bits were found but I did think it was game over for a bit.
-
Thought you might like it. Poor thing has been negleted and got hot - cylinder bolts were all but loose. Then this happened while fitting piston circlip ....😨....💩

-
Needed the air compressor (at low pressure) to feed this hungry air leak 😄


-
Everything's fixable.... not necessarily economical though with shop hourly rates. It has little to no value as a door stop or shed filler - have a go at fixing it yourself, no downside really. Crank seals wont usually leak much oil ... it sounds like you have a lot of oil leaking to stop the clutch driving the chain. Maybe the oil feed to the guide bar is leaking somewhere? (If the bar and chain are off then the oil pump will be going all the time the engine is running, so spewing oil from the bar mount area). MS251 should out run 023. Being a bit more modern and subject to emissions legislation, I wonder if 251 needs 'a muffler mod' to wake it up? Hah, here's a thought, might be possible to swap the exhaust from the 023 to the 251, if so that'd be a very quick experiment. Do the exhausts look different interms of exit hole size? Bigger is better within reason. Carb retune necessary before any long full throttle runs, please.
-
I'd echo the comments above. Easy to keep old saws running compared to modern saws when they get to 10 yr old. No reason for the 038 to go pop, give it a birthday overhaul now (fuel lines, filters, carb overhaul, degradable parts etc), check the tune regularly and look after the fuel you feed it. Job's a good 'un. 361 souldnt be dismissed if youve just gotta have a new one (fewer gizmos compared to later saws), see earlier post for sourcing one.
-
Was checking my belief the 391 is a clamshell engine design (it is), came across this: https://fireandsaw.com/stihl-ms391-chainsaw/ doesnt sound too positive... The 251 is clamshell design too. Clamshells are seen as a lower spec and less durable compared to the pro spec saws (like the 038). Expect a shorter lifespan. The ElastoStart feature is a feature to avoid IMO. Is the 038 completely knackered ?
-
Two questions: - when it's hot and you have the problem of the blades not moving, does engine rev up ? - if not, is engine trying to increase speed, ie making more noise but not reving (so like a chainsaw with the chain brake on) ?
-
Have a look here : https://arbtalk.co.uk/forums/topic/130178-makita-9010-rebuild-costparts/page/3/#comment-1963017 The original poster carver83 might be breaking his saw.... or it might be in a corner somewhere awaiting a replacement crank.
-
I imagine they'd do a better job if it were a clean sheet of paper task. In reality i expect it has just evolved as time went on... I dont suppose they had a scooby-do '3/8" lo pro' (or 1/4") was going to be a thing back in the day when the first chain came off the manufacturing line. Part numbers etc often throw up coincidental patterns, some useful, some not so....


