

bmp01
-
Posts
857 -
Joined
-
Last visited
Content Type
Profiles
Forums
Classifieds
Tip Site Directory
Blogs
Articles
News
Arborist Reviews
Arbtalk Knot Guide
Gallery
Store
Freelancers directory
Everything posted by bmp01
-
Stihl Ms 211 C would not start. Wet sawdust all over the carb.
bmp01 replied to John Rainford's topic in Chainsaws
Ah yeah, that 😃 -
Stihl Ms 211 C would not start. Wet sawdust all over the carb.
bmp01 replied to John Rainford's topic in Chainsaws
Make wood chips not saw dust ! Huh? Well, saw dust has a habit of lingering around the saw, getting sucked in the engine by the flywheel (fan), settling on the air filter etc. Wood chips just get flung out the back and are gone. Maybe more usefully.... Check the O ring on the back of the airbox, possibly nic'd or missing, see picture for location. A leak here will get sawdust to the back of the diaphragm and of course into the airbox. Plus you loose the 'compensator' effect - when the filter gets blocked your fuel mixture will get rich. Cant say I'm overly impressed by seal around the secondary air feed either, bit of a joke really. HTH.
-
I agree with this, although saying 181 is a toy is a little harsh. 171 is the toy. Muffler mod helps them out no end. Use a barge pole on the ergo start, primer bulb and toolless tensioner, they'll just give bother at some point. Looked after they last ok, but they are plastic so dont stand up to too much abuse.
-
Definitely well hidden.... On the few I've played with they seem bloody sensitive. ..1/8th turn either way and barely run...might just be cheaper end of the range though (Mitox strimmer, Oleo Mac hedge trimmer).
-
You mean ive got to read everything in the thread...... damn..... And digest it..... double damn. Nah, its ok - I was attempting (and failing obvs) to draw attention to the fact it was similar design to the other anti-tamper screw head. OP was already on the case, knowing there was an adjuster there as well (post 1).
-
Ok, I'll save you a few seconds. ...

-
Might be my imagination but it looks like the brass screw in first picture also has a tiny hole, offset from centreline (you need to enlarge picture to see) - meaning it's adjustable with the right tool.
-
I read your previous post, expect you're right, no disrespect intended. Was hoping the OP would get to a conclusion and let us know. As you said, new genuine crank is expensive....plus work probably means its a right-off, if it were crankcase bearings only it would relatively cheap on parts at least.
-
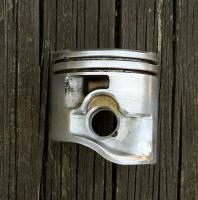
Stubby, dunno....my understanding was carver83 was referring to the bearing debris that was literally 'on top' of the piston - as seen in his picture. Does look like a spherical ball on the piston until you zoom in, then it looks a bit ragged, more like rolled up cage material.... ? Maybe carver83 will confirm but I'm guessing he's a little out of his comfort zone with this.
-
Which one, bottom of connecting rod ? Also know as big end bearing. Or one of the crankcase bearings ? (Big end bearing is allowed to move side to side but not up and down, and obviously if there is stuff missing .....its 'stuffed').
-
Pretty sure openspaceman was suggesting a picture of the exhaust side of the piston. I'd say the cylinder will go again from what i can see. Light scoring will clean up with a little bit of time and gentle use of 400 grit wet and dry sand paper. If you drag a fingernail over the cylinder wall does it catch in the scratches ? Using genuine cylinder much preferred over aftermarket stuff, thats before money comes into it. Splitting cases to get bearings out is a sizeable task though, good luck with that.
-
Maybe it doesn't look bad...... scuffing is below exhaust port.... Inlet side and piston crown seen some debris by looks of it but far from a disaster. Cylinder reusable? What went pop ? Lost a bearing or bearing cage or did it eat something ?
-
Little bit of oil goes a long way.... As you say with the shipping sounds like oil has gone thro the breather hose to the filter and then escaped to the outside world. I wouldnt worry about the engine too much, once its running and warm the oil will drain back to where it should be. If the filter is all foam then clean it like any foam filter for an engine. If the filter has a paper type element and also got oiled then it wants replacing. Oil else where will attract dirt but otherwise not a problem. 'Dirt' on outside of spark plug is paint over spray.
-
As above. And knackered pc hard drives for little flat magnets - neowotsits Good for cleaning up filings and swarf - but use magnet in a plastic bag so magnet and ferous junk can be separated (preferably over the bin).
-
My first saw. Was half dead from the auction house (this is in the era before ebay if anyone remembers that). Think the replacement Stihl 18" bar was sub 30 quid at the time. Apologies, off topic somewhat...
-
Magnetise the end of the T27 bit .... ?
-
"it was cutting really well..." "reving great..." "never run better..." Happens so often, unfortunately it looks like you had 3 warning signs. Before you strip the saw down better pressure and vacuum test to see if there is anything to learn. Do some searching online for what is involved and decide if you're up for it. But also note you dont always find leaks through cold pressure testing,... the way you've described it could easily be crankseals leaking badly once hot. Not much to loose now, its a good time to learn.
-
Any chainsaw repair folks around Northamptonshire
bmp01 replied to nemcc's topic in Maintenance help
Eh, wot ye say, some one call ? Still here, only fix and tune my own saws generally though. Whats the situation nemcc ? -
Thanks Rob and sorry for show response. I'll look into those points tomorrow, 'peening' on drive link is an interesting one.... its the non-loaded side of the drive link ? Wonder if that is same across the whole chain or local to the failure, there is other damage that surely came from the links bashing into each other as all came to a abrupt halt. I'll check. New clutch and rim (Oregon brand) were fitted at the same time this chain was fitted. Bar was dressed at the same time. Bar is used Sugihara, it was on the saw when I bought saw secondhand (previous chain was well used at that point).....nose sprocket has a question mark over it, likely to be worn, I'll check.
-
Wasn't a facebook advert in Rugby by any chance.... just curious....
-
Not really the time to punt for an ebay special is it.... Oregon rolls of chain come with presets and tie links, 40 off pairs per roll so I'm told, NewSawChains sell their surplus. Other route is to buy a bag of Oregon presets and a bag of Oregon tie links by their part nos from likes of L & S Engineers but by then you're well past the price of a new chain. The guys in the States are better supported in this respect. In my case the failed link appears the same as the NewSawChains supplied link which I'm told is Oregon....but.... there is a marked absence of the word I Oregon stamped on the preset or the tie link. Wonky's picture above (second one with one half broken) looks the same too.
-
That is the plan, new joining links are here. Now I need to know how best way to DIY fit new link, not convinced the spinner is best way anymore... Looks like that's cracked through the preset (looks just like the 'spinned' finish of a new preset).
-
Spot on - exactly that.... Plus there has to be clearance between the rivet and the tie strap in order to assemble but its a good thing if there is no clearance once the rivet if finish formed. No wonder joining links are the weak point.
-
Thanks for the comments AJStrees, trigger_andy, openspaceman. Openspaceman - Interesting observation regarding rivetting technique. ... enlightening even..... Ok, well the failure happened in an instant, engine revs went skyward that was the first I knew. No half measures - one length of chain rather than a loop. I used to look at failed bits of engines, searching for clues as to what went first so I'm reasonably in my comfort zone in anslysing the bits. I found fatigue patterns on the preset link which tells me it had a crack in it that was opening (and closing) each load cycle, with crack growing over thousand of cycles. The tie link has pinged, the material was stretched to the point of snapping. The remaining bit of tie strap is a cock-in-a-sock fit on its rivet, this could have happened in the failure but there is no sign of that . So the conclusion is the preset cracked first, crack grew and finally broke, tie link followed shortly there after. But why? If the rivetting is done well - so lots of pressure as well as rolling of the head - its likely the pin through the tie link is expanded within the tie link as well...so it takes up any radial clearance between the two parts. No clearance means the tie link can do useful stuff like taking its share of the load in the chain. Conversely, poor rivetting leaves radial clearance between rivet and tie link, so tie link cant take any load - the preset link does all the work, continually bending back and forth and fatigues. So the redneck use a hammer for rivetting rather than the pukker rolling tool doesnt seem so bad after all.... 😨😀
-
Just once so far. I have some joiner links arrived today. But also wondering about new chain if its going to break often from now on. Chain and bar not getting hot but they do look 'dry' to the point that after each plank I run the saw out of the wood to ensure chain is thoroughly oiled. Its oak that's been down for 5 years or so, still damp in the heart wood though. Auxillary oiler would be an advantage...


