bmp01
-
Posts
857 -
Joined
-
Last visited
Content Type
Profiles
Forums
Classifieds
Tip Site Directory
Blogs
Articles
News
Arborist Reviews
Arbtalk Knot Guide
Gallery
Store
Freelancers directory
Everything posted by bmp01
-
...this was a running saw... Not a nice running saw but still a runner.
-
No it isn't. I didn't spot this from the pull cord compression test, held its own for over a minute. Compression test was 135 psi - low for sure but I passed it off in my mind because I had to use 10mm adapter for the gauge. Aw well, you win some, just not this one.
-
I was just going off this. ... post 1
-
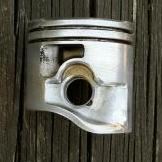
Sorry for the delay, that 201 (up the page somewhere) isn't going to run right for a little time yet. Needs a piston that measures a bit more than 39.70mm across the skirt. Probably explains why the idle screw had to be wound in some to get it to run. Cylinder has cleaned up surpisingly well.

-
Yeah, block them both off if you have concerns about the bulb. It's not necessary to run the saw. If the one way valve in the bulb isn't working 100% then the carb sees tank pressure which definitely upsets the apple cart. Also, just check that release of tank pressure you mentioned in post 1 was positive pressure and not vacuum.... hard to tell difference in sound between gas coming out or going in. Of course, if the fuel cap popped out ....
-
....time to f'kin learn then... 😈 It isn't hard or any sort of magic by the way. I understand there are plenty of videos on that well known video site.
-
Why would you not adjust the carb if the saw needs it ? You might be missing out on some of the potential performance gain... (And avoid seizing the thing....)
-
T'is a risk. Care to share details of std seal, is there a part no ? I've looked on 200t parts list but no joy there.
-
Yeah, I agree regular sizes would be preferable.... the original oring is a little over 1.0mm section I think (hard to be sure it's degraded and changed shape etc). Wouldn't be hard to machine up a new piston to take 1.0mm section Oring but at that stage might as well just buy new from Stihl.
-
Thank you ! Ever tried replacing just the O ring ? Piston groove: Dia = 3.17, Width = 1.20 Bore in carb 5.0 O ring with ID 3.0, Section 1.1 Viton material would be about right.... probably unobtanium.
-
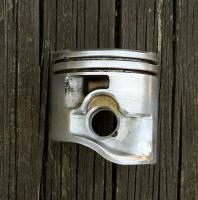
MS201 carb in bits. Air leak on the hi circuit. Hi jet (check valve) and accel piston removed. Hi jet is fine, accel piston seal is smaller than the piston (see piccy 2) and looking a bit shabby. That'll be it then. Apparently you cant buy a replacement accel piston assy from Stihl though..... Just needs a new O ring seal really.


-
Ah ok hadnt related throttle posn, thought it was all wide open throttle ... So are you saying it will it hold high rpm on part throttle for a good length of time but as soon as you go wide open throttle it falls over? That would be consistant with your blocked strato port expt. Suggests ignition is ok but not 100% certain... The accel pump is just a small spring loaded piston which gets pushed by a notch on the throttle shaft to squeeze extra fuel into the high speed circuit as throttle is opened. The piston is sealed in its bore by an o ring. The o ring wears, splits or degrades with bad fuel, piston and bore also wear in bad cases. So the problems arise because there is then an (small) air leak path across the accel piston into the high speed fuel circuit. Poor or inconsistant throttle response are the usual. Not sure it would do what you are seeing but then again who knows... Not a million miles from Wellingborough. If your mate travels up the M1 I'm a mile from M1 Jn 16 if that helps. Can sort this out via PM if you want. Reward is in helping fix the bugger !
-
Might be me but didn't the saw rev up, then start misfiring and drop revs ??? Agree with Spud that sounded rich at idle and the initial rev up didn't sound clear or particularly high revving. Was that from cold, any different warm? I wouldn't rule out spark plug / ignition trouble for the misfiring from high speed. Broken plug I had on a MS211 made saw impossible to start though, plug was arcing internally through the ceramic. Again as Spud says if blocking the strato port allows it to rev cleanly then its not ignition. Got a 181 here if you want me to test carb, coil on it. Would need posting, Northants. Last thing, this range of saws are pretty mediocre on compression from new, I've found high comp engines are more tolerant to fueling being a little out of wack. Have you checked compression?
-
Yep that's the sort of thing. I've got a bit of a thing against purge valves this week. ... Small 26cc top handle (chinese) was running ok'ish, put it down for 10 seconds and struggled to start it. When it did finally stumble into life, barely clearing itself, it was pig rich. This was boringly repeatable. Found nothing untoward in the carb - bit of a surprise. The light bulb moment was realising the purge bulb, while basically doing its job - for the first instant of pressure on the bulb flowed in the wrong direction (this was during diagnosis, not hot restarts before someone says..). Turns out the one way valve inside the bulb was perished. Not until there was significant pressure on the purge bulb did its internal valve seal. So, in this case the metering chamber in the carb (that oh so critical control parameter) was more or less connected directly to the fuel tank..... and seeing fuel tank pressure. Further, as the primer bulb fuel return line dipped below the fuel level in a brimmed tank, when engine was switched off the tank pressure (from heat soak) was back flowing fuel into the metering chamber, flooding the engine. I guess I had previously considered the purge lines being 'after' the carb - they couldn't really upset the carbs operation. This week I've changed my mind. A few extra pulls on the start cord and the simplicity of a carb without extra gubbins definitely trumps the 'easy start' sales pitch.
-
Beginning to see why this saw got put to one side. I think you're gonna have to look at the accelerator circuit if only to confirm its healthy (or do like you said earlier, get a replacement carb). Lots of talk about the primer bulb earlier IIRC, how's that working now? Have you tried running the saw with the primer bulb circuit disconnected ? (The return fom the carb must be plugged if you want to try this). Edit: a new primer bulb was fitted, probably not that then...
-
Ok, nice to have an update. I take it none of the carb cleaner came out the accelerator jet circuit then if as you say ' it all squirted out of the jet in the choke tube' If so that just leaves a question mark over the check valve operation. Fingers crossed. Edit: sorry, i have no useful info regrading replacment carb.
-
Try this link: https://arbtalk.co.uk/forums/topic/122598-still-m181c-help/page/2/ Be nice to confirm were the fault lies before bailing on it. Pretty close now I think. Try Spuds carb cleaner treatment and if no joy I have one last test, zero cost. After that either it works or send it to me, I have a few big hammers to fix it. Usually the microscope and lathe are more useful for this sort of project though 😃
-
I'm not convinced either. Another question for openspaceman, when the saw was idling, is the idle screw at factory setting or adjusted way rich? I'm thinking 'check valve on high speed circuit is needed for idle operation'...if saw idles ok, this says check valve is closed at idle, either it's completely blocked or working as it should. .....200 carb has a much bigger venturi compared to these strato saw carbs....
-
Picture paints a thousand words. ... and it seems like what I call the main jet (with its integral check valve) you are all calling a check valve. So, Spud is right (of course), in the blue circle is the check valve. If you have any mechanical dexterity you can just tap it out with a drift straight into the carb ventrui. Even better news; you can just refit it by tapping it back into place from the metering side. I typically clamp the carb in a vice, leather on the faces to protect. Note the depth and orientation of the check valve before you start. Check valves are replacable and have their own part no. One note of caution - if the carb venturi is small you need to be confident the check valve will travel all the way into the venturi and not bump into the far wall before its released from its bore. I think i did a 211 carb which is most likely the same. Looking at the carb picture and thinking about your hose blow /suck test plus the 2 apparant feeds to the check valve....it's a bit of a puzzle. 2 feeds, the jet feed, therefore a constant fuel feed, probably suppying most of the fuel. That leaves the high speed screw to fine tune the small additional flow supplied through the second hole. I suspect when you sprayed carb cleaner through the high speed screw the stuff went down to the check valve and some of it bounced back up fix jet drillng. How about you refit the high screw and bottom it, then spray down the jet feed....does any spray come out the second feed? Your earler blowing down a hose test: with the high speed screw bottomed as you did, you should be able to blow through the check valve. You should not be able to suck through the check valve though. But wait, before you conclude check valve is knackered you need to know the accelerator circuit also feeds fuel to the check valve..... Do you know where the accelerator piston is?
-
And here's a sketch of how those bits go together.

-
Oh hang on, I've got a picture of a main jet with the check valve parts next to it. ...here you go. .... (This is not the exact one from your saw / carb but they are all the same as far as I know).

-
Here's how I test main jet, hope you still have it out of the carb.... Put a hose over the outlet end of the main jet.... If you try to blow through the hose that's trying to flow air the wrong way through the jet - the check valve (in the jet) should shut and stop any airflow. If you suck on the hose air should flow through the jet (in the same direction as normal fuel flow). In your first paragraph, if i have it correct in my mind you are blowing into the main jet hole from the metering chamber side ? And youve blocked the main jet hole at t'other end (where it comes into the carb 'venturi' ? And you can still blow through the hose ? I dont see how.... unless accelerator jet piston is missing. Second paragraph, the only welch plug i can picture is the one over the low speed jets, there is no check valve under there. If it's another welch plug then it's a different carb to the ones I've seen, can you post a picture?
-
No, that's wrong. Check valve is typically only on high speed circuit, as part of the high speed (or main) jet. So while the jet is out make sure you can blow through it in one direction , as per the fuel flow , and not in the reverse direction. Low speed circuit doesnt have a check valve but sometimes there is a one way valve on the whole fuel circuit ...I think.... Edit, the logic for check valve in high speed jet is ironically for idle operation. It stops air going back down the high speed jet, passing through the fuel circuit and out the of the low speed jet (coz that would surely cock-up low speed fueling). If you think about idling and the pressure drop across the butterly (or throttle) valve you can see: - engine side of butterfly is at a depression - airbox side is at ambient pressure That's the driver for air going the wrong way through the high speed jet.
-
Back ground info - did you tell us the age of saw (sticker on brake handle will say)? Also, what's your perception, is it a high mileage dog? Hardly used ? etc Can you see the fuel line while running (to see if air is coming through during running), could be the air is only due to purge bulb use ?
-
Thanks for the extra info openspaceman. Seems like fuel line "rot" is the common theme. I wonder if it had some nasty fuel left in it, maybe followed up with alcylate fuel when it wouldn't run right...