

ucoulddoit
-
Posts
283 -
Joined
-
Last visited
-
Days Won
2
Content Type
Profiles
Forums
Classifieds
Tip Site Directory
Blogs
Articles
News
Arborist Reviews
Arbtalk Knot Guide
Gallery
Store
Freelancers directory
Everything posted by ucoulddoit
-
Hi Mark It's probably been 2 to 3 days so far for the base, but hard to judge as I rarely spend all day in the workshop with one thing and another. Also, working on a new (for me) design adds time, plus making jigs for the router for the first time used. For instance, photo below shows a leg to rail joint which is a mortice with curved corners which exactly matches the rail cross section, rather than a traditional mortice and tenon with shoulders. Probably widely used, but I first saw it in a video about Sam Maloof and used it before on a project with numerous joints. Was it worth the time making the jig for just 4 joints on this project? It does give the benefit of real accuracy and I've got it for the future, so long as I don't lose it like the one made before........! The top has needed a couple of days work in addition. Spent at least half a day just picking the bark off the natural edges and smoothing it off, just a wee bit. I don't often have a natural edge, but if I do, I prefer to really clean it up and retain the character of all the knobbly bits. But not everyone likes that style and it's certainly quicker to just round over the edges. Andrew


-
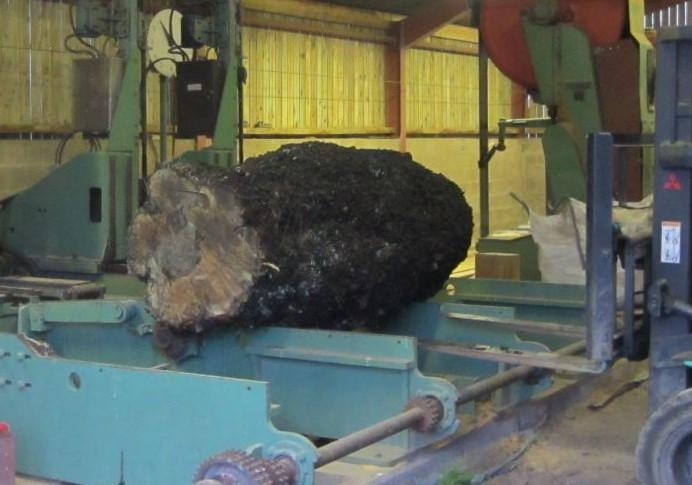
I’ve enjoyed seeing all the wonderful slabs posted on the forum by numerous millers over the years, but I’ve been curious about what they were subsequently used for. So I thought others might be interested to see what I make from the milled slabs from a large oak burr, about 70” long by 40” diameter weighing 1.4t and this thread will gradually record the projects as I make them. All for my own/family use and it will take a while to work my way through the slabs, so I hope you can be patient. The following link goes to a thread on the milling part of the forum about this oak burr I bought from another arbtalk member in 2013 which I then had milled, followed by drying at home. First project, still being worked on and hopefully finished by Christmas, is a small table, using the only piece with a natural edge on both sides for the top which is about 40” x 24” x 2” thick. At 22” high it’s higher than most ‘coffee tables’ but we wanted to be able to sit in a comfy chair or settee, watching telly, while eating our tea. Just what we used to tell our children they couldn’t do, but they have long since left home. I wanted a fairly quick project and took inspiration from George Nakashima’s designs which tend to have fairly simple supports, but quite stylish. First picture below is from ‘The soul of a tree’ about Nakashima, showing his Minguren 2 design. I adapted this to use two small slabs forming a T as sketched below. But soon realised neither of the selected pieces of timber was long enough for the spine support and the table, perhaps not surprisingly, lacked stability. Also, both slabs had quite wide sapwood on the outside and most visible edges. It seemed a shame to hide the best looking areas of burry heartwood underneath the top. Quite happy to incorporate the sapwood as the slabs were painted with borax soon after starting the air drying. They are now so dry I doubt anything would have survived and the finished furniture will be used indoors and completely coated with oil finishes. I also like the contrasting colours of heartwood and sapwood. Took a while to think through what options were possible, but I eventually settled on the revised design sketched below, which resolved my concerns but at the expense of more work. Before cutting the slabs, I wanted to check the design would have adequate stability, so I placed the top on blocks of wood on the floor corresponding to the proposed positions for the legs and it was fine. Both slabs were cut in two and flipped, so the sapwood is now in the middle under the table. The slab for the spine support is also lengthened by having two rails joining the two pieces cut from the selected slab. See pictures below. Still a fair amount of work to be done to get this finished by Christmas. Legs need the shaping finished, resin bronze filling, gluing together, sanding and oiling. Also need to finalise how to attach the top. Final photos below shows a trial with it all precariously balanced to check how it’s looking so far. A bit different to past projects I’ve done, but happy to keep going in this direction. Although I’ve been thinking about cutting a 13” diameter hole through the cross slabs and a 13” x 5” oval hole through the larger slab on the spine support. Just to make the base a bit less ‘solid’. Hopefully gluing up tomorrow but if you’ve an opinion about this design modification in the meantime, I’d be interested to hear. Andrew


- 16 replies
-
- 24
-

-
Burr horse chestnut saved from the firewood pile
ucoulddoit replied to ucoulddoit's topic in Woodcraft Forum
Also used the planer thicknesser, 1/2" router and random orbit sander, so a fair bit of the credit goes to Sheppach, Dewalt and Metabo. Andrew -
Burr horse chestnut saved from the firewood pile
ucoulddoit replied to ucoulddoit's topic in Woodcraft Forum
No problem. That's a nice slab of oak you have, quite thick from memory as I remember seeing a pic before. Thinking of starting a thread about using the burr oak I had milled as I'm part way through the first project. Andrew -
Burr horse chestnut saved from the firewood pile
ucoulddoit replied to ucoulddoit's topic in Woodcraft Forum
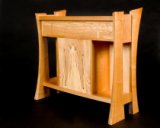
Hi Muttley Glad you like it. Tried to take some more pics but it is so small, it's hard to get a view that shows much else. The picture below shows the chamfer on the front edge of the top. Quite subtle, but helps to give a bit of shape to the top. It's only a 20 degree chamfer and I guess making it steeper, in timber with a bit more colour, might make it more obvious with the light reflected differently from each face? Interesting bit of timber to use. It came from a tree in a work colleagues garden about 20 years ago which was being trimmed by a tree surgeon. In those days, I didn't have an Alaskan mill, just a small chainsaw with a 14" bar and freehand chainsawed the side off a 4 foot length with a good sized burr. Then took it (plus various other odds and ends) to a woodmiser to tidy up the freehand sawn face, and cut a 2" plank leaving the burr as a good sized lump. After drying outside for 2 or 3 years it's been in the roof of my workshop ever since, gathering dust and basically forgotten about. Delighted to see how it turned out and it's surprising how many of the 'odds and ends' from that period when I milled anything, are still worth hanging onto. Andrew
-
Burr horse chestnut saved from the firewood pile
ucoulddoit replied to ucoulddoit's topic in Woodcraft Forum
No progress photos unfortunately, partly because it was so quick to make. But here are a few thoughts about the background to the design and making of this small table. The following sketches show how the design evolved, and it’s not finished yet, although the first one has been made. I wonder if the legs might be better splayed out slightly by cutting the corner mitre joints at say 40 degrees instead of 45. The geometry of the tapered chamfers at the mitres needs fixing. And, I like the idea of a ‘nest of tables’ perhaps two identical smallish ones under a larger/longer one of similar design. And …….., lots of other ideas which could keep me busy for ages. I wanted a design that could be machine made, really quickly, possibly suitable for small batch production. I’d used mitre corner joints before for small tables and like look of ‘folding a plank’ so that the grain runs around the corner. So that was a starting point. The width would be 10” as that’s the width of my planer thicknesser and I wanted to avoid the time needed to edge joint planks. The height and length were to suit the plank length of about 4 feet and the positions of the corner joints to avoid larger defects in the plank. First sketch got me started and fulfilled the brief and dimensional constraints. Second sketch was trying to improve the appearance by adding chamfers and the third sketch is how it was made including tapered chamfers and curves on the edges of the top and legs. I cut a 250mm wide plank from the slab on the bandsaw, surfaced one face and an edge, then thicknessed it to about 45mm, trimmed it to width, and cut 20 degree chamfers on both sides of the plank. Then cut the plank into three pieces, cut the mitre joints on the bandsaw and cleaned them up with a hand plane. Drilled the dowel holes in the mitre joints. Cut the legs on the bandsaw to taper their thickness, then cut the curved edges on the top and legs using a router and curved mdf templates. And finally, sanding with a random obit sander and glued the mitre joints with polyurethane glue. Just a few hours work which I could reduce a fair bit if making several at once as the set up time for the machines would be spread over several tables. Final sanding, picking out bits of ingrown bark and filling with resin all took longer than the actual making! And then it was given several coats of tung oil. My wife thinks the curved edges and tapered chamfers make it look a bit more ‘classy’. That’s a matter of opinion I guess, but I agree with her and copied this idea from a DVD I watched about Tage Frid who used this technique on his designs. Final sketch shows the stages to cut the tapered chamfers, starting with a straight and square edge. Really quick to do with a router. Andrew


-
Burr horse chestnut saved from the firewood pile
ucoulddoit replied to ucoulddoit's topic in Woodcraft Forum
Thanks Andy. Finished it recently but wasn’t sure about putting up a picture. But fairly quiet on this part of the forum these days, so I thought why not. Didn’t take any other progress pics, but I’ll upload some sketches later. Andrew -
Hope you weren’t expecting a massive piece of burry timber! I’ve been sorting through my stock of milled and dried timbers as I’m getting to an age where realistically, I just won’t be able to use all of it. Never used horse chestnut before and always assumed it would be pretty bland and uninteresting, so was thinking of putting this into the firewood pile. A casually applied rub with a rag and tung oil showed it’s worth keeping an open mind……! First piece of furniture I’ve made for over four years and also one of the smallest, but quickest, and my wife loves it as it meets her brief for ’somewhere to put my mug of coffee when lounging on the settee’. The tapered chamfers on the top didn’t quite work out as expected, but that will just need a bit more design development next time. Some folk thought it was marble! Now wondering about some of the other planks put into the firewood pile…….. Andrew


- 11 replies
-
- 18
-
-
There are some good reclaimed materials available. I used reclaimed oak parquet from the Usher Hall, Edinburgh, for my workshop floor. Bonded onto the underlying concrete as I was looking for a wooden floor over the concrete, able to tolerate machines being moved about on small hard wheels. Took an age to scrape off the tar from the underside of the blocks and clean the tongues and grooves. But it worked out an economical solution and still looks spectacular 10 years on, as my wife likes to remind me when comparing it to the lino in the kitchen........ Andrew
-
Just a hunch as I've not seen this done. But I think I'd lay the oak at 90 degrees to the whitewood and secret nail through the tongues. Or, if the planks need to run parallel to the whitewood, I'd think about putting ply between the whitewood and oak and again secret nail through the tongues through the ply and into the whitewood below. Either way, as the oak will be fully supported it could be thinner, say 20mm? Andrew
-
When looking for floating flooring materials earlier this year our local supplier/fitter had solid T+G maple planks which from memory were about 20mm thick and between 125 to 150mm wide. But their advice was to screw plywood to the concrete sub floor and bond the planks to it, rather that use solid planks for a floating floor. Very nice but too expensive and so we went for a prime oak engineered board click system. Andrew
-
When I first started milling timber for my own use, I wasn’t sure if I’d have the patience to wait for it to dry properly. But it was surprising how quickly the volume of milled timber overtook the rate I was using it. So, it’s perhaps no surprise that despite this thread starting over 8 years ago, I’m just starting to use the timber! Anyway, I thought I’d bring the thread ‘back to life’, briefly, as others might be interested to see how the milled burr oak turned out. It was milled almost exactly 8 years ago, then air dried for between two to three years outside, undercover and away from sunlight. Followed by between 5 to 6 years in my timber store which has a dehumidifier running. Having now cut into a few pieces, the moisture content is about 10%, which will be fine for furniture making. The first two photos below are a smallish piece, 40” x 24” and 50mm thick. The straightedge confirmed there is virtually no drying distortion which I’m amazed at and also very pleased. There are the usual small surface checks which are inevitable with burrs, but otherwise this and the other planks are more or less flawless. This piece will be a coffee table for my wife, to be finished by Christmas. As it is so flat, I’ll just sand it smooth and the slight surface undulations should complement the natural edge for an overall natural appearance. The other photos are two larger slabs, 6’ by 28” at the widest point which are destined to be the top of a desk for my son. They too have minimal distortion and I should be able to get a 30mm thick, 60” by 30”, perfectly flat top out of the 40mm thick slabs. A bit nerve racking building up to ripping these slabs into three smaller pieces. It’s taken a couple of days with paper patterns, chalk, and some re-design to get to the stage of cutting them into smaller pieces earlier today, which will be flattened with a router in a few weeks. Final photo shows how the three pieces will go together but obviously needing a lot of work on them first. My sons response to sending this picture to him was ‘looks awesome dad!’ which made me smile. Been a worthwhile investment financially, for enjoyment and learning a bit more about drying timber. And the best pairs of slabs are still stacked up waiting for future projects. Andrew


- 31 replies
-
- 11
-
-
Two pictures of the bowl made by Steve using the wood sample I sent to him. Very pleased with it and glad I asked him if he would be able to make it for me. Andrew


-
Cheers Steve and really looking forwards to seeing the bowl you make with the 12" x 12" x 1 3/4" sample. Andrew
-
Hi Steve. Thanks for looking into this and I'll send a sample. It's good looking timber regardless of whether it's a genuine mahogany or a related species and I'm looking forwards to using it, hopefully over the next couple of years or so. Andrew
-
Thanks for looking into this aswales. I've been studying the online notes and pictures for The Wood Database, and other online stuff, but am conscious it is too easy to become biased towards the answer I'd like! Seems to be quite subtle differences between different mahogany types and sub species and difficult to pick out what would give a definite answer. So an independent view is appreciated. Andrew
-
Thanks Muttley. Lets's hope Steve can make a definite ID. Andrew
-
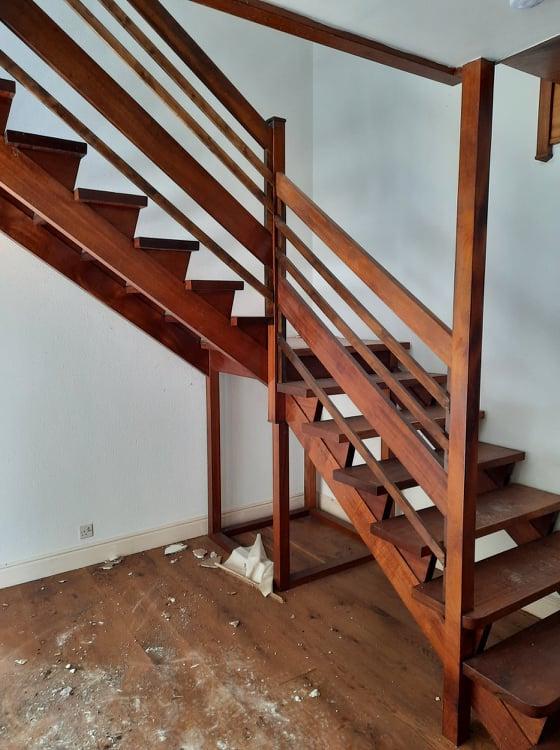
Thanks for all the comments. Another picture below is four treads after pressure washing to remove the demolition dust and grit. I'd wondered about an African mahogany and some planks have ribbons of twisted grain which is see from several internet sources is found on Sapele. Online pictures of sapele endgrain look similar as well, but I've not checked the spacing/scale of the pores. My dad was pretty good at wood identification so I suspect it is a 'mahogany' of some sort, rather than Iroko. I recall him telling me as a child that he bought it for a good price as mahogany was out of favour for joinery work in the mid 1960's because it was a 'hardwood' and less easy to work with than alternative timbers. Andrew

-
Thanks Nepia. Steve was the first person I thought of when writing the post, so I 'll just wait and see if he spots this thread. Andrew
-
Looking for opinions about the mahogany species in the attached pictures if anyone can help. The reclaimed timbers are from a staircase my dad made in the mid 1960’s for the house he self built where I grew up. The house has just been demolished to make way for a new care home! Fortunately, although the house was sold on about 25 years ago and I’ve lived 200 miles away for over 35 years, I’d heard about the project and was able to get most of the staircase timbers, about 10 cu ft, so that I can make a few things which will have some sentimental value. There is a bit of colour variation, some timbers are a deeper red than others which are yellowy/orangy red. The end grain and side grain looks similar though. Just wondering if both samples are the same mahogany species with natural colour variation? Or different species? Also, I’m wondering what species they are most likely to be, Honduras, Cuban, Brazilian or from somewhere else? Andrew


-
Thanks for your advice Rob and link to your website. The two short chains are Oregon ripping chains and so is the one for the 25 inch bar. So I’ll probably go that route in future if I need any new chains as my mills are quite small. With hindsight, I should probably have asked my original question differently, as I mill stuff for my own use and should have realised the professional millers on here would view it from a business perspective. Time and cost isn’t really that big an issue for me, within reason. Something more along the lines of ‘are there technical and/or safety reasons against lengthening a ripping chain’. After posting the question, I fairly quickly found a discussion on another forum along these lines, and a comment that a chain shouldn’t have more than one join, i.e. fine to join chain off a reel to make up loops, shorten a stretched chain, or repair a chain. But that was dismissed by others, so I’ve concluded that lengthening a chain is a viable way forwards. Should have bought a grinder years ago! But my hand filing has worked fine with an occasional re-grind for just a few pounds. They are small mills and only ever had very light use. Haven’t milled any logs for a few years but the mills have continued to have occasional use for re-sawing large dry timbers so they will fit onto my bandsaw and planer. That was the original reason to buy the small log mill, so I’ve pretty much gone full circle, but am keen to have them in good working order in case something like a ‘highly valuable walnut’ is being given away…..! Andrew
-
Thanks Alec. That's useful advice. I have a mini mill and use a 25 inch bar in a MS391 with a ripping chain which is good to use in conjunction with the Alaskan mill. I still have the 20 inch bar, but only use it for cross cutting now. After a break from milling for a few years, I milled a log at the weekend as a favour for a friend and hit a nail on the second cut......! So I decided it's time to get a second chain for the 28inch bar to avoid another long delay hand filing a damaged chain when out milling. A granberg ripping chain looks like £40 to £50 and is certainly the easy option. But I'd be interested to learn how to modify chains and this seems like an opportunity so I'll look into the kit you mentioned. I see the Malloff book also has advice about splitting and joining chains. Andrew
-
I’ve two ripping chains for a 20 inch bar which I used when I started milling with a small log mill. But they haven’t been used for years as I upgraded to a 28 inch bar in an Alaskan mill with a Stihl 661. Both had only moderate use and were professionally reground after the last batch of milling they were used for, and the teeth are now about 8.5mm long on one chain and 9mm on the other. So, they have a fair bit of life left in them. Just wondered if joining them to make up a longer chain to fit the 28 inch bar would be OK? If OK in principle, would it be advisable to have the longer chain reground so that all the teeth are the same length? Probably not much of a cost saving compared to buying a new Granberg ripping chain, but it seems a shame to leave them soaking in a tub of oil if they could be used again. Andrew
-
The tables are from 'The conversion and seasoning of wood' by William Brown which was published about 30 years ago and is available to buy online. An online review comment I saw mentioned it is a bit theoretical and I'd agree, but still useful. I needed to read it several times though, to work out what I really needed to know! It's geared to producing high quality timber. Only one of the ten chapters discusses timber conversion and when I started milling timber for my own use, that was the main topic I needed advice about....... Now I realise avoiding drying defects is perhaps the real skill to acquire in order to create valuable timber. I've not come across a 'bible' but have found useful stuff in various books which all together combines into good advice. The Maloff book, Chainsaw Lumber making is good, but I feel it leans towards milling lumber for construction rather than furniture making which is my main interest. Whereas for others, it might be the only book they need. Andrew
-
I’ve found the attached tables useful over the years to work out the size and spacing of stickers for different types of timber and thicknesses. They don’t mention mulberry, but a quick look online brought up a tendency to checking and slow to dry. Not sure what thickness your planks are, but I’d hazard a guess at ½ inch sticks about a foot apart. And plenty of weight on top as already mentioned. Andrew


