

ucoulddoit
-
Posts
283 -
Joined
-
Last visited
-
Days Won
2
Content Type
Profiles
Forums
Classifieds
Tip Site Directory
Blogs
Articles
News
Arborist Reviews
Arbtalk Knot Guide
Gallery
Store
Freelancers directory
Everything posted by ucoulddoit
-
Where to buy 1inch spacers / firring strips
ucoulddoit replied to hamilton32's topic in Milling Forum
In case of interest, I used to following advice about sticker sizes, spacing for different thickness and type of timber, etc. Andrew
-
Where to buy 1inch spacers / firring strips
ucoulddoit replied to hamilton32's topic in Milling Forum
I’ve always used 20 x 20 ripped on the table saw from 45 x 95 regularised timbers. Can get almost 40m from a 4.8m length which works out about 20p a metre. Also have a bundle of sticks sawn at 12mm thick by 20mm wide which I use for oak. Andrew -
My limited experience of oak framing while working as a structural engineering designer, was the timbers were sourced and milled to order. Also, working green oak, cutting joints, etc. is so much easier than once it’s dry. But my work with oak framing was 15+ years ago, on medium and large sized projects and I dare say there is a lot more use nowadays on small projects, perhaps even just single timbers for lintels and visible beams to create a ‘feature’? So maybe there is a need for readily available stock sizes? A sawmiller who used to mill logs for me had experience of milling locally sourced logs for framing timbers to be used locally. I remember him talking about the timber grader being able to decide from looking at a log, which way the milled timbers would be inclined to bend. So, for a rectangular beam, the log could be turned so it would bend in the direction of the long side on the rectangle and the framer could turn it to bend upwards for instance, and reduce deflection in a beam due to the weight on it. Andrew
-
Thanks for all that. Surprised I've never heard of it being done, so I guess others might be interested too. I've been watching the Tally Ho project for years as well almost from the start. A real inspiration and great workmanship. Takes me back almost half a century to when I built a boat which led onto some great sailing adventures. Recently started to binge re-watching the videos from the start. Also following the Acorn to Arabella and Restoring Rosalind projects. All a bit different but all have used chainsaw mills at some point as a 'workshop tool' which is how mine gets used nowadays, re-sawing lumps of wood that are too big for the bandsaw. Andrew
-
Good point as they are re-sawing a dried piece of timber. Andrew
-
Just watched the latest Tally Ho boat building video and it includes a brief section about chainsaw milling purpleheart timber for the rudder. That's a really hard dense timber and they have a hose running, presumably for water cooling? Just wondered if others have seen this before and any thoughts about doing it. Skip to about 2 minutes 30 seconds in the video. Andrew
-
Oak felling seasoning and milling advice?
ucoulddoit replied to Stihl_Ben_UK's topic in Milling Forum
Just a few comments. I’d remove all the sapwood for external use, could be 2 inches or more, so that will quite significantly reduce the usable quantity of timber. I also seal the ends with PVA, but working outside, it’s almost inevitable that some dirt and grit will get stuck to the end. Having once quickly blunted /chipped a set of planer blades while machining some milled planks with sealed ends, I now cut off the ends before using them. Quite a costly and inconvenient error to make! The cladding planks I cut were for vertical cladding, hence the rectangular section, 20 x 100. No experience of feather edge boards, but I see online there is a range of widths and thicknesses available. Smallest was 150 by 16 tapering to 6. Largest we’re 200 by max 25. Not sure what factors to consider when selecting the cross section, but let us know if you find advice online. I wonder if they should be fitted with the heart side outside so as they dry and cup, they’ll not create a gap? Or maybe it should be the other way round or maybe doesn’t matter? I’d plan the milling cuts to suit the pith position, so that it can be excluded. I’d typically have sawcuts 2 inches above and below the pith, then split that plank along the pith. Or to reduce drying defects further, I’d remove 3 or 4 inches from the middle of that plank. Might seem wasteful, but that part if often poor quality and has shakes. For the sizes your proposing, you could have a much thicker slab through the pith which might be well off centre due to the tree leaning. Throughout it’s life? Re timing of milling, waiting a year or more shouldn’t matter, and milling in the autumn so that initial drying is over the winter is worth considering if your timescale allows that. Andrew -
Oak felling seasoning and milling advice?
ucoulddoit replied to Stihl_Ben_UK's topic in Milling Forum
The pics reminded me of an oak tree offered by a tree surgeon from whom I’d previously bought good quality logs. The promise of a ‘nice large oak tree’ persuaded me to drive 40 miles each way to inspect it, but I was pretty disappointed and didn’t follow it up! Having said that, if it had been in my own garden or a neighbour’s, I’d have happily milled it for my own use on the basis there might be some good stuff and also a fair amount that ended up as firewood. So I hope you’re able to get something from it. This isn’t advice from a ‘pro’, but as they might reject the tree outright, and there hasn’t been a flurry of advice, an occasional miller’s approach might be what you’re looking for? So here goes. Hard to see from the photos, but I presume most of what can be seen and described as leaning, is actually the second length? What length is the 3 foot diameter section and is it the main butt below the second lengths? Assuming the main butt is a usable length, I’d start by cross cutting at the main junctions, bends, etc. to have shorter straighter lengths. Looks like several branches have been cut off at some point and based on my (limited) experience, this usually means at least localized rot inside, sometimes quite extensive. Were the branches mainly on one side? If so, one side may be clearer, with less knots and rot? But as its leaning, there is probably reaction wood which might cause more distortion during drying and in use, so possibly not suitable for fine furniture making. But sounds like you're looking at other uses? What type of cladding are you aiming for? Waney edged or straight planks? Attached photoes which were posted a few years ago are for straight larch cladding planks. I chainsaw milled several larch trees in a wood into 100mm thick slabs which could then be manhandled and taken to a sawmill for secondary milling into 20mm planks. Worked a treat! That approach would let you see if the timber is actually worth the secondary milling into thin planks. If after chainsaw milling it into slabs it doesn’t look that good, i.e. rot, knots, etc. at least the thick slabs might have a use as sleepers, posts or even split for firewood! Haven’t got my tables to hand but from memory 20mm oak would need stickers at about a foot spacing to minimize distortion if you were going to dry it before use. Would be good to see some photos of how this turns out. Andrew


-
Not sure if that’s a genuine question……? Anyway, as a fellow hobbyist in case you’re interested, attached are a few pics of ‘kindling’ I cut a few years ago. A plum tree bought from another Arbtalker, milled using a 2.2HP bandsaw with a 25mm blade. Now use a 25mm Ripper 37 blade, the smallest available, which is so much better for both green timber and resawing dried stuff. Plum tree was about 16 inches max diameter, so first cut through the middle was done with an Alaskan mill, followed by sawing into planks on the bandsaw. Prior to getting the Alaskan, I’d freehand saw a trunk in half with a small chainsaw, so in conjunction with the 2.2HP bandsaw, it was possible with minimal extra outlay to mill decent timber to round about 20 inches diameter. Which coincidently, is the most I can manhandle. Some of the best ‘kindling’ I’ve ever had. Despite years of keeping an eye open, never found milled plum timber like this available elsewhere so very pleased to be able to do it with the tools I already have. But I’m well aware you’re able to mill much larger stuff. Andrew


-
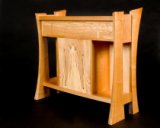
Came across these pics while looking for something else. An offcut of spalted beech, about 1.3m long, made at least 15 years ago. Not sure though if I can claim to have made it, as it’s a natural sculpture and stands on the floor without any support. This was the first piece sawn off an odd shaped log with twisted grain, probably a leaning tree as the pith was way off centre. A good example of a log to reject when looking for timber suitable for milling, according to the books and experts …… When my wife saw it she pointed out , ‘that looks good!’ It’s been standing in a corner of our sitting room for a long time now. Bought this log almost 20 years ago from a firewood merchant, together with several other bits of ‘firewood’, maybe a couple of tons, all for £100 including lifting it into the truck I’d hired to deliver it to the local mill with a woodmizer. An experiment in my early days of milling and drying different types of timber when I was reluctant to invest a lot, buying prime logs, until I knew how to do it successfully. And it was a success! A few years on I had a pile of air dried burr elm, spalted beech, sycamore, cherry, cedar and larch which was all quite different to what you might find in the average timber merchants. Which inspired me to start buying some larger, proper milling logs. Back then, when I was daydreaming of turning a hobby into a business of designing and making furniture, milling timber and traditional timber framing, I often wondered about trying to sell stuff like these ‘sculptures’. But the daydream stayed a dream, as work took an unexpected turn for the better, and happy now I’m retired to pass on these photos in case anyone out there has the marketing skills to turn stuff like this into actual money…….. Andrew


-
If you scroll down to 31st Jan there’s a short thread and I’m sure as mentioned there was a thread on the milling forum, but can’t find it from a quick scan through the last few pages. Andrew
-
I have to admit the inspiration for it was a piece at the Cheltenham furniture show, maybe 12 to 15 years ago. Can’t remember the price on it though! Andrew
-
What do you do with your offcuts? Been sorting through my pile of offcuts as the midges on the West coast of Scotland have almost gone for another year so we can enjoy getting the firepit out again. Each year, as I decide what it’s time to let go, my wife has a look through the firewood pile and puts to one side a few pieces she has had her eye on. Pieces worth keeping, as she is better than I am at seeing what has potential to be a bit different, a nice shape, aesthetic, good colour, etc. So here are a couple of bits of ‘scrap’ she liked this year, which were shaped, sanded and had a first coat of oil yesterday, and will soon be hung on our outside walls. The rest was sawn into short bits, and enjoyed on the firepit last weekend, on a starry night, bringing back memories of where and from whom the trees were bought, who milled them, the furniture made with the rest of it, etc. First piece of ‘scrap’ is yew, a thin slice just 15mm thick by 1.8m long, cut off a thick plank with my chainsaw mill as it was just too thick for a table top I made a few years back. My wife has had her eye on this piece for years. Next one is burr oak from a piece of scrap about 1.1m long by 0.45m wide and wedge shaped, varying in thickness across it’s width from 50mm down to 5mm. It was destined for the firepit as it was hard to see it being much use for anything as it was so thin on one side, had a large hole / ingrowing bark and was more or less flat on one side. But it did have potential which is why it’s been in the wood store for about 10 years. I decided to experiment and see if I could deep rip thin pieces off the thicker half. So, after cutting it lengthwise in half, flattening one face and an edge on the planer, it was sawn on the bandsaw into two thin book matched planks. Final thickness after planning was 9mm. After gluing them together, they were glued to a piece of 9mm ply to give a bit of extra strength. This one will go on the wall outside my workshop, under cover and sheltered from the rain. So pleased we kept this bit of scrap! Andrew


- 6 replies
-
- 13
-

-
Controlling movement in Milled slabs.
ucoulddoit replied to arboriculturist's topic in Panther Mill UK
Sounds like case hardening caused by drying too quickly if the two thinner boards cup significantly. I find the old rule of thumb for air drying of a year per inch thickness plus a year for hardwoods up to about 4" thickness works pretty well, regardless of what the moisture meter tells you sooner. I remember seeing a kiln dried perfectly flat plank of lovely walnut being ripped into two thinner boards which cupped so badly it had to be thrown away! And there are other issues to consider. How many folk use 1/2" stickers for oak for instance instead of the usual 1"? That helps to slow the drying and also avoid other defects such as surface checking and internal honeycombing. Further drying after air drying also needs to be slow and dehumidifier kilns are better for this than a steam kiln. But only a small proportion of wood will be split into two thinner boards, so that's not a reason to be negative about steam kilns. Overall, I'd say, it's a matter of pre-planning which boards will be milled thick, for future re-sawing, and dry them accordingly. That's what I do, but only on a small scale for my own use. I've found it works well and gives good flexibility to re-saw for designs that have not even been thought about when timber is first milled. Andrew -
Got around to sorting out the problem with these steps. Photo below shows the underside of the top step / platform which now has a 3/4" square (19 x 19mm) brass bar each side. So, the timber step with the grain direction side to side spans onto these two bars which in turn span onto the round brass bars front and back which are supported on the legs. Feels very solid! The screws are just to hold each bit in place and take no load now, and the back screws are in slotted holes in the square brass bars to allow for movement in the timber step which could be 2 to 3mm if they are moved from inside the house to an unheated garage / outbuilding at some point (over the next 100 years or so). Still annoyed with myself for getting this wrong, but with hindsight, I prefer the top step having the grain side to side instead of front to back. So, it's worked out OK in the end. Andrew

-
Controlling movement in Milled slabs.
ucoulddoit replied to arboriculturist's topic in Panther Mill UK
I used concrete breeze blocks left over from a building project. About 50 to a ton. Andrew -
The steps are pretty chunky. In fact my wife seems to be struggling to move them about. So maybe they will get a home in my workshop! But, joking apart, although some projects might be over engineered with components that are too large, structural safety comes in part by having clear load paths and simply making everything bigger isn’t necessarily safer. The top step doesn’t in my opinion have a good load path to the legs. So I’m going to change the design by adding the brass bars and will post a picture in due course. This really got me thinking about my design objectives. I’m sure I’ve developed a track record of making stuff that ‘won’t break’. Thinking about that, I recalled a pitch pine cupboard we have for our bed linen. I first saw it as a child and the key has a hand written label with the note ‘Made from a pitch pine tree bought standing’. It’s dated 1895. It’s been in the family since then and we now have it, 127 years on! That label was part of what inspired me at a young age to dream about turning trees into beautiful furniture. I now dream about what I make being treasured by my grand children and their decendents. So, the aim of things I make is for them to stand up to a long life of use and abuse. As well as a design which hopefully stands the test of time, rather than chasing the latest fashion. Time will tell if I manage to achieve that, but I’ll not be around unfortunately to enjoy going into the next century! 127 years from now is 2150, a century on from the date being talked about to be carbon neutral. Maybe these steps will still be used by a family member? The timbers may have worn, but there should still be enough section left to be strong enough. There is no reliance on glue, tenons are wedged. All the holes for bolts and the brass rods have brass bushes to minimize wear. I've done what I can to give them a long, long, life. Not sure where those thoughts came from. Maybe the bottle of wine I just enjoyed sharing with my wife! Off to watch a film now and fixing the steps is for another time. Andrew
-
Pretty much spot on! So pleased someone worked it out. OK, so here’s an explanation of the mistake I made. It’s the top step / platform as mentioned. It’s especially annoying given my working life in industry as a structural engineer. I tried to fix it, so what doesn’t look like it was intended? The mistake is, the grain should run front to back, not side to side, as the platform is supported by the brass rods on the front and rear edges. When I realized it was the wrong way round, I went back to the photo on the internet, used as the basis for the design, and it had the grain front to back! Just hadn’t noticed that, but should have worked it out. Looking at the photos below showing the underside of the top step, you will see it is supported by the brass rods at the front and back. But the grain runs parallel to these supports instead of the board spanning front to back onto them. So, my weight of 15 ½ stone standing in the middle of the platform could cause it to split suddenly along it’s length and maybe I’d break a leg or worse? There is a joint along the middle where I ripped and rejoined the wide plank after machining to just over an inch thickness, so that might be an additional weakness? The two bearers screwed to the underside of the platform were an attempt to strengthen it. If they had been part of the original design, they would be on each side and supported by the brass bars so that the loads would transfer from the platform to the bearers then to the brass bars and finally into the legs. But, fitted as an afterthought, they couldn’t be supported by the brass bars. Also, I realised they couldn’t be glued across the grain due to future movement that might occur, so they are screwed into the platform with a slotted hole at one end to allow for the movement. But there isn’t much thickness to screw into and will the screw pull out capacity in tension hold my weight? Need to sort it properly. I’ve thought about making a new platform with the grain turned 90 degrees. But it’s a lovely piece of wood and took quite a while to make it. Am now leaning towards re-using the platform with bearers on each side, made using brass bar, probably about 1” deep by ¾” wide, instead of mahogany. But I need to check that size is strong enough and stiff enough to carry a person. So, the two short brass blocks at each side will be replaced by brass rectangular bars spanning front to back between the brass round bars with the platform supported on top, spanning side to side. That will work with the existing holes in the legs and platform height as I can get a much smaller edge distance on the holes through brass compared to mahogany. I'll get rid of the two mahogany bearers. It might even look as though it was intended to be made that way! All very annoying and the brass rectangular bar will be an unforeseen additional expense, but looks like it will work out fine in the end. Could have happened to anyone? Thanks for all the comments. Andrew


-
All good comments, but not what concerns me. I hope the brass bars supporting the top platform and attached to the legs are enough to prevent them splaying under load. That’s how it was done on the one I more or less copied from a photo on the internet. Now wondering if it’s a construction flaw, not design, as I now realise the mistake goes back to when I selected the timber for the platform? Just to confuse everyone even more. Andrew
-
I had wondered about a highly valuable mahogany stair tread as the prize, but they are just too valuable to me...... Andrew
-
Surprised no one has figured out the design flaw. To narrow it down, it’s the top folding step / platform. I’ve tried to fix the design flaw, but what did I get wrong? Answer tomorrow if no one gets to it first. Andrew
-
Especially as I've tried to sort out the problem! But I still have a niggling doubt. Andrew
-
That was one of the details which took a while to sort out as it wasn't obvious from pictures on the internet. As well as the legs spreading apart, I realised the top step might flip up, like a see saw if someone stood on the front edge. Photo below ( a bit blurry) shows the L shaped grooves for the brass rod at the back of the top step. Fingers crossed, that seems OK. But I might recess a couple of 3mm brass plates around the bottom of the groove as the brass rod will wear the wood over time. Andrew
.thumb.JPG.e57728f4e57622a0782a86e4d594ae1d.JPG)
-
No guesses yet? It's potentially quite serious and given how I used to earn my living can't quite believe I got it wrong. Andrew
-
Spot the design flaw. I decided to resurrect this thread as it had quite a lot of viewings about a year ago when I asked for opinions about the reclaimed mahogany I’d acquired and I thought there might be some interest to see the first project completed recently. It is folding steps for my wife who struggles to reach the top of our kitchen cupboards. I pretty much copied the design from photos online and copied the sizes from some steel folding steps we have. But it was surprising how much still needed to be worked out. I like the fact that the reclaimed mahogany came from a staircase my dad made almost 60 years ago, and some of it is now a step ladder! I’d been given the reclaimed mahogany, but still spent a fair bit on this project. The brass rods and square bar, plus silicon bronze coach bolts (couldn’t source brass), nyloc brass nuts, washers, etc. all came to over £70. And I needed a beading router cutter for the steps. Not used any tropical hardwoods for years and had forgotten just how good mahogany is to work with and what a colour and finish! My wife is delighted with them and it’s good to be able to tick off one more item from our ‘wish list’. When I mentioned I might have an occasional use for them in my workshop she wasn’t happy about that at all!!!! Anyway, there is a design flaw, discovered towards the end of making the steps and still wondering whether to just leave it as is? Any guesses as to what I got wrong? I'm afraid there isn't a prize. Andrew


.JPG.78adc940b13a2b5c2c2efdc6be07d5f5.JPG)


