

ucoulddoit
-
Posts
283 -
Joined
-
Last visited
-
Days Won
2
Content Type
Profiles
Forums
Classifieds
Tip Site Directory
Blogs
Articles
News
Arborist Reviews
Arbtalk Knot Guide
Gallery
Store
Freelancers directory
Everything posted by ucoulddoit
-
Depending on the proposed use of the boards, if you cut pairs of boards off each time you rotate the log, the pairs can be 'book matched' I.e. Opened out a bit like butterfly wings with a matching pattern on each side. This can look really good for large items like table tops. I posted some pictures about a year ago of a burr oak sawn this way. Andrew
-
Just realised that the shed full of sculptures may be air drying after being carved from green timber? I wonder if that is a bit of a cash flow issue if the work you've done has to wait a year or more before it can be sold? But maybe people can put their name on the one they want and make a down payment? Andrew
-
I know what you mean, but another way to look at it is that he made the (aesthetic) decisions about which tree shapes to use, how to finish the outside (smooth or rough), how thick to leave the shell, the decision to have a chiselled finish on the inside instead of smooth, etc. All of which contributes to the overall appearance? Very impressed by these 'sculptures' but wondered if the shed which is full of them means he has lots of unsold stock in which case, maybe they are not that commercial? Andrew
-
A large well known timber merchant I've used takes the view that shakes, ingrown bark and other 'defects' are not measured out and should be accepted in yew. Not sure that I entirely agree with this approach but if you accept that yew has 'character' rather than perfection in large sections, and use it appropriately, it can be very good. Andrew
-
I've not tried selling anything but it is a pipe dream for the future so who knows? For the time being my family are keen to have everything I make. The 'arty' pieces do take a long time to design and I feel it might be difficult to maintain the creativity if doing it full time. So a few standard themes/designs that can be modified slightly to make 'one off' designs seems the way forward to me plus a big stack of wood! Andrew
-
Thanks for the encouraging comments. I was fortunate to have a plank that was suitable despite several shakes and the sap wood was starting to rot in places so it might easily have gone on the firewood pile! Just wish I had the skill to turn making stuff into money......... Andrew
-
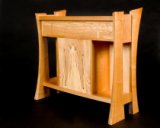
Happy to share this as I only make things for my own use. Not sure that there is anything new about this design, but it was a new challenge for me! Made for my office and finished a few weeks ago. A few colleagues have enquired about commisioning one, but very time consuming to make....... So probably not the basis for a money making design although having worked out the sequence of construction, it would be much quicker if done again. The top and main leg are a single plank of yew with a natural hole in the middle which was cut and 'folded' into a right angle (dowelled mitre joint) so that the grain is continuous around the corner. The other leg and shelf are made from small diameter branches which were halved, then seasoned followed by cutting into strips which were reassembled as shown. All fixed together with dowels and very long screws so pretty basic construction really. Andrew


-
Thanks for the praise but it isn't my idea. I made the jig (and a shorter one) about 14 years ago and it's been used occasionally over the years. There are lots of examples of this technique using a router if you Google 'Flattening wide boards with a router'. Also examples of using a hand held power planer. This YouTube video is an example on an industrial scale. [ame=http://www.youtube.com/watch?v=BdTr0OTAqx4]Slab Flattening with Router Plane - YouTube[/ame] Andrew
-
I meant to reply to this thread ages ago but decided to wait until I'd taken the following pictures. I was also trying to find someone local with a wide planer thicknesser, but eventually resorted to using my router in the set up shown in the pictures. With hindsight, for a one off table top for my own use it was probably the best way forward as it took less time to flatten and thickness two boards than the traveling time alone to have them machined. The two book matched sawn boards were 4' long, 20inches wide and 2 inches thick. Due to drying distortion the finished thickness had to be 1 1/2 inches but the 40mm diameter router cutter managed to remove up to 1/2 inch of material in each pass. If I'd ripped each board into two planks there would have been less 'waste' and the planks would have fitted my 10 inch planer thicknesser. But I was reluctant to split two such good boards. Another advantage of using the router was that there was virtually no tear out in the burred areas and only light sanding with a random orbit sander was necessary. No hand planing was necessry. Final picture is the table top in the process of being finished with boiled linseed oil diluted 50/50 with genuing turpentine. The boards came from a dead elm and were starting to decay/spalt in some areas which I felt added to their character. In the first three coats, the timber soaked up about a pint of oil and looks as though it will take a lot more. I find the oil hardens and strengthens any spalted areas of wood that are a bit 'soft'. Andrew


-
How do you guys attach the mini mill to the log?
ucoulddoit replied to jamesd's topic in Milling Forum
You could screw blocks of wood onto each end of the log, then fix the plank to these blocks. There would be holes in the ends but not the faces of the posts. I've done this to quarter saw planks from a quartered log but not tried it for posts. Andrew -
Re the curved apple wood pieces, I'd uploaded the picture below once before but couldn't find the thread so here it is again. It's burr elm and was cut after the lump of wood had dried for a few years. Apple tends to split so I cut the curved sections while it was green and most pieces have dried without too much distortion and no splits. Andrew

-
Pan I don't have a kiln or access to one, but I've found I can manage without one provided I'm patient. With the oak, I'll air dry it outside for at least a couple of years, then move it into a well insulated timber framed shed with seals on the door and windows. I run a dehumidifier in the shed, so it is similar in some respects to a kiln, but it doesn't have a fan or any fancy electronics to monitor and control the humidity, etc. When timber has been air dried, I bring it into the shed and re-stack it with sticks between the planks and put weghts on top, either concrete blocks or previously dried timber. After a few weeks I turn on the dehumidifier and reduce the humidity setting gradually over a few months. The 'shed' was originally built and used as a small workshop but now is mainly used for drying and storing timber as I've built a larger workshop. The photo below shows the current pile of timber being conditioned and stored in this way and includes from the top, larch, cherry, laburnum, sycamore, burr elm, yew, more burr elm at the bottom and some curved sections of apple. The planks with no sticks between them are already dry and are just weight on top of the latest planks taken in for 'conditioning'. Years ago, I did dry some small planks from two cherry trees in the house which worked fine, but if doing this, I'd recommend taking them in during late spring/early summer when the humidity is likely to be slightly higher than in the winter when it is heated. I thought about spraying the oak planks to minimise the risk of insect infestation. I might still do this but my understanding is that borax is not permanent under damp or wet conditions, so although the timber is stored undercover, the damp caused by occasional driving rain may reduce the effectiveness of the borax. There are various books available about all this, and the best one I've read is 'The Conversion and Seasoning of Wood' by William H Brown. It has lots of technical advice necessary to achieve furniture grade timber such as the thickness and spacing of sticks for different species of wood and plank thickness, a good graph showing the relationship between humidity and equilibrium moisture content in timber and lots about various drying defects to be avoided. Andrew

-
I remember seeing your thread about that big burr oak and it looks as though there will be lots of excellent timber in it, worth a lot as milled planks. My comment about 'firewood prices' is perhaps the wrong view. It is not a reflection on the potential value of the milled timber, just that there may be a limited market for selling an inaccessible butt, so a buyers market for those with a chainsaw mill and able to put in the milling time. Would be interesting to hear others views on this. Andrew
-
Thanks for all the comments. Re the sapwood, I'm hoping it will darken a bit but there should still be a contrast to the heartwood once it is seasoned and it should be OK for indoor furniture. The butt was milled at G&S Specialist timber just outside Penrith. Their Stenner mill can take logs up to 5 feet diameter and up to 28 feet long. But I suspect there will be a weight limit for lifting a log onto it so it probably isn't possible to go to the maximum sizes in both dimensions. I'd delivered it to them in April but their mill was then unexpectedly out of action which was a bit frustrating. But realistically, it is much better to have waited until now so that the first 6 months or so of air drying will be over the winter. Re the kerf width, the Stenner blade is 3mm thick, so about a third of a normal spec chainsawmill. On this butt a chainsaw mill would have created another 4 cu ft of sawdust. The butt was easily accessible and Timmy who I bought it from was able to organise getting it lifted into a trailer. So I paid what I regarded as a top price. Not quite sure of the total volume of the log before milling because the weight measured by the loader doesn't tally with my measurements of the planks. But I paid somewhere between £8 to £11 per cu ft. So at that price, I was keen to maximise the yield from the log which I suspected would be a one off for me. If the butt had been inaccessible and could only have been milled by a chainsaw mill, perhaps the value would have been not much more than a firewood price and so less important to maximise the amount of timber milled? I'm a real fan of chainsaw mills and have two Alaskan mills, but this was a situation where I felt it was worth using a static mill. Andrew
-
I finally had this burr oak butt milled yesterday and the planks are stunning. So I thought I’d upload a few pictures as requested/promised and a few notes about how the milling went. It wasn’t possible to cut through and through planks across the most burry side which was 40 inches wide, as had been my intention. This was because the relatively short length (70 inches) and uneven shape made it very difficult to set it up and support it properly on the carriage of the large Stenner vertical bandsaw mill. After about 45 minutes, the 3 guys who were struggling to get it into position concluded that we’d have to change the cutting plan. I suppose that is where a chainsaw mill can be used to cut almost any shape of log? So, I suppose the disadvantage of extra wastage of sawdust with a chainsaw mill could, in some situations, be offset by being able to get planks from a smallish, odd shaped butt and get a waney edge on both sides? Perhaps it might have been possible with a horizontal bandsaw mill? Anyway, a few planks were cut off the first side, then it was rotated and a few more cut, then it was rotated for a third time and several more were cut. The aim was to cut planks as wide as possible with one waney edge and in pairs of the same thickness. The burr extended almost to the heart and some planks have over 20 inches width of solid burr over most of their area. There was a small shake on one side close to the heart, but this only appears in two planks. We got 16 planks ranging from 20 to 30 inches wide in thicknesses of 1 ½ inches, 2 inches and one 4 inch slab through the centre. In all, about 27 cu ft of milled planks, 2 cu ft of sawdust, and also about ¼ ton of large burrs, some 2 feet in diameter which were cut off the outside so that the butt would sit properly on the carriage. I’ll probably mill these later using my chainsaw mill or cut veneers from them on my bandsaw. The second picture below shows a typical pair of book matched planks, about 4 feet max width by almost 6 feet long. Third picture is perhaps the best pair of planks, although there is a bit of rot starting at one end. There are six pairs, plus a few individual planks. I presume that it is brown oak? Last picture are the planks stacked on a timber frame with ½ inch thick sticks at about 10 inches spacing, all as per advice gleaned from other posts, mainly from Jonathan. So thanks for all that helpful advice. The stack is under cover on the north side of our house so I’m hoping it will dry slow enough to avoid surface checking and other defects. The straps are more for safety, i.e. to stop the stack toppling over but they may help to reduce the drying distortion. I’ve piled some large timbers on top to add some weight. As for the cost........! I was determined to have this butt milled on a large Stenner mill, to minimise the amount of sawdust and to get absolutely flat planks. But doing so has meant there has been about 700 miles of travel involved, so the transport costs have almost doubled the cost of buying and milling the butt. But it is for my own use, it’s been a lot of ‘fun’ getting it done, and has cost a lot less than buying dry planks of similar quality. Apologies if I’ve sounded a bit enthusiastic about this. But after almost 30 years of milling timber on and off as a hobby, it’s great to have such a fantastic pile of timber to look forward to using in a few years time. Andrew


-
From the internet forecasts today, it sounds as though a hurricane might cross the south on Monday.......... Andrew
-
Andrew - I would suggest you might as well go for a 36" mill. There is no down side really to the longer rails and you can use it with a 25" bar, but then if you ever do upgrade to a larger saw (which from your post sounds like it's eventually inevitable ) you will already have the mill. The price difference is trivial. Alec I suspect you're right Alec. I've had my eye on a burr oak tree on a neighbours land for a while which should have enough timber in it to make buying an MS660 worthwhile. So it probably is inevitable..... Re upgrading from the small log mill to a bigger mill, I've a spare post and a spares bag of bolts, etc, so I'm proposing to just buy a bracing kit and a rail kit to construct the larger mill for about £100. I assume this would work? Andrew
-
I 'd been using a Stihl MS171 with a 14" bar for a few years to cut firewood and bought a small log mill specifically to mill a lump of burr elm using that saw. After milling a few more small logs I was soon dissatisfied by the limitations of using such a small saw and looked at options for a bigger one. I felt the MS 660 would give the flexibility of continuing to use the small log mill with a 20" bar and still have the option of a bar up to 36" for the future if I bought a larger Alaskan Mill. But since it would only get occasional use, I felt I couldn't justify the cost and settled on an MS391 with a 20" bar. That has been fine for a couple of years, but now I'm feeling dissatisfied again at not being able to mill larger logs than about 18". I discovered recently that the 391 can be fitted with the same bars as the 660 and am going to try a 25" bar with a 24" Alaskan Mill. My logic being that with the mill fitted, the cutting width will be about 20" so it should hopefully not be too under powered and the larger mill, attached to both ends of the bar should make it easier to cut planks of uniform thickness across the full width. So it probably sounds as though I should have bought a larger saw and mill at the start. But to be honest, it has suited me fine to make progress with steadily larger kit rather than spending a lot to begin with when I had no specific plans what to use it for. By the way, I only mill timber for my own use. These comments are not meant as a recommendation, just relating what I've done so far. Andrew
-
-
I had a think about this and remembered a small log I milled a couple of years ago when I first bought a small log mill for use with a chainsaw with a 14 inch bar. Quite a contrast to some of the massive trees milled in other threads! I wondered what the definition of a small log might be? Some years ago I read an article from someone wondering whether the walnut tree in their garden was worth milling and the advice was that 'if you can only just get your arms around it, it will be big enough'. Since I started milling with the small log mill I've not been able to walk past a tree without wondering if I could put my arms right around it......! Which is probably a bit strange? Pictures below are the 1st and 2nd cuts on a small log of laburnum which was gripped in a Black and Decker workmate to hold it steady. It had burrs all round so it held fine but for a round log, you could screw a block of wood to the underside and grip that in the jaws of the workmate. Third picture are the planks cut from three short sections from this laburnum tree which had several bends, hence why it was cut into short lengths. Although the sapwood had rotted away, the heartwood was sound and so this was another bit of firewood which was well worth milling for personal use. I've since bought a chainsaw with a 20 inch bar but I suspect that the smaller saw would still be preferable for this size of log. Andrew


-
Re the problem of stresses in a butt, I should probably have mentioned in my earlier post that I tend to mill relatively short logs so they are probably less prone to distortion if there is stress in them. 7 to 8 feet long is the max length I tend to use which will yield planks long enough for almost any type of furniture, but I've milled quite a few logs only 3 to 4 feet long. These are fine for my own use and can yield some terrific timber, but probably a waste of time if you want to sell it. The thick quarter sawn planks I mentioned are then resawn into thinner boards once the timber is dry and I've decided what to do with it. James asked for comments about milling small logs. Before I had an Alaskan mill, a few times I chainsawed logs free hand lengthwise into smaller sections then had the pieces milled into thin planks on a woodmiser. Instead of quartering the logs. I cut them into three sections as sketched below so that I could still get reasonable width planks. Quite easy to breakdown a log 20inches diameter by 6 feet long so that it can be moved in the back of an estate car by this method. But there is quite a bit of waste if chainsawing freehand. Andrew

-
A slight variation to taking the first cut through the pith is to make cuts 1 1/2 to 2 inches above and below it then split the plank in half with a couple of cuts, again either side of the pith. So a small square of timber containing the pith is completely removed to minimise the risk of cracks developing. I often do this to get a couple of thick quarter sawn planks, then through and through planks for the rest. But I only mill timber for my own use so the extra time taken isn't an issue. Andrew
-
I've used 'Makers Marks' a couple of times and found them to be very good quality. They are engraved rather than stamped. Can't remember the price, but from memory was reasonable, and there was no minimum order so it is possible to buy just a few, to your own design. Andrew
-
I was given a small pear butt a few years ago from someones pile of 'valuable timber' which they had been hoping to sell. It had been stored for so long that despite having the ends sealed with paint, it had dried to the extent that it had a half inch wide split the full length along one side to the heart - hence the reason it was given away. When I milled it into planks, I found the shrinkage stresses that caused the large crack had also caused numerous small cracks inside throughout, so there was not much of use in the end. It was a shame that an otherwise good piece of timber was wasted. Now I'd steer clear of timber dried for an appreciable length of time in the round and would recommend halving or quartering anything that is not being milled into planks so that the smaller section have a better chance to dry without splitting. Andrew
-
Thanks James. I enjoy following your posts as well. Andrew


