bmp01
-
Posts
857 -
Joined
-
Last visited
Content Type
Profiles
Forums
Classifieds
Tip Site Directory
Blogs
Articles
News
Arborist Reviews
Arbtalk Knot Guide
Gallery
Store
Freelancers directory
Everything posted by bmp01
-
Just been out to take the cover of my MS260. Got another idea for you what about the nylon chain rubbing strips pressing on the chain? Have a look at the attached pictures. The nylon strips are pressed into the cover, but they are pretty loose. So easy to remove and easy for wood chips get behind them and move then out against the chain. ... I think that would cause a little bit of drag on the chain. bmp01


-
It's not obviously out of line but we're only looking for a fraction of a mm, can't see that in a picture. Put both bar nuts on the back stud, lock the nuts together then try to tighten the stud into the housing. If it moves you know it was loose. You'll have to remove it and loctite it in. Repeat on the front stud. ... bmp01
-
Sounds like a diagnosis. Have to wait for new sprocket to make it conclusive. The bolting it up thing is a puzzle though. It sounds like the wear pattern is not in alignment with the chain but that would imply a change in the position of the bar or position of the sprocket. Even a spur sprocket can move a little so youd have to be out by quite a bit. And youve changed no components? Couple of other things to try... -Assemble the saw with the bar but without the chain, tighten down the side cover. Does the clutch still rotate freely? I'm sure it will but worth the time it takes to check. -Back to normal assembly - If loose chain tension makes no improvement (it should have), maybe its nothing to do with sprocket. Are you pinching the chain drive links between the bar rails when the cover goes on? I know its across two bar and chain assys but are they all std components? New or old? Any damage to bar rails or where the chain enters the bar? Is the the clutch cover flat? Whats the wear pattern like on the clamping faces... that sort of thing. bmp01
-
Yes. Just so long as you don't get one of the ones pileswasp and eldon are on about
-
What we're the symptoms with this 'off centre sprocket' - a description might help the OP to determine if it's the same issue. I can imagine a frequent tight - loose - tight - loose etc type feeling as the chain is pulled round.... bmp01
-
Doh , I missed that. Thanks for highlighting it. 2 excessively tight spot chains then Actually, lets see what the result of loosening the chain is. Also, If the chain tightens every 7 drive links (one rev of the sprocket) then sprocket is at fault. bmp01
-
Back off a bit more, you don't need to run it like that but let's see what happens, you might just have a chain with excessive tight spot ? On another subject i had a cheap pole saw that was going tight and clicking, turned out 3 or 4 of the drive links were burred over at the edges. Was an Oregon chain, 90 % good links, and almost new. Needle file, burrs removed and all good....well, as good as it was going to be. bmp01
-
I guess you've tried backing off the chain tension a fraction and got same result? bmp01
-
Nope hand reamer, just to remove scoring, so oversize by 0.2mm say, reamer cost insignificant over 10 carbs or more. Batch of pistons, in plastic not plated brass, fiver each.... even if they were 10 quid each, your still saving heaps over a new carb. No use to me though, every saw i look at is different ! Working accelerator pump might be as manufacturer intended but the whole arrangement is a bodge to allow lean idle for emissions purposes, isnt it? Fold in the amount of PITA engine behaviour you get when the thing inevitably misbehaves and I'm all for deleting it and run idle mixture to give good engine response. My experience is over approx 10 carbs (various engines) so no way is it conclusive. Totally accept your point re MS200T engine response too. bmp01
-
Ok - you know better than me. What's the alternative though if the accelerator piston and its drilling are scored? -New piston and o ring is a temporary fix at best. -I guess you could ream the drilling and make a bepoke oversize piston, actually that's quite realistic if you do loads of them. -Or punt for replacement carb.... minefield - cost vs quality ... bmp01
-
Ah-ha, 201 is a strato saw, no way the carbs are going to be the same then. I'd go with blanking the accelerator piston circuit on the original carb then. Nothing to loose, you can always get a new carb later. ... bmp01
-
Don't suppose the carbs are inter-changeable between the 201 and 200 are they? Would be good to swap a known good carb on to the 200 .... bmp01
-
Don't want to pi55 on anyone's bonfire...but....the lever being 2mm too high - that would have flooded the engine (direct opposite to what you experienced). I bet there are more gremins in there somewhere and someone tried to cure the symptoms of no fuel by wrongly adjusting that lever. Personally I'd go through the rest of the fuel system and make sure it's right. bmp01
-
This is well worth a look, Zama Technical Guide. You'll find the setting info for the metering lever in there. http://www.zamacarb.com/pdfs/TechguideSO.pdf&ved=0ahUKEwiUlZudk7XTAhXIJlAKHb3RD18QFggeMAI&usg=AFQjCNGLlvPYMb6LZUNDqoT_UovEWcER1A Just one question, that silver cross head screw inside the metering chamber, does that look messed with - has someone been in that carb before? bmp01 Edit - metering lever looks like it is very high in your picture, is that just the cameras perspective or has that been messed with too?
-
That side of the carb is called the metering chamber, coz that's the side that controls the amount of fuel going thro the carb. .. Was it bone dry when you took the cover off? If so that tells you there was no fuel getting through. Now you need to figure out why. Don't touch that brass coloured screw - that's a jet which will limit the fuel flow to the high speed side of carb. The little Lever with the spring under it operates a valve - push down gently on the lever and you'll see the valve bring lifted. Does that work? The end of the lever should be flush with the face of the carb, when the spring has returned it to its rest position, is it? Also, as you can take decent pictures, take the cover right off, turn it over and post a picture of that too. bmp01
-
A bit awkward. The saw ran fine most of the time but harder and harder to start from cold, eventually it wouldn't. Decent spark with an old fashioned 'jump the gap' tester so I was convinced the problem was fuelling, but that theory started to be less likely when i swapped in a good carb and still no joy. Swapped the plug at some point because it was clear I'd flooded the engine. It started instantly then - just like restarting a hot saw, half way through pulling the cord. Didn't half make me jump I must have swapped that plug in and out 5 times after that, before I accepted the fact the plug was knackered - and thats why I cut it up to see how it had failed. The arcing pattern explained everything. I concluded a damp plug - such as you get when starting on choke - just made it easier for the plug to short out and not arc across the gap. Lesson learnt, just carry a known good plug and put it high up on the priority list of things to swap in when dealing with a PITA engine. bmp01
-
It's a NGK plug = good quality. I took my ime to dissect it, the swaged section removed in the lathe, then the filler picked out gently. It was visually intact before i started the process. It had racked up tens of running hours, failing in service with the cracked ceramic. It's possible it was subject to handling damage prior to fitting but only to the same level as any other plug. bmp01
-
Only plug failure I've experienced was recently, with one of those small M10 plugs in an MS211. Ok, so the saw runs reasonably high compression of 195 psi but that's not extortionate and it shouldn't cause a failure anyway. I dissected the plug, ceramic was cracked, nice arc pattern confirmed it was shorting.... see attached pictures. bmp01


-
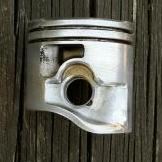
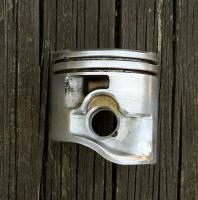
I agree saw looks like it is running rich, probably rich at idle too. I bet it is leaning out - that's to say getting closer to optimum - when hanging on the strop, so the idle speed goes up. I wonder if in that orientation - the fuel line is pulling a mixture of fuel and air ie fuel pick up isn't fully dipped in the fuel. ..maybe the fuel level in tank is on the low side? bmp01
-
As above but if it's sat for a while or had old fuel, it could be a part seized engine and you've got no crankcase pressure to operate the fuel pump in the carb. Whats the compression like on the pull cord? What's the saws history? Has it gradually got worse or completely fine one minute, broken the next? Has it been stored for months on end? Start with the easy stuff, fuel filter, fuel line, impulse line for the fuel pump. Beg, borrow or buy a known good carb to rule that out. You can inspect piston with the exhaust off, that's quick and easy, good one to tick off the list etc. Or take it in for repair / send it to someone to fix. bmp01
-
But, but.... So 20 thou, 0.5 mm - how much extra life is that going to get you? Compare it with a new bar, how much metal have you got before you run out of clearance, got to be 2-3 mm minimum?? In economic terms you've got; Cost for bar rework to get you 0.5 mm life verse Cost of new bar with 2mm life...so in component costs alone the rework has to cost 1/4 of a new bar. Cant see that happening. bmp01
-
I would have thought replacing the nose sprocket ought to be economic, it's just driving out a few rivets, swapping out components, riveting - 5 minute job. Rest of the world doesn't see it that way though If the drive links are bottoming out, you've had your money's worth bmp01
-
Ah-huh, I did manage to break the throttle switch cover on my 211 Ok, so i could have just bought a new cover but this fix allows me to take it all apart without fear of breaking the next cover


-
You had to take the throttle switch cover off, to get that throttle rod engaged right? I haven't found a way to avoid that step. ...and it always feels like I'm going to break the cover when reinstalling. It's worth checking you've got full travel of both the throttle spindles. Top one (air intake only no fuel) opens later in the application of squeezing the throttle trigger and if it doesn't open fully the stratified charge thingee.... won't be. Plastic contact points wear with usage, on mine i couldn't see any reason not to permanently twist the throttle rod to take up some of the slack, so thats what i did. HTH. bmp01
-
Nicely put, point taken, i was in two minds about using it, seems ok so far ... 3-4 years. I used a bit of silcone hose as fuel line once. It increased its size 2 fold and lost most of its mechanical strength ie tore very easily. So yes, not very clever to use silicone sealant on the engine despite the tube of goo saying it is fuel resistant. Dirko is spec'd in the Stihl parts lists. If it is also silicone based that's a worry.... Do you know, i think i still have a tube of Hylomar - I'll go see if i can find it and if its stil usable, must be 25 years old Good tip about the cellulose thinners, didn't know that. Thanks for info. bmp01