

ucoulddoit
-
Posts
283 -
Joined
-
Last visited
-
Days Won
2
Recent Profile Visitors
2,796 profile views


ucoulddoit's Achievements
")
Rising Star (9/14)
-
 Rare
Rare
-

-

-
 Rare
Rare
-

Recent Badges
-
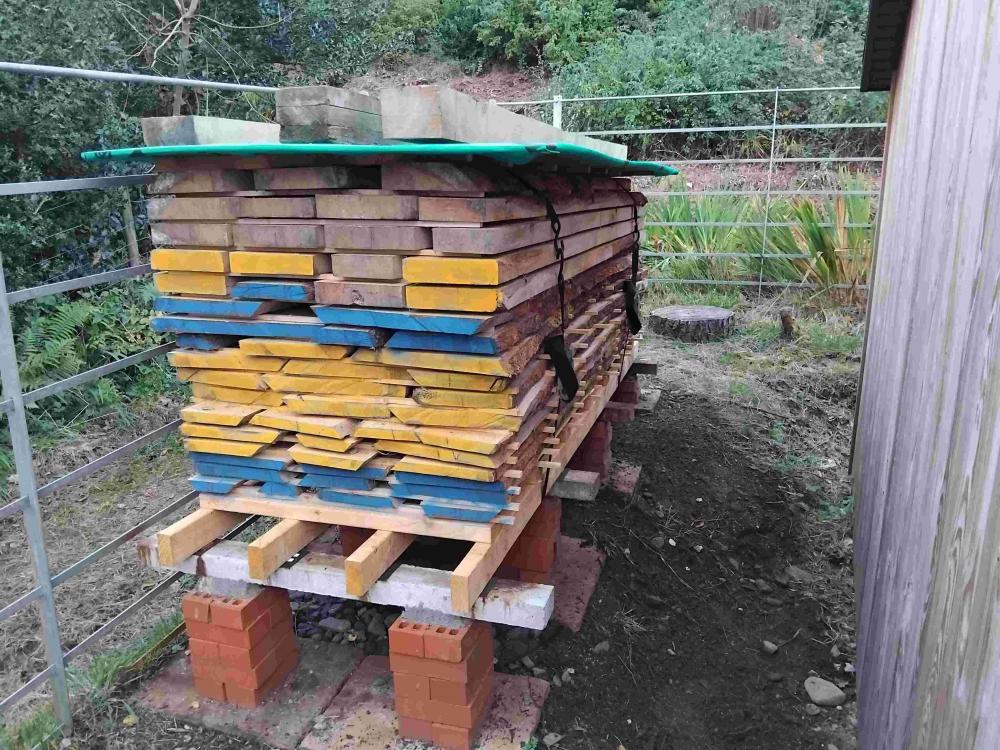
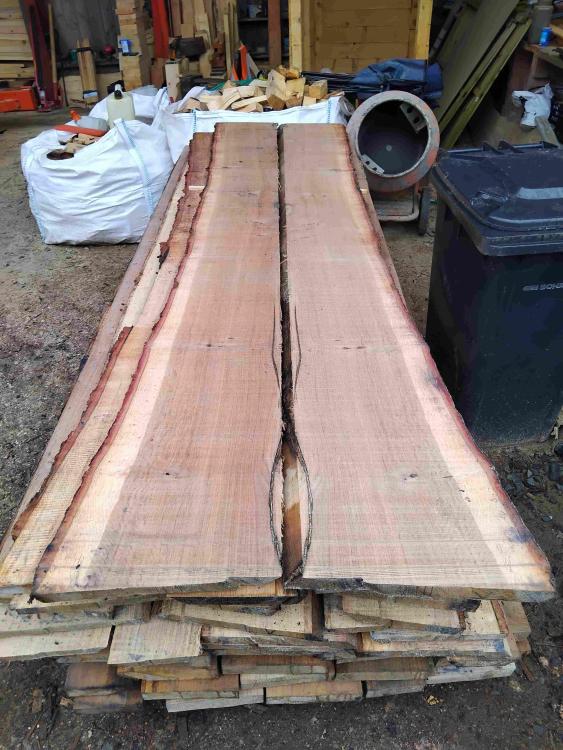
Finished stacking these oak planks and will add more weight on top in due course. Before the next gale! The ends were given two coats of PVA before milling, but I also decided to spray paint one end of the quarter sawn planks to help identify which quarter of the original log they came from, so I can easily match up the four sets of planks. Planning to leave the 30 and 40mm quarter sawn planks to air dry for at least 18 months to 2 years. Will then move planks selected for a project into the workshop for about 6 months before using them so they dry further to 10% or less, with a dehumidifier running. Hoping to make several large furniture projects using this timber, but nothing designed yet. The 55mm planks will hopefully be used next summer before it’s fully air dried, for some steam bending experiments and then perhaps a couple of steam bent garden benches. Will then see what’s left. Andrew
-
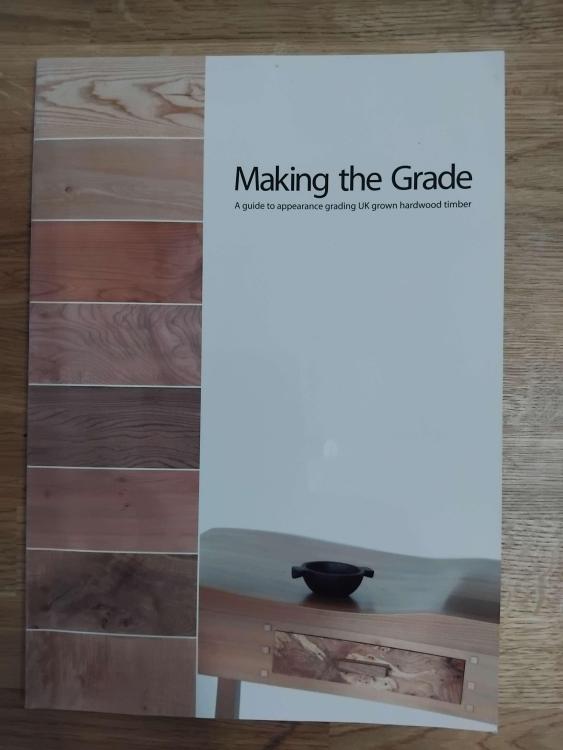
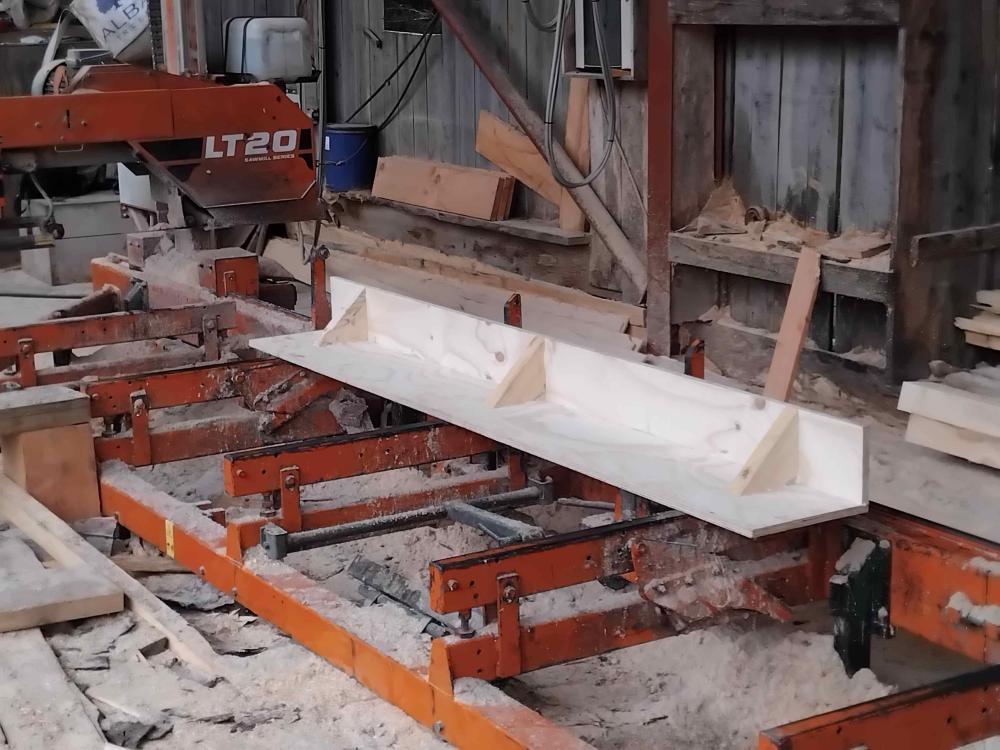
Milling finished so a quick update. The 18mm ply board with 45 degree blocks worked a treat. Fixed it to each quarter with a screw at each end and milled down to one board past the ‘centre’. Then removed the board, flipped the log over and finished milling the second half. In each quarter, the ray fleck figure is visible in the four centre boards as I’d hoped, so I’ve the option of jointing each set of four planks to make four 0.9m to 1.0m book matched ‘slabs’. Maybe table tops? Planks are generally very good, with a few small / pinhead knots. A few splits around the heart in some boards, but I’ll cut that off in due course. Overall, looks like grades 1A and 1B based on the pictures in the publication ‘Making the Grade’. Not bad for a 160 / 170 year old garden tree and thankfully no nails. Re the volume of useable timber, the log started as about 40 hft (hoppus measure). After milling there is an average 10 planks per quarter and a total from the four quarters of about 30 cu ft of planks including sap. Having measured the planks excluding bark, sap, heart and splits, the quartersawn heartwood volume is 20 cu ft with planks generally 200mm+ width with a max of 270mm width and up to 350mm at the flare at the bottom of the log. Interesting to see that the heartwood measure is half the hoppus measure, which I guess gives a better idea of the ‘value’ in a log? The upper log was milled slightly differently to the earlier sketch. I was looking for roughly 10 x 2 planks which will be trimmed to different widths after drying to exclude sap, etc. Just aiming to have some stock of oak, not for anything specific at the moment. There was a shake I’d forgotten about, we found a patch of rot from a broken branch and other issues, so we adjusted the cut pattern as we progressed to keep faults on the sides of planks rather than in their centre. Got 18 square edged planks with six quarter sawn / ray flecked planks, three either side of the heart, plus flat and rift sawn planks. All the planks from both logs now moved from the sawmill and about half stacked and sticked with 20 x 12mm sticks at 400mm centres. Waiting for storm Amy to pass in the meantime and after finishing the stacking, will cut and split all the offcuts for our stove. Nothing wasted! Overall, milling these two logs has yielded some good timber for my ‘a hobby woodworkers’ future use. And lots of fun! Andrew
- 12 replies
-
- 15
-

-
Reading through your notes, looks like you’ve created a successful, varied and enjoyable business. Andrew
-
Enjoyed looking at your website. Andrew
-
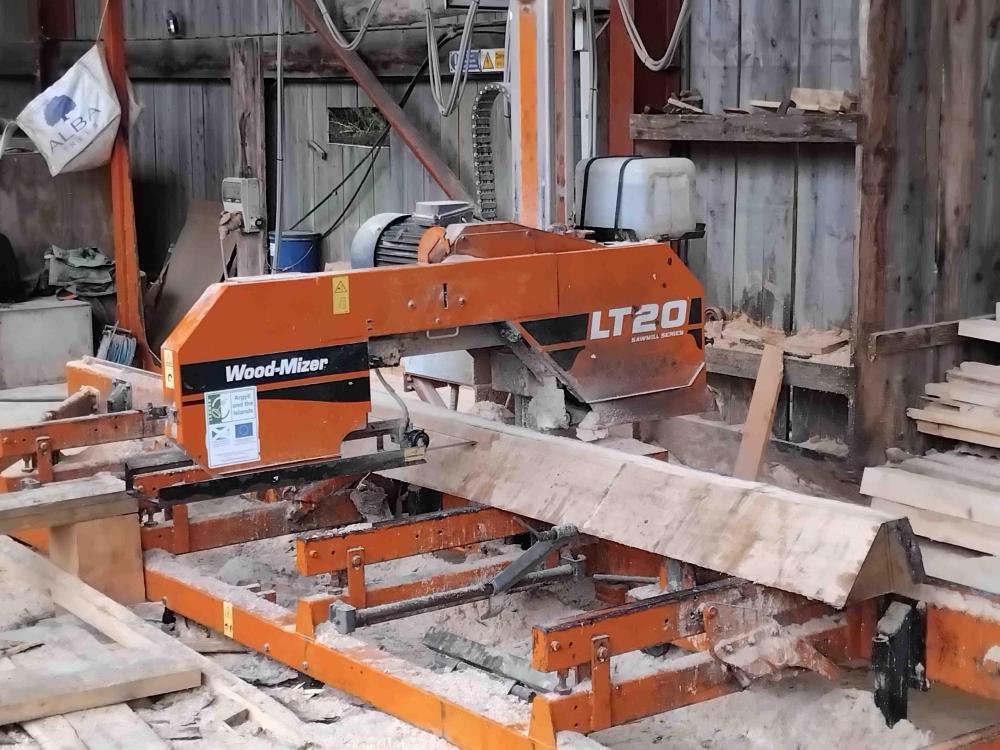
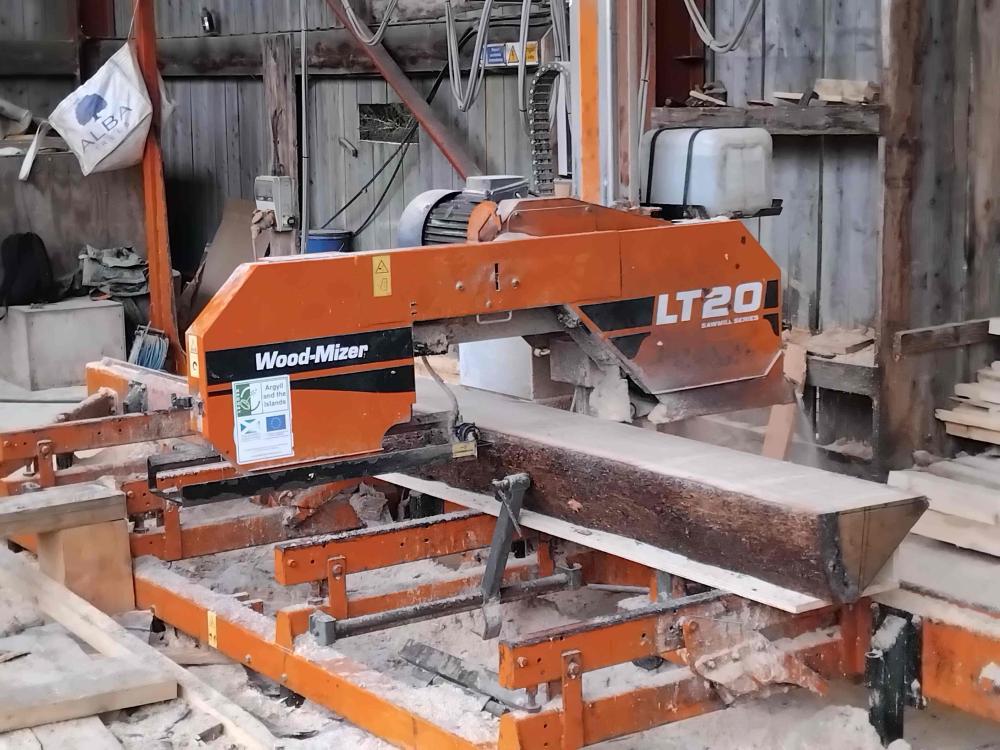
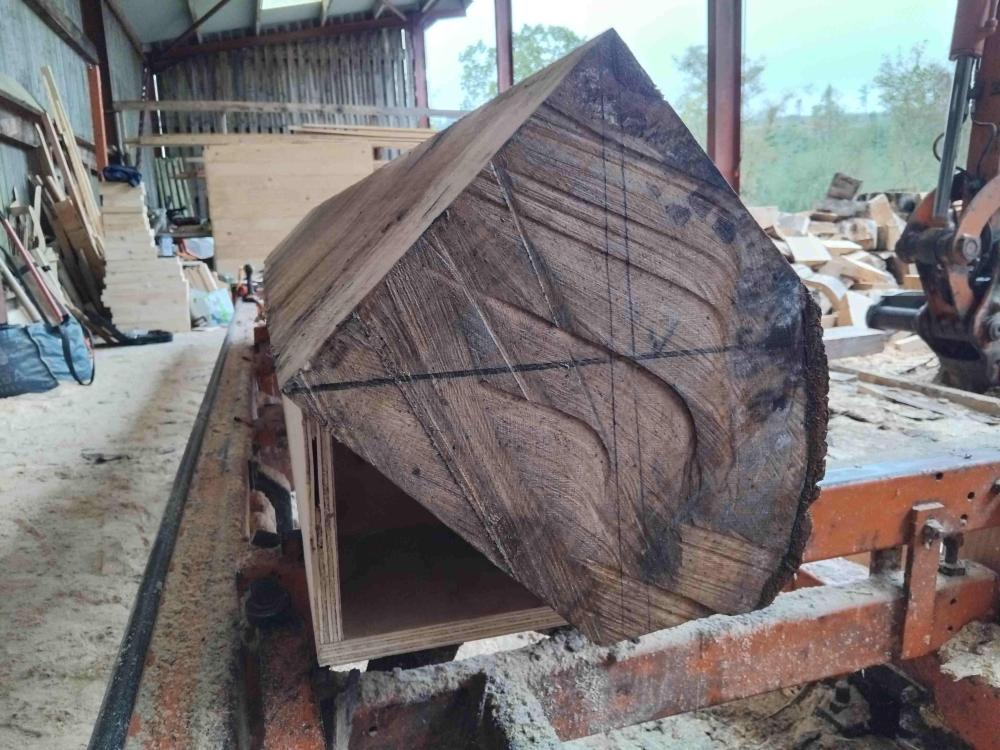
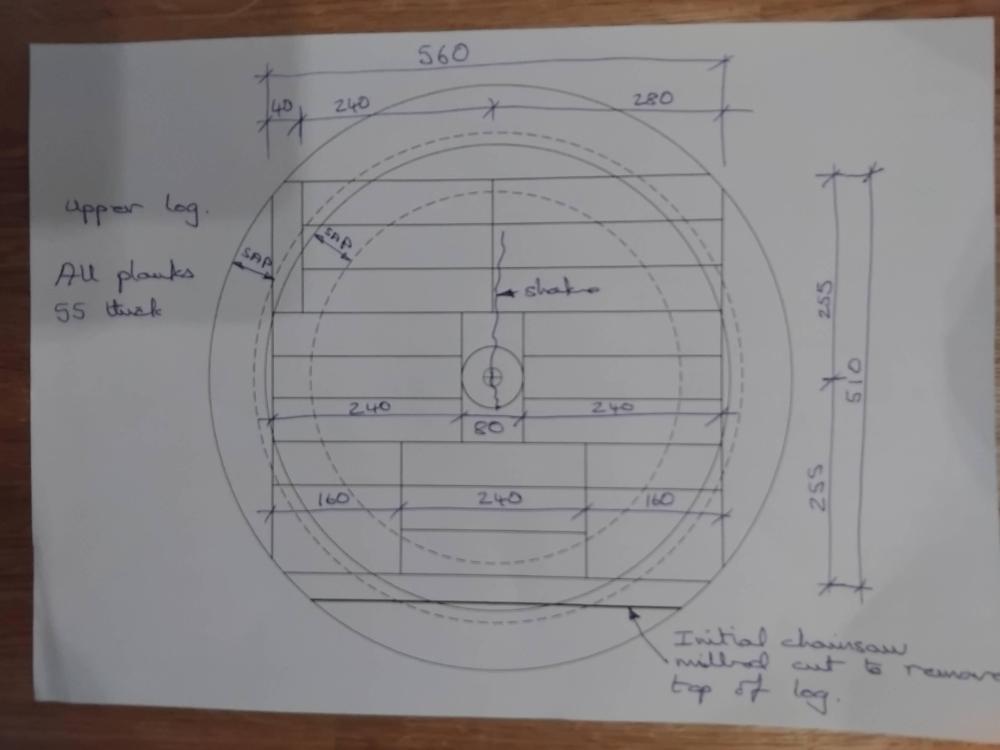
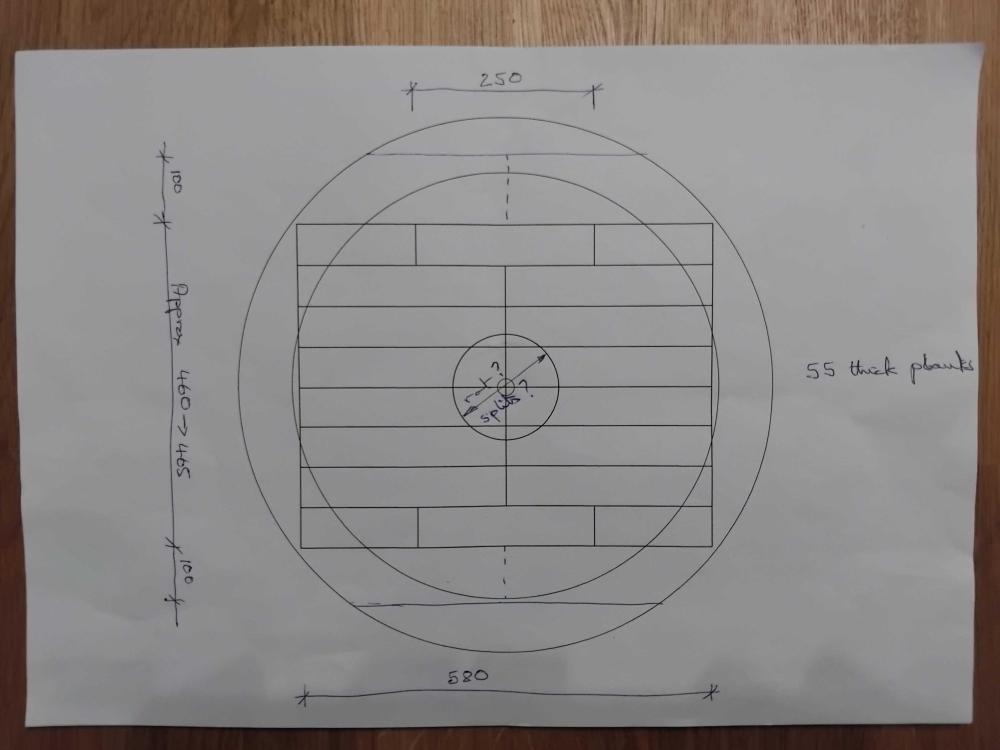
Good to hear from you Andy. Thought you’d left Arbtalk as haven’t seen your name appear for ages. The upper log will be sawn on the bandsaw as it’s a bit smaller, max diameter about 30 inches / 750mm tapering to 24 inches / 600mm. Following sketch is the current plan for milling. It’s based on what can be achieved with a Woodmizer LT20, 800mm max log dia, 650mm max cut width, 590mm max cant width and 250mm max cut depth. So the log should just fit onto the mill. Hoping to get four quarter sawn 55mm thick planks, 2 either side of the heart. Similar to your suggestion. Plank widths likely to be about 250mm max, if I’m lucky, after sapwood and heart removed. I had wondered about a squarish cant, to remove most of the sapwood, about 600 x 600 then split into quarters for quarter sawing, but the 250mm depth of cut limit wouldn’t be enough for that size of cant. My rule of thumb is a minimum 30inches / 750mm diameter log for quarter sawing which on a good day achieves max 10inch / 250mm wide square edged heartwood planks, then getting progressively narrower. But that needs a bigger bandsaw mill. For the bottom half of the log, a mill with a max cut width of 1m+ and cut depth of 0.5m would have been required and I suspect I’d need to haul the log a long way to find a suitable mill. So the combination of chainsaw and bandsaw milling work for me on this log. Andrew
-
Thanks for the sketch and boxing out the heart is my usual approach, typically 3 to 4 inches square. One of my earlier sketches was similar, and I had a few other ideas. On this log, instead of boxing out the heart at the start, I’ll trim each plank after milling, with a circular saw to remove any poor wood or splits close to the heart. Undecided yet whether to also remove the bark and sapwood from each plank as well. Not planning any natural edged designs, but who knows so I may leave a few with the bark on. Hoping to get at least four ray flecked boards from each of the quarters, which if spread / ‘folded’ like a fan, might give a dining table top sized slab of grain and colour matched boards plus the ray fleck figuring. As the growth rings will be close to 90 degrees for all four boards, the light should reflect off adjacent planks in a similar way, creating an appearance of continuity. I’ve previously book matched planks with the growth rings at a shallow angle and the light reflects differently spoiling the intended effect. So, for me, it’s not just the quantity of ray fleck boards that can be milled from a log that matters, I’m also looking for groups of planks which will have matching grain patterns. Andrew
-
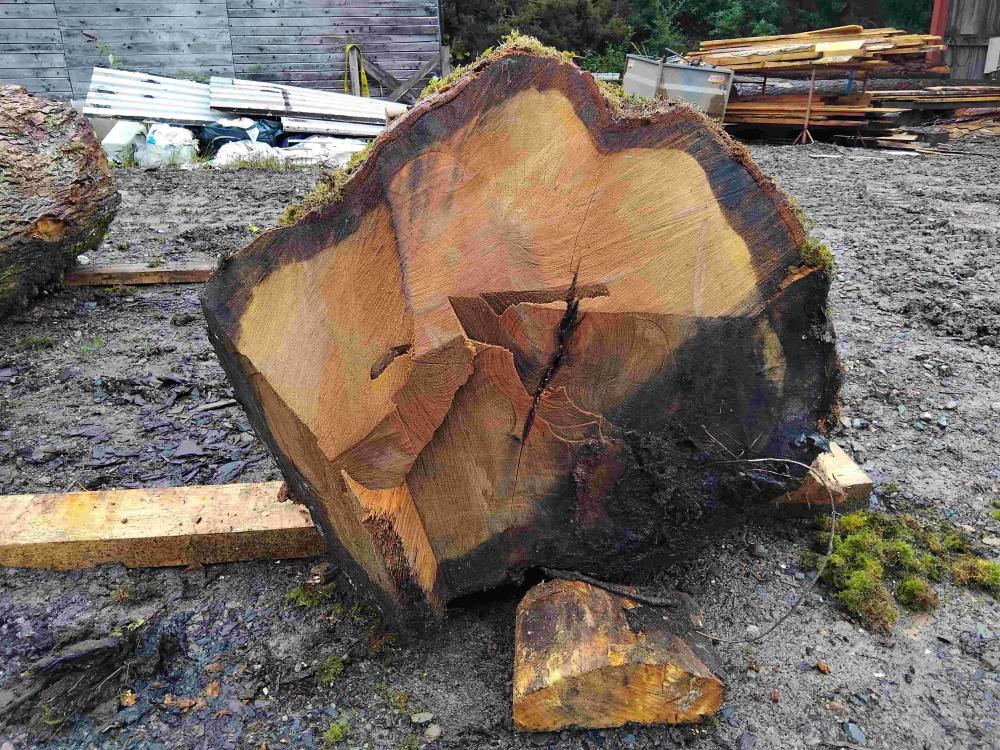
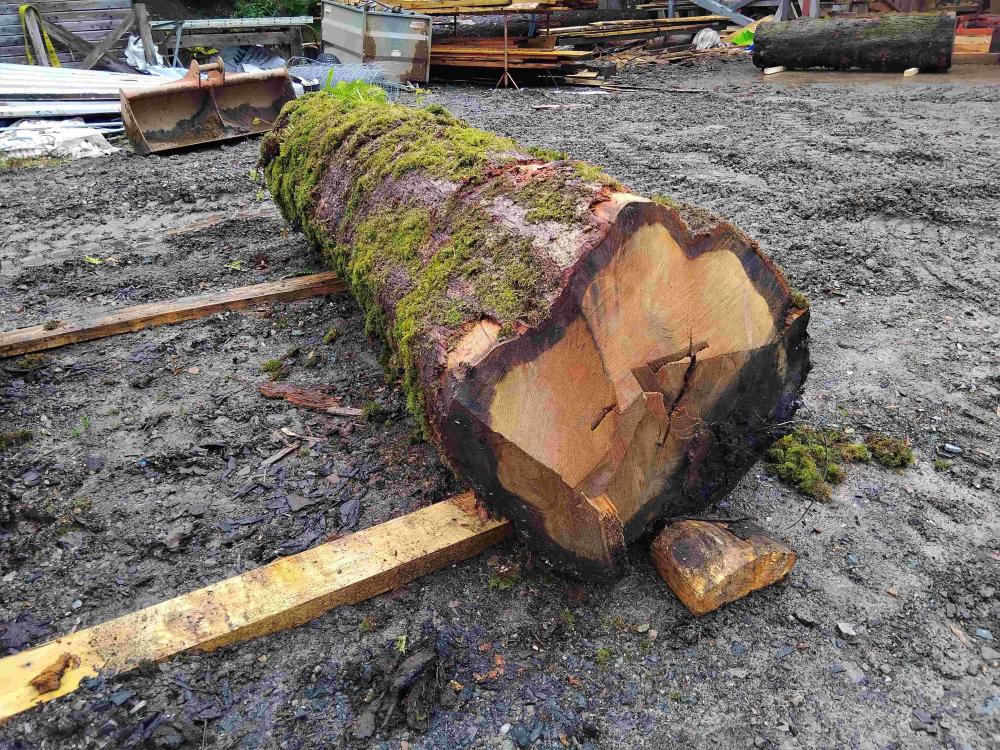
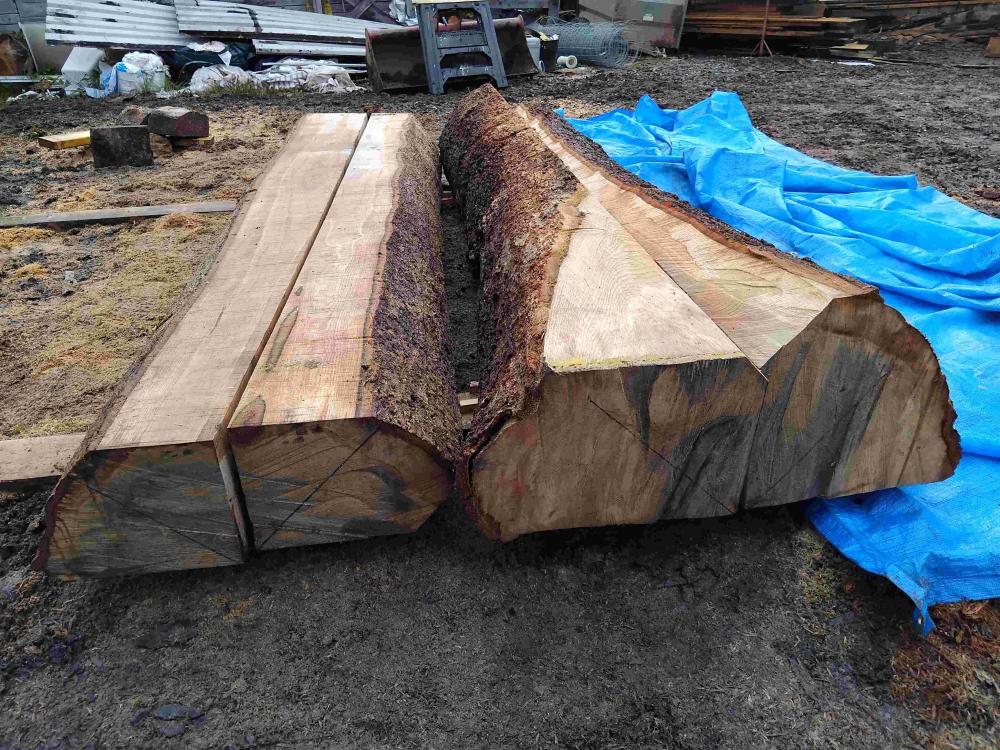
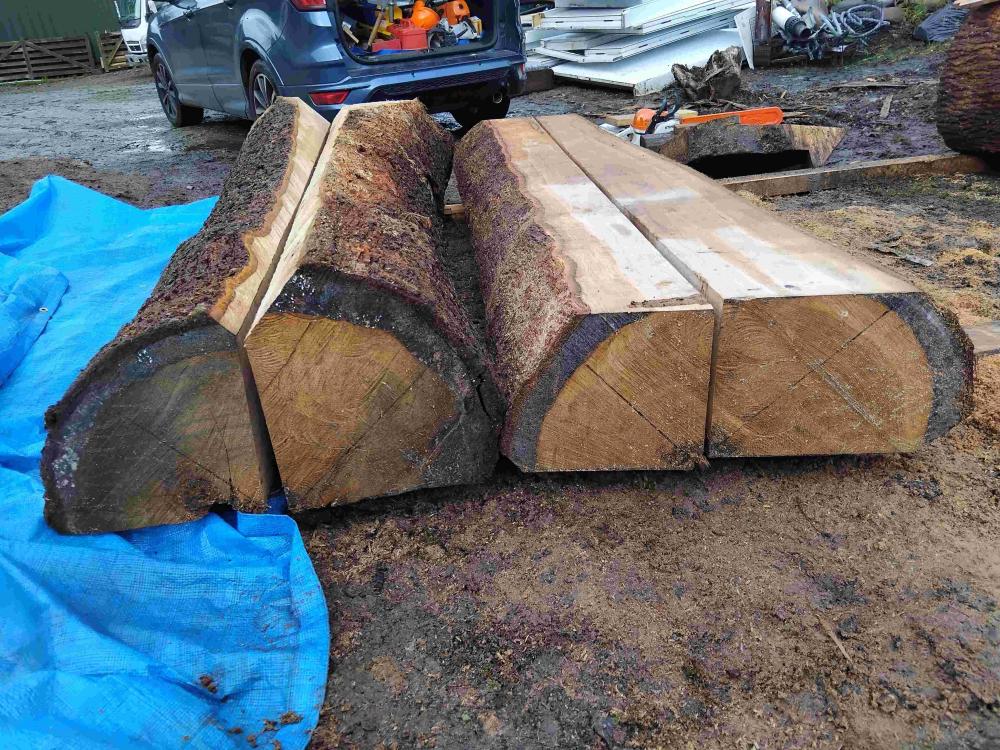
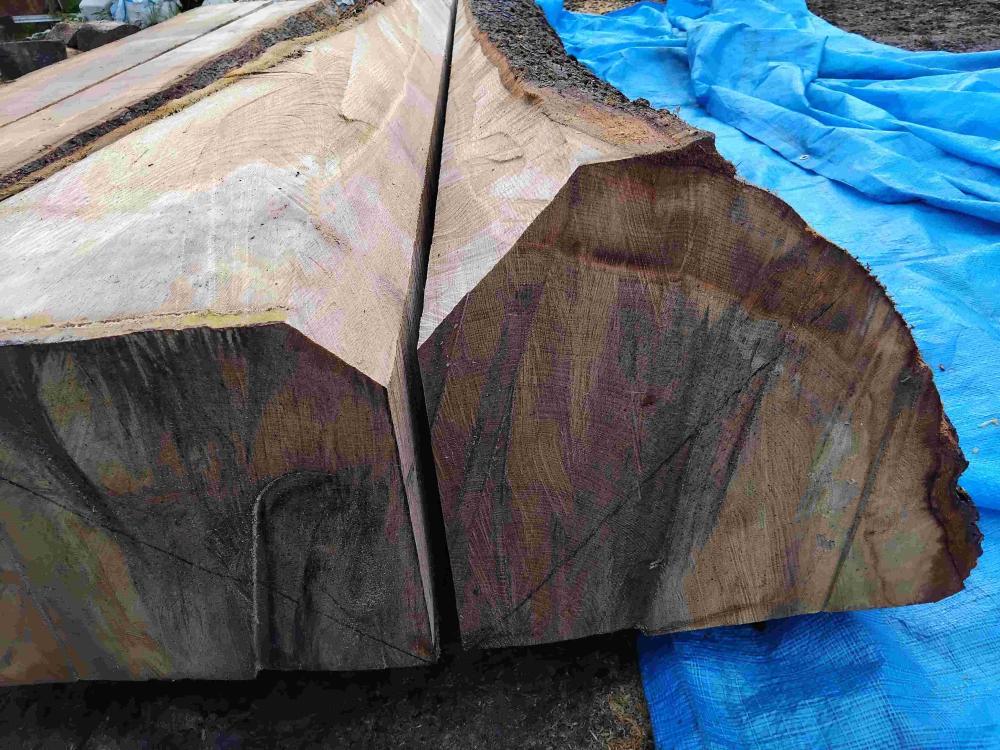
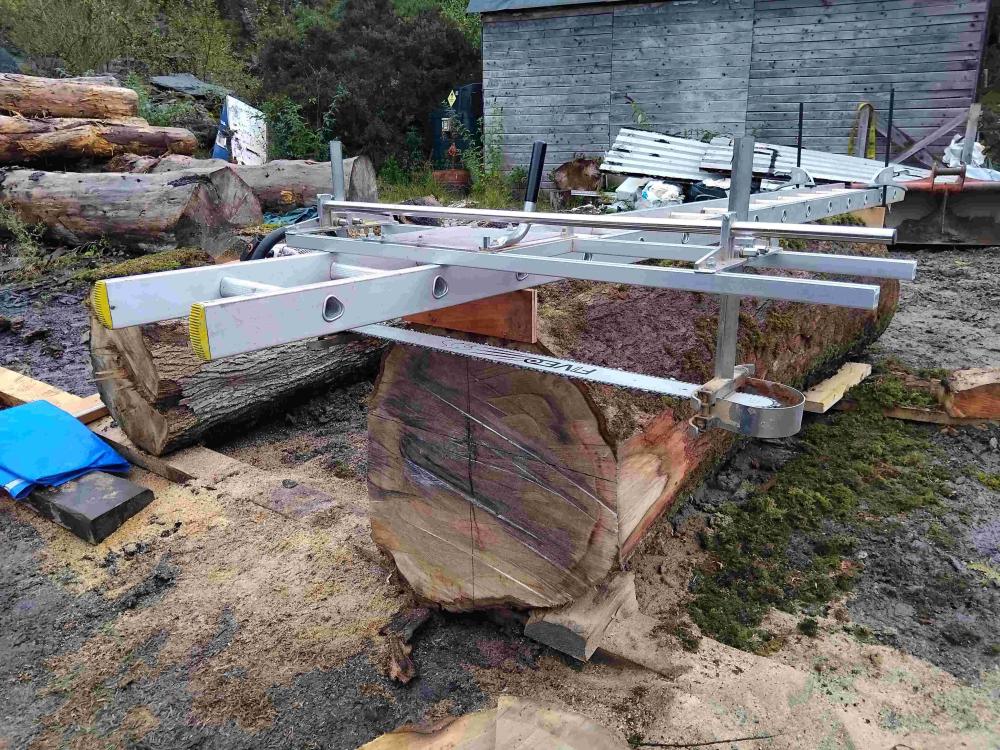
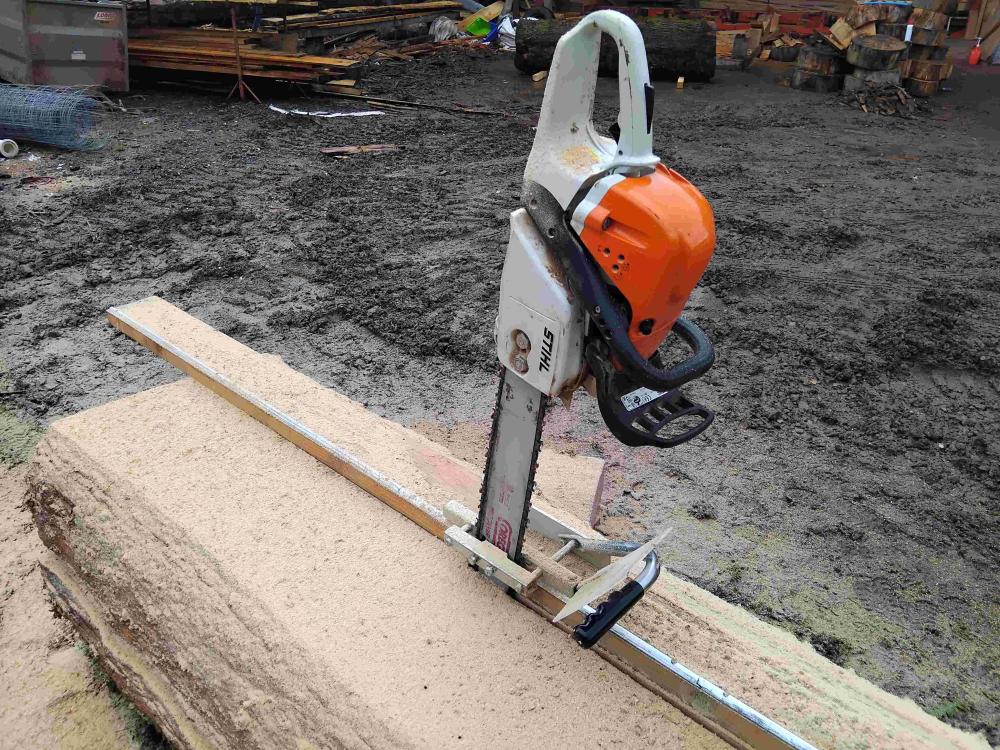
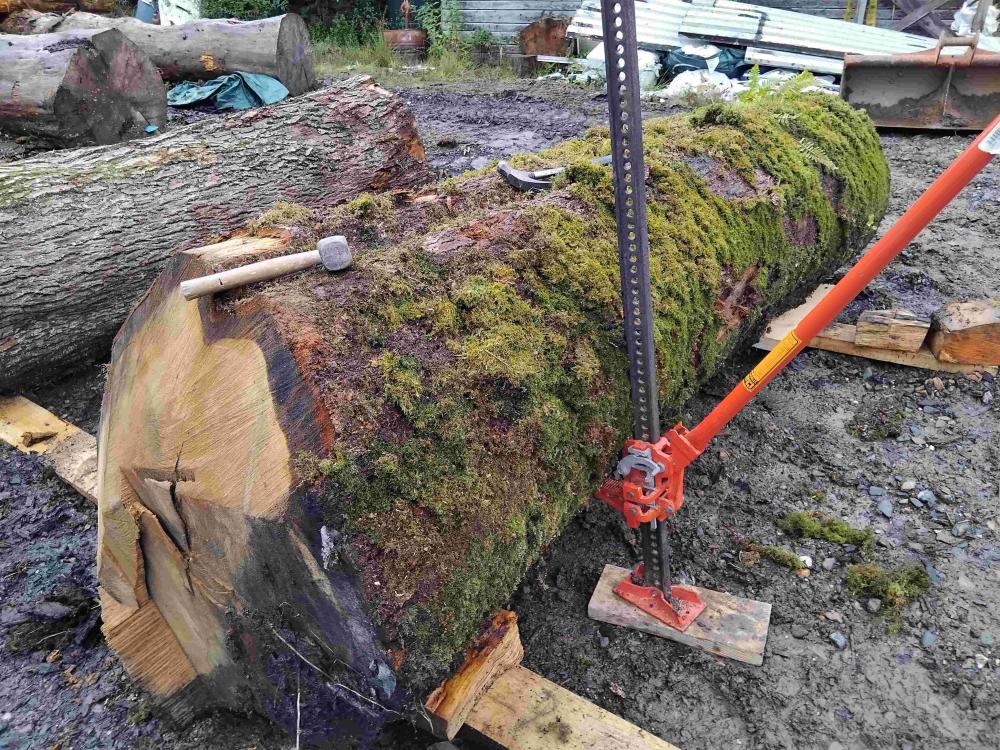
Thought others might be interested to hear about quarter sawing an oak log last week using two Alaskan mills and a bandsaw mill. The milled timber will be for my own and a friend's use for furniture making once seasoned and my aim was to maximise the yield of book matched ray flecked heartwood boards. Didn’t realise until recently that although quarter sawn boards can have the growth rings between 90 degrees down to 45 degrees. Ray flecked boards, a feature of arts and crafts style furniture, need growth rings between 90 degrees down to 75 degrees. For the past couple of years I’d been looking for an oak log nearby, at least 30 inches diameter, about 10 feet long and straight, suitable for quarter sawing. Recently I heard of one being felled a few minutes walk from home! Tree was still living, but at the top of a steep bank and leaning over a drive way and adjacent house. So it needed to be felled. Concerned about nails in a garden tree. Also, unsure if it grew at an angle, i.e. might be reaction wood, or if the top of the bank had started to give way in recent years and it was vertical for most of it’s life, so no reaction wood? Also, a visible scar 18 feet up where a large branch had snapped off raised the risk of heart rot? Lots of reasons to dismiss it as a firewood log, but decided to mill it. The bottom 18 feet from ground level to the scar was felled in one length, at my request, It tapered from 40 inches to just over 2 feet diameter, DBH about 34 inches. Cut it into two 9 foot lengths as too heavy to move in one piece and it was lying at a step angle on the bank so not suitable for chainsaw milling where it landed after felling. Bottom section tapered from 40 inches to 30 inches, and once felled and cut to length I could see the pith was reasonably centred and no obvious defects from old branches or rot. Looked ideal! The local sawmill (only 2 miles from home) were happy for me to do some chainsaw milling at their yard, a few preparatory cuts, before final milling on their bandsaw. The bottom, largest section will be quarter sawn. Took a while to work out the best sequence of milling and after several options, the attached sketch is working so far. The chainsaw milled cuts, now completed, are bold lines, and the bandsaw cuts, still to be done, are the thin lines. TH quarter saw milling.pdf Started by rolling the log using a farm jack, so a large shake was vertical, more or less aligned with one of the proposed chainsaw cuts Then freehand trimmed the flare on both sides using a chainsaw so my Alaskan mill would fit. Then trimmed the bottom end flat and square, followed by drawing vertical, horizontal and diagonal guidelines on both ends, all meeting at the pith. Then painted both ends with 2 coats PVA. Top slab, mostly sapwood, was removed with my Alaskan mill to create a flat straight face, parallel to the pith. Then the log was milled full width through the pith. My Alaskan mill started as a small log mill with an MS171 (14 inch bar) bought years ago. Then upgraded it to an MS391 with 20 inch bar for milling, and about 10 years ago changed it into a 24inch mill using additional parts plus an MS661. This log was a good excuse to buy longer 48 inch rails, a 42 inch bar and two full skip rip chains, all from Chainsawbars. So I can now mill up to 36 inches width. Amazed how quickly the MS661 cut this average 32inch width of oak with the new set up. The top slab was raised onto wood blocks, then cut in half along the vertical guideline, again following the pith, using my Alaskan mini mill with the depth set so that it didn’t cut into the bottom section. Some lovely ray flecked figure on this cut! After rolling off the two halves of the top slab, the bottom slab was halved using the mini mill. One edge of each quarter was then freehand trimmed the full length with a chainsaw, parallel to the diagonal guidelines, so they will sit flat on the bandsaw bed with the pith parallel to the bed. So, that’s the log quartered and ready for bandsaw milling into 30mm and 40mm planks. Based on the 90 to 75 degree limits, might get as many as 16 ray flecked boards, i.e. four matched boards from each quarter. I’ll keep my fingers crossed. Quite time consuming and all done alone without lifting gear which was hard going for an ‘old age pensioner’. The quarters have been pressure washed to remove moss, soil and maybe stones. Planning the band sawing in a week or so. Just need to make a ply board with 45 degree blocks to support the quarters for horizontal cuts. In the meantime the quarters are covered to keep the sun off and minimize the risk of surface checking. Will post more pictures in due course. Andrew

- 12 replies
-
- 11
-
-
Not sure how thick or wide your slabs are. But, after air drying slabs down to 15 or 16%, I re-saw them into narrower and thinner sections before the final drying down to 8 to 10% suitable for use indoors with central heating. Dries quicker doing that, and less likely to develop defects such as splits, etc. I don’t have a kiln, but run a dehumidifier in the workshop and stack timber out of the way to slowly dry down to 8 to 10%. Years ago, I just used to keep the planks in the house and they gradually acclimatised before being machined to final sizes. But you might not want a stack of planks inside! Needs to dry slowly. I suspect with firewood logs the aim is to dry them as fast as possible and if they split it doesn’t matter. Andrew
-
Ronseal wet rot wood hardener can be used on areas that are softening due to spalting.
-
Pretty sure kiln drying after initial air drying often includes the option of a short hot spell at the end to kill off anything in the timber. Obviously depends on the type of kiln being used. Was a long time before I realised this is a bonus with kiln dried wood, not only a lower moisture content.
-
Not my own work, but the attached photos continue the theme of ‘From a 1.4 ton oak burr’ and are a hollow form turned from an offcut of the oak burr. 16 inches high x 8 inches diameter and it looks great! It was made by Darren Crisp, https://www.darrencrisp.com/ and has taken about a year since we first met to discuss the commission. We initially worked together to decide how to make best use the offcut / lump of burr, and also to get to a rough shape that I liked. Then he worked on refining it and initial hollowing. The offcut / lump of burr had been air dried under cover for about 12 years, but the inside when we cut into it was still about 20% moisture content. So, I brought it home for about 8 months to dry and acclimatise the wood to suit the humidity in the room where it will be kept. It was weighed monthly and gradually got lighter as moisture evaporated until after about 6 months the weight remained constant having lost about 350g of water. The following graph is the record of the monthly weights (not total weight). Quite surprising how much water had evaporated. Should now be fine in a centrally heated environment. Darren then trued up the shape as it had distorted a bit when drying at home. The hollowing out was completed and defects were filled with bronze resin. Darren suggested leaving the ‘burrs’ unfilled and so we only filled the defects, i.e. drying cracks, etc. and that was good advice. A couple of worm eaten areas were consolidated using Ronseal wet rot wood hardener (very thin resin) and were left unfilled. He then carried out the final finishing, down to 2000 grit and it looked immaculate even before being oiled which I did back at home. The hours fairly mounted up for the commission, but the finished hollow form is a great addition to the collection of things being made from the 1.4 ton oak burr. Andrew


-
Bowl blank jig It's the time of year again when I sort through my timber store looking for forgotten ‘treasure’! Decided to be ruthless this year as I’d noticed a few worm holes have appeared on planks I’ve had for 10 to 20 years. Fortunately nothing too serious, but I was keen to stop it spreading. Also, I recently milled a decent sized elm log which I wanted to go in the woodstore, at the bottom of the stacks of timber, and space was running out. So, I spent a few days shifting a few tons of planks, chain sawing off any infected timber, removing sapwood from some nice oak, deciding which planks I might use one day and what will now be firewood for the stove. Then brushed preservative on all the vulnerable species of planks I’m keeping which will hopefully make them less tasty. Created lots of offcuts and decided to make a bowl blank jig for my bandsaw so that some of the better bits, free of worm holes and defects such as splits, might be of use to others someday. Picture below shows the first attempts, up to 600mm diameter, using ash, burr oak, sycamore, burr laburnum, yew, spalted beech and spalted birch. After air drying in a well ventilated shed for so long they are typically about 12% to 14% moisture content apart from the thick burr oak which even after about 12 years is around 20%. Have painted PVA around the sides, will paint them with preservative in due course and possibly store them in my workshop which has a dehumidifier, to reduce the moisture content further. Still need to look at the apple, plum, horse chestnut, cherry, spalted holly, and other ‘special’ species, although no need to hurry as they have been in a very dry store for years and look fine. Not doing this to sell the blanks although I guess the bigger pieces especially are worth a bit? I know a few turners who might be keen to acquire some large pieces of dry ‘firewood’ and I’m keen to see how the timbers I used in early experiments milling and drying all those years ago have turned out. Useful to be able to see from the blanks what looks most promising to me, and will perhaps choose one or two of the larger blanks and follow through to a commission. To be honest, it’s a bit of a faff making the blanks although the jig is very quick and accurate to use. Would be interested to hear what others think about the following for future reference if I decide to make more of the larger offcuts into bowl blanks: Is the small hole for the pivot pin in the jig an issue. It’s 8mm diameter by around 10mm deep? Might it be worthwhile making the blanks slightly larger diameter and include some of the waney edge? Should one of the faces be flat and perpendicular to the edge? I’m limited to 250mm width on my planer, so the faces of the larger blanks still have some drying distortion. Do woodturners in general prefer a rough shaped offcut which they can decide how to size, etc. i.e. no need to prepare a circular blank? Although I guess if aiming to sell the offcuts, circular blanks might have more potential buyers? Picture below are some of the offcuts from the blanks, offcuts from offcuts, and now wondering if the larger pieces would also be of use? Andrew


-
Almost 4 years since I used my Alaskan mill and a combination of withdrawal symptoms and being keen to use it again while I’m still fit and strong enough led to me spending yesterday milling an elm log on a local estate. A windblown dead elm, about 30 feet long and over 2 feet diameter which was quite ambitious for a mill with a max capacity of 20 inches! But, quite achievable for hobby milling to get timber for my own use. It had lost most of it’s bark, but seemed largely sound and the freshly cut ends looked fine with no obvious shakes, rot, etc. I was given the freedom to cut and take (buy) what I wanted, so chose a 10 foot length where the diameter was a shade under 2 feet. It was quite dry when cut which didn’t really give much idea of the colours, but a convenient shower at lunchtime let me see what I might achieve one day with oiled planks. Looks promising! After milling the first few planks, I trimmed one side using the Alaskan Mini Mill to reduce the width to 20 inches so that I could continue milling the planks. I find the mini mill really useful, but suspect it doesn’t get much use by others? A very satisfying days work and now stacked temporarily at the estate and will be moved soon to my drying shed at home. Planks are max 20 inches wide and were milled at 65mm thickness which should enable me to achieve a minimum of 50mm / 2 inches after planing to remove drying distortion. Or, I can resaw them after drying to get say two 25mm / 1 inch planks. Through the centre, an 80mm plank was milled, then an 80mm strip was cut out, centered on the pith, to remove it and reduce the chance of defects (splits) migrating out from the pith, leaving two decent sized 80mm thick quarter sawn planks. Always good to have some thicker stock, but they can also be re-sawn into thinner planks when dry, so plenty of flexibility for future projects which haven’t been designed yet. Would be good to have a bigger mill and get wider planks, but in reality, 10 foot long, 20 inch wide by 65mm thick freshly sawn planks are pretty hard to move on your own aged 65! So that’s the log that was milled. Also bought a slightly smaller beech log which the estate have agreed can be left lying in the woods where it will hopefully start spalting. Will check in a year or so, and guess it might take two years to reach the stage of being spalted but not rotted and useless. A bit of an experiment. Will be almost 70 years of age once all this is ready for furniture making ……. Andrew


-
Following on from my previous post, this thread re-kindled a long term interest in visual grading of timber, so I dug around a bit online to see what’s current. The following link should go to the Wood Campus website which has a factsheet including relevant publications, etc. for visual grading. Strength Grading (factsheet) - Wood Campus I’d wondered if the Eurocodes might have superceeded the standards I’m familiar with from the past, but I see BS 4978 2007 is still listed. So I’ll look after my well used, dog eared paper copy. Not sure if there will be a free pdf on line as I only had a cursory look. The factsheet includes a table showing the relationship between grade and strength. I think it’s worth noting that softwood visual grading using the British Standard will be either GS or SS. But in terms of strength, as an example, GS grade larch is stronger than GS grade spruce, i.e. timber species of the same grade are not interchangeable for strength. The table relates the grades for different species to C16, C24, etc. Re the original question on this thread, I found details of several courses for visual timber grading from a simple Google search. Typically circa £2k for a three day course and the qualification needs renewing annually, so a fair investment would be needed. My previous post mentioned it’s fairly easy to separate the good timber from the bad using self taught visual grading. For my own projects, I had an ample supply of logs and just used what was obviously ‘good’. But I guess in reality, for a business, it’s necessary to also look at the middle ground, not just the extremes of good and bad, otherwise a lot of timber might be rejected that could pass a rigorous visual assessment. And I guess that would go towards justifying the investment in training. Andrew
-
A few thoughts from a retired structural engineer with a fair bit of experience working on timber projects. Firstly, I’d say most visual grading is mostly done on large section timbers, not small stuff for studs, etc. Also, every milled piece of timber needs grading, it’s not possible to grade the timber in a log prior to milling. The grading process is relatively straightforward, looking at specific aspects of each milled piece of timber, such as timber species, knot sizes and positions, grain slope, growth ring spacing, etc. Soon becomes a matter of common sense really, to identify what’s good or bad. Can be self learnt using readily available publications, but not sure what is current as it’s 10 years or so since I did this. A trained / qualified grader will stamp each piece of timber. But if it’s for your own use, you have the option of deciding whether the stamps are necessary. I’ve no experience of self grading timbers for a project needing building standards approval, but have heard of it being done. I guess it needs prior discussion with the council engineers to convince them you know enough about visual grading to be ‘trusted’ to do it. There is also the issue of what happens when a property is sold on, if a surveyor for instance queries the origin or spec of the materials used. Might make it harder to sell or reduce the value? Re timber studs, your engineer’s spec almost certainly requires treated timber. Using a timber species with inherent natural rot resistance such as larch (heartwood) would be my starting point if looking into this. But maybe it’s possible to adequately treat other species on site? And no reason why the studs couldn’t be visually graded. Would be worthwhile checking with the design engineer if the sizes specified are based on strength, deflection, or the detailing necessary to incorporate insulation, air spaces, etc., i.e. the studs might be way ‘over engineered’ just to suit the detailing, in which case the strength grading would be less critical. But again, I’d research all theses issues and discuss all your detailed proposals with the council engineer before starting, so they are comfortable you can be ‘trusted’, rather than asking them how and what to do. Andrew


