bmp01
-
Posts
857 -
Joined
-
Last visited
Content Type
Profiles
Forums
Classifieds
Tip Site Directory
Blogs
Articles
News
Arborist Reviews
Arbtalk Knot Guide
Gallery
Store
Freelancers directory
Everything posted by bmp01
-
Ok, let me explain it again. .... don't use the hammer to flatten those lumps. Get-it? Well, it looks shiny. Interested to see how it goes now. Regarding the starting thing, it is worth labouring the point as it's a safety thing. Its not the force needed to start the thing - I'm sure you will cope with that. It IS about how much the saw reacts to the the pull cord force. In this respect a lighter saw and especially a top handle one is worse than a heavy one, we all know that. But adding in the higher compression on a small saw really makes things surprisingly jumpy. bmp01
-
It's Shed tuning, Spud Not commercially viable granted, but fun for those that enjoy that sort of thing. But in fairness if you can run the piston up close to the squish band it will reward you with a little bit of extra oomph but more importantly an all round nicer engine. The turbulence you can get from tight squish is underrated IMHO, a more dependable / reliable combustion process due to the extra gas movement, so even if the mixture isn't spot on (it never is, through the whole rev range) - combustion will be better. So hopefully a more crisp engine response. Just makes the saw nicer to use. Innit.... Starting it might need a bit more care though, especially a top handle saw like this one - you listening MattG? bmp01
-
Mr Pierce, ye PM need a wee clear out too.... apparently. Anyhow, payment sent. bmp01
-
No change, I'd still like the 136 please. I'll repair yours with bits from mine or repair mine with bits from yours. I have no desire to hord parts so I'll gladly pass on what i don't need after rebuild. bmp01
-
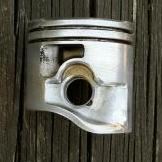
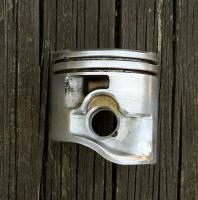
That piston looks good. The one i have was grey to black when viewed from exhaust. I recon it thought it was a "double acting piston" with combuston above and below The ring came out in three bits, broken either side of the locating pin. Don't think JB Weld was gonna fix that. Does yours feel like it has reasonable compression? bmp01
-
ooooh, please, if it has a good piston i could make use of that. The one i have in bits has a broken ring, piston written off blar, blar. PM inbound Thanks bmp01
-
Got any double sided tape? You want the stuff that is just a bit thicker than normal sellotape. I've got some made by 3M and some used for carpet laying, both work. When you need to remove it, use heat. The key here is a uniform thickness of what ever you use to hold the paper. Yeah, i understood how little you need to remove. I don't think you even need to go very coarse (200 grit?) but cleaning the paper and cylinder regularly to stop it "plugging" will help. And of course none of this is worth it if you make a mess of the cylinder bore so keep the bore and piston OD clean. And keep the paper away from the edge of the piston, say 1mm minimum in from the edge. Just my 2 pence worth.... bmp01
-
Emmm....not sure about that. On a 4 stroke (what i know best) running lean definitely causes ext temp to go skyward. As you go lean, combustion slows down. Slow combustion means you get less energy converted into mechanical energy - imagine the extreme case where the bulk of combustion is taking place as the piston is way past tdc and travelling down the cylinder, you just dont get the cylinder pressure at the right time to do any good. And if you don't remove the energy from the gases they stay hot - so higher exhaust temps. Pistons and exhaust valves also get toasted. It's got to be the same with a two stroke. Plus, and maybe more importantly the higher engine speed you get with a lean engine means 1) more combustion cycles so even if every thing else were equal that's more heat to get rid of and 2) combustion takes a finite time so at some point the engine is reving too fast for the engine to be efficient (just like the running lean logic above)... and that's more heat out the exhaust. Conversely a bit of extra fuel - running rich - the extra mass of the fuel absorbs some of the combustion heat causing cooler combustion and a cooler engine. I know which I'd rather have. bmp01
-
You not planning a life in politics then ???
-
So is this the MS230, that wouldn't run. ..the one where carb had been visited by "Bodger's Inc" in a former life? If i were you I'd do some searching on how to tune a carb before you do much more with it, there is a real chance of damage if its running lean (and therefore hot). There are some good You Tube videos on the subject, you need the soundtrack as tuning is done by ear (or with a tacho if you have access to one). bmp01
-
So get a bit of sandpaper stuck on the top of the old piston, spin the piston with a bit of wood. 5 mins and those protruding lumps will be gone. Use the existing squish band to guide you in your progress. You're not afraid to get in there and clean up the combustion chamber, this isnt much different. In both cases very careful cleaning required. ... bmp01
-
CNC lathe.... surely? bmp01
-
Yeah, Dremel isnt a precision tool, i was assuming you'd blend to surrounding to create clearance not an exact squish number. Have a look at Mastermind's squish machining technique on Arboristsite. He uses a single profiled cutter mounted on a sustitute piston that closely matches the bore size. .... hand operation IIRC. Or for the material you need to remove - sandpaper mounted on the end face of a piston / sustitute piston (end face or piston not flat). By the way, are the 4 lumps lower than the squish (that really would be carp) or is the piston domed? bmp01
-
Agree on all counts. MS200 has a nice little connecting rod - not much stretch in the two bearing bores, unlike say a 1 1/2" or 2" (38 to 50mm) bigend ... bmp01
-
Tiny bit more. But can be done at the same time as the existing squish and cylinder bore machining. No reason why the CNC cutter path has to machine the squish flat either. bmp01
-
It should be, it's a machined band, cut at the same time as the boring opertion. Disappointing to hear the combustion chamber of MattG's 200T has lumps in it, presumably in board of the machined squish. Time for Dremel work? Equally disappointing the squish is in the 1.0 mm range, poor effort. bmp01
-
Is the 200T subject to the same sort of tolerances as the rest of the range or do Stihl make a special effort on these? How about shooting for 0.45mm (18 thou) as a starting point for your mods bmp01
-
If you take a std Stihl carb and disable the accelerator pump, what's the difference between that and a Stihl carb that didn't have an accel pump in the first place? Was it anything obvious? I can imagine more drillings into the carb port (close to the butterfly) fed from the low speed circuit. The jet for the low speed circuit may be a different size too but that's so small i don't know how you'd tell. bmp01
-
Hello, Glad you got it sorted. Did your diagnosis include taking the old carb apart ? Accelerator piston scored and O ring undersize ? No ideas about the life of new carb. Does that have a accel pump in it? bmp01
-
Or if you have enough thread you could loctite a grub screw above the correct screw. That assumes its proper engineering thread in metal, not some self cut thread rubbish. bmp01
-
Epoxy, JB Weld. There are fuel proof versions which should be ok with oil. I presume its just to seal the leak and there's no structural implication. Somewhat awkward to find in UK, i got some from Opie Oils when i was buying oil for the car. If you can access the holes through the filler cap you might even be able to do the job with out disassembly, I'm thinking several flushes with fuel and then degreaser like brake cleaner.... unless you want to take it apart again... bmp01
-
Yeah, we can add a second line to the expression... "If it works, don't **** with it" Such as, "But if in doubt, rip it apart" Works for me bmp01
-
Another vote for pull cord rope stuffed in the cylinder - i like the idea of distributing the load with something a bit flexible, much like what the running piston sees with combustion pressure. A solid piston stop is the direct opposite. bmp01
-
Result ! Thanks for the update. Soooo, why did tightening the bar nuts cause the chain to not run smooth? Do you think it really was an alignment issue between the sprocket and the bar - because the sprocket had restricted sideways movement? Or simply the wire getting into the rollers of the needle bearing under some conditions? bmp01
-
Inside the tank I can just see the ends of the studs, as in round, end of a thread. But actually i don't think the studs can put any sideways defection in the bar / cover. The shoulder on the stud would have to be unwound about 5 mm before it stops the cover going on. You can see in my pictures above there is a recess in the cover, for the stud shoulder to pass into if indeed it were far enough out to come through the bar. Your picture is showing the studs are either screwed right in or almost all the way in. bmp01