

ucoulddoit
-
Posts
283 -
Joined
-
Last visited
-
Days Won
2
Content Type
Profiles
Forums
Classifieds
Tip Site Directory
Blogs
Articles
News
Arborist Reviews
Arbtalk Knot Guide
Gallery
Store
Freelancers directory
Everything posted by ucoulddoit
-
Well, that was a much harder job than expected! Not much spare rod, so I tried a fine taper about 12mm long and that was enough for the die to get a bite onto the brass and pull itself in. Used parafin as suggested as lubricant, but still found it quickly jammed if I wasn't careful. Could only manage about 1/8 of a turn, then backed off 2 or 3 complete turns to clear the cutter. Seemed as though the brass cuttings jammed inside the cutter instead of peeling off. For the second thread, I lightly filed the rod all round to reduce the diameter by about 0.1mm and that seemed to help. I'd thought about buying a good quality 10mm die instead of a 'cheap set', but had thought that would be fine for brass. Now regretting that. But that's life! Thanks again for the advice. Andrew

-
Thanks for all the replies. I checked the rod diameter with a vernier gauge this morning and it looks to be spot on 10mm. It’s a new tap and die set from Machine Mart, first time used, but I suppose you get what you pay for! I’ll persevere and post an update in due course. Andrew
-
Making steps for our kitchen using some reclaimed mahogany and struggling to cut the threads on a 10mm brass rod to support the folding top step/platform. Is brass usually more awkward to thread than than steel? Years since I've done this sort of metalworking and only had a brief go at it last night. Have chamfered the end of the rod and maybe need to do it a bit more. Any suggestions? Andrew

-
The desk project is now complete, having taken about 9 months from initial sketches to delivery. This thread is about timber from a large oak burr and as the frame used timber from another oak tree, I wasn’t going to show the finished project. But it’s pretty quiet on the woodcraft forum, so here’s a few pics. Also, some notes about the design of the frame and milling the oak for the frame. Good to have used timber milled 10 to 12 years ago instead of just daydreaming about using it! Very pleased with the final outcome and so is my son. I particularly enjoyed seeing how the design evolved through a process of ‘form follows function’, rather than starting out with a fixed idea about the final appearance or using a standard design. Having said that, I’ve no doubt a search on google would bring up desks with some similarities, so I’m not claiming this is an original or innovative design. But my starting point was a blank sheet of paper and then used what’s in my head and that contributed to the fun of making this project. After making stuff in my spare time for over half a century, I look back and wish I’d been encouraged to be more interested about design earlier. So, happy to pass on these thoughts as others might be interested to hear how the design developed. Quite a long post though…… First pics are the finished desk. Then three sketches showing how the design of the frame evolved. Can’t find my initial hand drawn sketches unfortunately, but it was a lengthy design process and at times it seemed as though the design was taking almost as long to finalise as it took to actually make it! The second sketch, although not a finished design, was along the lines of what I’d decided I wanted the frame to roughly look like with angled legs, rails and drawers plus the overall sizes. I’d deliberately avoided thinking too much about construction details at this stage as I find that can stifle my creativity. I find it’s too easy early on to focus on simplifying the construction of ‘details’ instead of exploring what I can achieve with the overall design, and end up with something a bit different. I find there is almost always a way to solve problems later on, in the context of the overall design, rather than just thinking about the individual details. This sketch was used to create an approximate cutting list so that I could select suitable pieces of air dried oak that needed to be re-sawn into thinner planks, then stored in the workshop for a few months to lower the moisture content to about 10%. Third sketch was developed several months later, just before making the frame. I’d been conscious that the angled legs, rails, plus drawer carcass would complicate the jointing. Then hit on the idea of making the drawer carcass a separate ‘box’, just sitting on top of the front and back rails, and clear of the legs. That was a real breakthrough and obvious with hindsight, but it took a while to realise it was an option. Fortunately there was enough of the re-sawn oak in suitable sizes. My son is 6’ 4” tall, so the overall desk height is 31” to match his adjustable desk at work which is set to a comfortable height. That’s higher than a ‘standard desk’ but even so, with the drawers plus a rail underneath the top, it was going to be pretty tight to be able to get leg room. Hence the shape of the front rail, curved on the underside to get a bit more space. That curve, changed my thoughts about the legs, so their shape was changed to also incorporate curves which then became a theme throughout the design. The top already had a curved front edge plus a curved joint. The wide single rail in the end frames was changed to two narrower rails, placed at levels which ensure the mortices don’t clash with those for the front and back rails, plus the bottom rail has a slight curve too. The front rail and drawer fronts are concave to match the front edge of the top. The offcut from underneath the front rail became the top part of the drawer fronts which were burr oak offcuts from the top. Almost nothing was wasted. The quartersawn oak for the top part of the drawer fronts are also concave shaped, but outwards, creating space underneath to router a groove for a finger pull to open the drawers, avoiding the need for handles. So, from the initial ideas in the second sketch, there is a clear logic to the final design in the third sketch which evolved through resolving problems and construction details. I’d say it’s an engineered design which is quite functional in terms of how the desk will be used. Personally, I think the aesthetics of the final design are far better than the second sketch, but that wasn’t something that drove the design forwards. I didn’t start, just thinking about how to make it look good. Also, the final design was relatively easy to construct with minimal waste as already mentioned. I’m very pleased with the final design, but to be honest, it’s not (quite) perfect to me when I see the finished project! I won’t tell you what I think could be improved and anyway you may have your own thoughts which differ from mine. Maybe I should invest some time in learning 3D computer modelling so that it is easier to visualize a complete design? Anyway, I find that thinking back like that about how a design developed, what wasn’t quite right, what could be improved, helps me when starting on the next and future designs. I daresay some folk can get straight to a final design. I can’t, but fortunately I’ve learnt how to enjoy the process of getting to a final design in a ‘round about way’. Moving onto the oak for the frame, I started with 80mm quartersawn oak slabs which had been air dried outside for about 10 years. The pics below show the log I bought from a tree surgeon a few miles from home. It was about 30” diameter by 7’ long. He had already cut the bark off the top and sides using a chainsaw freehand, and sold the pieces to a florist for a window display. I was limited to about 6’ length to fit in the back of our estate car and the yellow marks were the cut lines I marked on to shorten it and split it into quarters. He cut it freehand into the four smaller pieces so I could transport it home in the car, over two trips. Then I milled it outside, at the side of the road, using my MS171 (14” bar) in an Alaskan small log mill. Some was milled as per the sketch which yielded almost true quartersawn slabs with lovely ray fleck on the surface, some of which was used for the angled legs with plainer planks for the rails, drawer parts, etc. Hope you managed to get to the end of this! Next project with the burr oak will hopefully be later this year and probably a large dining table using the best slabs of the burr oak for both the top and frame. They are large enough for a 6’ x 4’ table top with solid burr over the whole area, so looking forwards to sketching some initial ideas. Andrew


.thumb.jpg.4a4557513c70ba82a6d8c6cae87d9d50.jpg)


.thumb.jpg.caa0338a770863b99449a61a763543c8.jpg)
.thumb.jpg.0fefa7866f481c0045a24725f504b971.jpg)
- 16 replies
-
- 18
-

-
That looks great. But is it a habitable house? I wouldn’t want to make the large investment of self building a whole house without some certification as it would probably be very difficult to sell later on, especially if a potential buyer needed a mortgage. Andrew
-
Brettstaple is a form of construction that uses ungraded timber. Solid timber panels are fabricated using hardwood dowels to hold the timbers together. I’ve no experience of this type of construction though, so can’t give it either thumbs up or down. Andrew
-
Thanks. I’m really pleased how it’s turned out and good to do it with not much more than a router, hand plane and sander, and mainly working outside in the garden. I was set on having a slightly concave front edge, but that was at odds with the convex natural edges. So the initial idea was to add a triangular piece both sides, which led onto the single piece across the front with the curved joint to the main slab behind to keep it’s basic shape. The curved joint further back on the initial design spoilt matching the grain, so that was changed to a traditional straight book match. Took a while to work it all out though, and quite conscious it would be easy to spoil two great slabs. Andrew
-
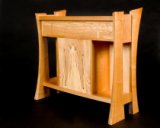
This is the second project using some more of the burr oak planks. It’s a desk for my son and making the top from two largish slabs might be of interest. First picture are the two planks chosen for the top. Nice planks, but I had a shape in mind for the desk top and simply edge joining the two planks wasn’t what I wanted to achieve. The burr is great, but I felt losing some of it would overall be better. Following pics are the trial and error process using paper templates and chalk to find what might work. Took quite a while but found a solution that’s was obvious once found! Then onto initial flattening and thicknessing the planks with a router, further trial fitting to find the best match for the joints and final flattening of the planks once glued together, using a very sharp jack plane and a random orbit sander. I made the edge joints using a router with a kitchen worktop bit and running on a sheet of mdf on top of the burr oak. So, the slightly rough surfaces on the planks at this stage, pre gluing together, weren’t an issue as the router ran smoothly on the mdf which also acted as the guide template for both the straight and curved joints. The curved joint was quite a challenge, but the finished joint is barely visible as shown in the close up pic. Final picture is the top with a coat of oil. Still need to cut a hole for the computer cables and managed to find a bronze ‘desk cable grommet’ for these to match the resin bronze filler used to fill holes in the burrs. Progressing now with the legs, frame and drawers which are way too complicated and just as well it’s a present, not a piece to sell. Andrew


- 16 replies
-
- 17
-
-
Not relevant to the original question, but regarding green/wet versus dry timber, pretty sure there should be less in service movement in timbers that absorb moisture compared to wetter wood that has dried down to the same relative humidity. The equilibrium moisture content of wood which has been kiln dried to say 12%, then left outside to acclimatise to the ambient relative humidity, will be lower than wet wood left outside to air dry and acclimatise down to the same ambient relative humidity. No matter how long the two pieces are left outside. Probably not relevant for a ‘rustic gate’ but could be for an external door and more so in furniture making. I aim to dry timbers for furniture making to a moisture content which corresponds to less than the expected ambient indoor relative humidity. Then store the wood for a while to acclimatise to a slightly higher relative humidity which in theory makes the wood a bit more ‘stable’ and the subsequent furniture better able to tolerate variation of relative humidity indoors at different times of the year. Andrew
-
Pretty sure PEG was used in the preservation of Henry VIII’s warship Mary Rose, which was raised from the seabed about 40 years ago. Round about the time PEG was being promoted for woodturning. Think the remains of the ship are in a visitor centre in Portsmouth now? Must go sometime. Andrew
-
Instead of rounds cut straight across, you could try cutting at an angle to make oval shapes. But you would need to experiment with wood species, log diameter, oval thickness, etc, to find what works! A book I have suggests an angle of 75 degrees, that’s just 15 degrees from straight across which might be fine for thinnish ovals. I’ve done it with elm from a log about 400 dia and 60 to 70 thick ovals. It was years ago and can’t remember the angle but it was probably about 45 degrees. There was a fair bit of distortion, but they didn’t split. I guess it works because the outermost wood fibres are not a ring right around the oval shape as they are with a circular disc. Andrew
-
Best process to finish and treat elm timber
ucoulddoit replied to Steve Bullman's topic in Woodcraft Forum
Took a while to find some old pictures, but in the meantime, I googled wipe on polyurethane and found there’s lots to look at. I clicked on the following, and it seems a good starting point. First two pictures are a box of children’s building blocks, made in 2007 using ‘weathered’ sycamore, that’s 14 / 15 years ago, surprising how time flies. It was finished with the 50/50 poly. First picture was taken when new. The second, of the top, was taken today and shows how the light sycamore has darkened, and interestingly, looks like the ‘weathered’ brown sections have lightened. So overall, it’s a more uniform colour. The box is kept at a southeast facing window, so gets lots of sunlight. But the finish is still intact. The bricks which have been in the box since new, with the lid on, are still almost white. Last two pictures are a yew bed made 10 / 11 years ago and finished with danish oil. Comparing the pics when new and taken today shows how much it has darkened. I was quite surprised by the magnitude of the change, maybe poor lighting contributed to it in the picture? Anyway, still a nice piece of furniture. Andrew


-
Not done much milling for a few years, and only ever as a hobby for my own use. So hopefully the pro’s won’t roll their eyes too much…. This wasn’t a money making venture. I was offered some of this beech butt earlier this year by my brother in law who’d had it delivered to his house already cut into three sections. He needed help cutting it up for firewood. He mentioned there was some rot, so I immediately thought, spalted beech, maybe mill it? Today’s (half day) milling was the top section. The bottom 8 feet was so rotten it was almost possible to crawl inside the hollow trunk! We’d cut it into rings for firewood a few weeks ago. But the top section, about 5 ½ feet long showed more promise. The rot was coming down from the top, not up from below. My mill is the 24” Alaskan, a bit small for milling a 3 foot diameter butt! However, the odd shape, meant that with minimal freehand trimming, the mill fitted fine on the top part. The bottom half was then freehand sawn down the middle, split apart, and milling continued down the right hand side below what had already been completed, to create matched slabs 3 inches and 2 ½ inches thick, about 20 inches wide. I suspect they might distort a bit and perhaps split as it’s at the transition between the 1st and 2nd lengths with grain running in different directions, but pretty sure there will be some worth keeping and at those thicknesses, there should be plenty to plane off to flatten them. Some nice looking bookmatched slabs, even allowing for the rot at the top end that will need to be cut off. Decided to let my nephew keep most of the slabs but I’ve kept a 20 inch wide by 4 ½ inch slab which might become large bowl blanks one day. And there was lots of firewood. Was good to be out with the mill today. Reminded me how much fun it is opening up a lump of wood, wondering what will be inside, the delight when it’s something special, then dreaming about what could be made with it……. Andrew


-
Best process to finish and treat elm timber
ucoulddoit replied to Steve Bullman's topic in Woodcraft Forum
I've not used it on yew but can't see why it shouldn't work. I'll post some pics in a day or two when I've time to take them. It was a tip I got from a 'well known' Yorkshire furniture maker I met at the Harrogate woodworking show years ago and was his method of finishing dining tables. Andrew -
Best process to finish and treat elm timber
ucoulddoit replied to Steve Bullman's topic in Woodcraft Forum
As there hasn’t been any response yet, I’ll suggest a hardwearing finish like polyurethane. An oil finish on yew looks good. So instead of using a brush, you could make a 50/50 mix of polyurethane and turps then apply it with a rag like an oil finish, i.e. wipe it on, leave for a few minutes to soak in, then wipe off what’s left on the surface. I’d start with say three coats and see how it looks. Andrew -
I used a MS391 for milling with a 20 inch bar in the small log mill which was fine but a bit slow and just for a few smallish logs, max size about 18 inches diameter. As others have said, milling can become addictive and my kit was quickly on the small side for what I then wanted to do. I bought parts from Rob D to convert the small log mill into an ‘Alaskan mill’ and changed to a 25 inch bar following advice from Alec, to get about 20inches width of cut. Stihl recommend a max bar length of 20 inches, but I was happy to try a longer bar as set up in the mill it can’t cut more than 20 inches. That worked fine for a while and was more accurate than using the small log mill at the limit of it’s capacity. Subsequently upgraded to an MS661 which is just so much better. But still happy to have progressed gradually to this point instead of investing a lot at the start when I really wasn’t sure if I’d have much milling to do. Andrew
-
Best process to finish and treat elm timber
ucoulddoit replied to Steve Bullman's topic in Woodcraft Forum
Would be awkward to use plain resin as it would need a mould set up around the edge. You could thicken the resin to make a stiff paste but that would be pretty expensive using bronze as the filler. Alternatively, you could use talc which is really inexpensive to make a grey coloured filler and maybe just finish the exposed edges with a different coloured filler? But, I doubt it would stick to the wood sufficiently to take screws for the legs, so the screws would need to be long enough to get a grip in the wood, if it’s thick enough. I think it might be simpler to cut a recess and glue in a block of wood, then shape the edges. Or maybe flatten the surface and glue on a wedge shaped piece of wood. Andrew -
Best process to finish and treat elm timber
ucoulddoit replied to Steve Bullman's topic in Woodcraft Forum
I had another look at the Axminster site and they still sell a 100mm nylon wire brush for a drill, but much more expensive than the 75mm one from Toolstation. I can’t remember when I bought my B & D foam sander, but probably a few decades ago as well……. Andrew -
Best process to finish and treat elm timber
ucoulddoit replied to Steve Bullman's topic in Woodcraft Forum
That’s a shame as it’s a good attachment that has lasted well. Bought mine ages ago, so apologies for the dead end on this. Maybe someone else can let us know what they use. Anyone want to suggest something? I found it good because the soft foam was good for freehand shaping whereas other sanding drums I’ve looked at have a rubber core and are a bit too solid. Andrew -
Best process to finish and treat elm timber
ucoulddoit replied to Steve Bullman's topic in Woodcraft Forum
That's stretching my IT skills a bit, but here goes. Also struggled to find them on the Axminster site, but Toolstation have the nylon wire brush. Abracs Nylon Filament Wheel Brush 75mm WWW.TOOLSTATION.COM Non spark filament circular brush impregnated with abrasive grain. Ideal for deburring, surface treatment, stock removal... It's a Black and Decker sanding drum I use. Amazon site says it's unavailable, but this link will let you see what to search for. https://www.amazon.co.uk/BLACK-DECKER-DX32365-Cushion-Sander/dp/B0001IWH52 Andrew -
Best process to finish and treat elm timber
ucoulddoit replied to Steve Bullman's topic in Woodcraft Forum
That resin would be fine, but pretty sure there will be cheaper options. I buy the resin and bronze from Alscot in Glasgow and from memory I use their polyester casting resin rather than epoxy. Andrew -
Best process to finish and treat elm timber
ucoulddoit replied to Steve Bullman's topic in Woodcraft Forum
That’s the stuff. Doesn’t look very nice when mixed with the resin, but polishes up well. Looks nice elm and should look really good when fine sanded, filled and oiled. Andrew -
Best process to finish and treat elm timber
ucoulddoit replied to Steve Bullman's topic in Woodcraft Forum
I'd flatten and smooth the surface to 120 grit paper before filling the holes. Lots of options for filling the holes. I like using clear cast polyester resin with bronze powder which polishes to a shiny bronze/gold colour. Put a generous amount of hardener into the resin before mixing, then add the powder until it's a really thick consistency, a bit like car body filler. Once cured, continue sanding using steadily finer grits up to say 400. Others use coloured resin, or glue mixed with sawdust from the plank being filled. Some folk wouldn't fill them at all! Just a matter of personal opinion as to what's right. I knew a guy who finished all his stuff using a steel wire brush to roughen the surfaces whereas most people would expect a sanded finish. Who's to say what's right? How dry is the plank? If it drys and shrinks when brought into the house the resin might loosen, but again, that matters to some people, but not others. What to do with the edge of a plank? No right answer again, but the console table plank has a nice shape in my opinion, so I'd probably just use the nylon wire brush in a drill to remove any loose material. Then use the foam sanding drum to free hand shape the edge, rounding the top and bottom edges slightly and also removing any sharp or protruding bits, but I'd retain most of the knobbly bits. But, if I was making this for my sister who doesn't like natural edges, I'd cut them off and form a curved edge with rounded corners on top and bottom using a router. Andrew -
Best process to finish and treat elm timber
ucoulddoit replied to Steve Bullman's topic in Woodcraft Forum
If the planks have a natural edge which you want to retain, I've found a nylon wire brush and a soft foam sanding drum, both of which can be used in a hand held electric drill, works well for finishing an uneven surface. On a really rough/uneven edge such as a burr, the nylon wire brush can get right into the crevices and leaves a burnished finish which doesn't need sanding. Both are stocked by Axminster Tools and are in the photo below. Would be good to see some before and after pictures of the planks. Andrew
-
Managed to finish this in time for Christmas. The design is at odds with the intuition built up over a working life as a structural engineer so it's been a bit of an experiment and challenge for me, but quite happy with the final result. Would certainly look at the Nakashima designs again for inspiration whereas before I wasn't sure about using his ideas. Since starting the thread I googled minguren 2 and found auction results for his original tables at about £60k!!!! Good to have been able to make this using slabs of timber, worked almost entirely using hand held power tools. I only used the planer / thicknesser for the two small rails which could easily have been made with hand tools. Andrew


- 16 replies
-
- 12
-


.jpg.8c3379f821dc564fe6155561e1f29118.jpg)


.jpg.2fb0855fde13ed9f81801e195bcadf71.jpg)
.jpg.3eb515785feab10dc9a48e8b61bae370.jpg)


