

bmp01
-
Posts
822 -
Joined
-
Last visited
Content Type
Profiles
Forums
Classifieds
Tip Site Directory
Blogs
Articles
News
Arborist Reviews
Arbtalk Knot Guide
Gallery
Store
Calendar
Freelancers directory
Posts posted by bmp01
-
-
So is this the MS230, that wouldn't run. ..the one where carb had been visited by "Bodger's Inc" in a former life?
If i were you I'd do some searching on how to tune a carb before you do much more with it, there is a real chance of damage if its running lean (and therefore hot). There are some good You Tube videos on the subject, you need the soundtrack as tuning is done by ear (or with a tacho if you have access to one).
bmp01
-
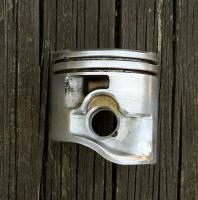
Yes, man. And that was my precise issue. They protrude (along with the rest of that crappy ring around the periphery of where the jolly old squish should be) by about ~0.15mm. Which scuppered my otherwise tasty measurement of 0.55mm I got for normal area (away from that stupid moulding artifact). Growl!
So get a bit of sandpaper stuck on the top of the old piston, spin the piston with a bit of wood. 5 mins and those protruding lumps will be gone. Use the existing squish band to guide you in your progress. You're not afraid to get in there and clean up the combustion chamber, this isnt much different. In both cases very careful cleaning required. ...
bmp01
-
CNC lathe.... surely?
bmp01
-
Dremelling it would be nigh on impossible I think to get it right. A pro tuner would lathe it away I guess.
I'm not that perfectionist....and of course after losing the stock base gasket and then shimming out, with a custom paper/tin-can gasket, we probably take me to about 18 thou under the molding flaws and 26 in the regular part of the band.
But yeah, you're right bmp01, 1.0mm for a STIHL oem cyl is rubbish, and I've expected them to machine away the molding bosses.......

I'm glad I cleaned the dome first now, else I'd have never known.
Yeah, Dremel isnt a precision tool, i was assuming you'd blend to surrounding to create clearance not an exact squish number.
Have a look at Mastermind's squish machining technique on Arboristsite. He uses a single profiled cutter mounted on a sustitute piston that closely matches the bore size. .... hand operation IIRC. Or for the material you need to remove - sandpaper mounted on the end face of a piston / sustitute piston (end face or piston not flat).
By the way, are the 4 lumps lower than the squish (that really would be carp) or is the piston domed?
bmp01
-
Seems a bit tight. I guess you can get away with a tighter clearance on a 2t where each time the piston comes up it is under compression but on a 4 stroke with the piston flying up on the exhaust stroke all the bearings and conrod will be under tension as they slow the piston to tdc.
Agree on all counts. MS200 has a nice little connecting rod - not much stretch in the two bearing bores, unlike say a 1 1/2" or 2" (38 to 50mm) bigend ...
bmp01
-
And then it would cost more . Another CNC machining opp and tooling to hold it .
Tiny bit more. But can be done at the same time as the existing squish and cylinder bore machining. No reason why the CNC cutter path has to machine the squish flat either.
bmp01
-
I thought ( wrongly perhaps ) that the squish band was just the area around the periphery ?
It should be, it's a machined band, cut at the same time as the boring opertion.
Disappointing to hear the combustion chamber of MattG's 200T has lumps in it, presumably in board of the machined squish. Time for Dremel work?
Equally disappointing the squish is in the 1.0 mm range, poor effort.
bmp01
-
Is the 200T subject to the same sort of tolerances as the rest of the range or do Stihl make a special effort on these?
How about shooting for 0.45mm (18 thou) as a starting point for your mods

bmp01
-
If you take a std Stihl carb and disable the accelerator pump, what's the difference between that and a Stihl carb that didn't have an accel pump in the first place? Was it anything obvious?
I can imagine more drillings into the carb port (close to the butterfly) fed from the low speed circuit. The jet for the low speed circuit may be a different size too but that's so small i don't know how you'd tell.
bmp01
-
-
Or if you have enough thread you could loctite a grub screw above the correct screw. That assumes its proper engineering thread in metal, not some self cut thread rubbish.
bmp01
-
Epoxy, JB Weld. There are fuel proof versions which should be ok with oil. I presume its just to seal the leak and there's no structural implication.
Somewhat awkward to find in UK, i got some from Opie Oils when i was buying oil for the car.
If you can access the holes through the filler cap you might even be able to do the job with out disassembly, I'm thinking several flushes with fuel and then degreaser like brake cleaner.... unless you want to take it apart again...
bmp01
-
Good result and I'm sure we all learnt something.
Yeah, we can add a second line to the expression...
"If it works, don't **** with it"
Such as,
"But if in doubt, rip it apart"
Works for me


bmp01
-
Another vote for pull cord rope stuffed in the cylinder - i like the idea of distributing the load with something a bit flexible, much like what the running piston sees with combustion pressure. A solid piston stop is the direct opposite.
bmp01
-
Result ! Thanks for the update.
Soooo, why did tightening the bar nuts cause the chain to not run smooth? Do you think it really was an alignment issue between the sprocket and the bar - because the sprocket had restricted sideways movement?
Or simply the wire getting into the rollers of the needle bearing under some conditions?
bmp01
-
Thanks Stubby.
So I need empty the oil talk and look for the square bits then?
Inside the tank I can just see the ends of the studs, as in round, end of a thread.
But actually i don't think the studs can put any sideways defection in the bar / cover. The shoulder on the stud would have to be unwound about 5 mm before it stops the cover going on. You can see in my pictures above there is a recess in the cover, for the stud shoulder to pass into if indeed it were far enough out to come through the bar. Your picture is showing the studs are either screwed right in or almost all the way in.
bmp01
-
Just been out to take the cover of my MS260. Got another idea for you
 what about the nylon chain rubbing strips pressing on the chain? Have a look at the attached pictures. The nylon strips are pressed into the cover, but they are pretty loose. So easy to remove and easy for wood chips get behind them and move then out against the chain. ... I think that would cause a little bit of drag on the chain.
 bmp01


-
Thanks eldon. Are you able to tell from the below image?[ATTACH]219169[/ATTACH]
It's not obviously out of line but we're only looking for a fraction of a mm, can't see that in a picture.
Put both bar nuts on the back stud, lock the nuts together then try to tighten the stud into the housing. If it moves you know it was loose. You'll have to remove it and loctite it in. Repeat on the front stud. ...
bmp01
-
Sounds like a diagnosis. Have to wait for new sprocket to make it conclusive.
The bolting it up thing is a puzzle though. It sounds like the wear pattern is not in alignment with the chain but that would imply a change in the position of the bar or position of the sprocket. Even a spur sprocket can move a little so youd have to be out by quite a bit. And youve changed no components?
Couple of other things to try...
-Assemble the saw with the bar but without the chain, tighten down the side cover. Does the clutch still rotate freely? I'm sure it will but worth the time it takes to check.
-Back to normal assembly - If loose chain tension makes no improvement (it should have), maybe its nothing to do with sprocket. Are you pinching the chain drive links between the bar rails when the cover goes on? I know its across two bar and chain assys but are they all std components? New or old? Any damage to bar rails or where the chain enters the bar? Is the the clutch cover flat? Whats the wear pattern like on the clamping faces... that sort of thing.
bmp01
-
Sounds like a rim sprocket would be a better solution anyway so will speak to local dealer about it.
Yes. Just so long as you don't get one of the ones pileswasp and eldon are on about


-
I changed my 260 to a rim sprocket from nearly new as there were a few issues with your type sprocket being manufactured off centre and damaging the needle bearing.
What we're the symptoms with this 'off centre sprocket' - a description might help the OP to determine if it's the same issue. I can imagine a frequent tight - loose - tight - loose etc type feeling as the chain is pulled round....
bmp01
-
I thought that but he says it does it on a 15" and an 18" so 2 chains and 2 bars makes me think its maybe the spur .
Doh
 , I missed that. Thanks for highlighting it.
 2 excessively tight spot chains then
Actually, lets see what the result of loosening the chain is.
Also, If the chain tightens every 7 drive links (one rev of the sprocket) then sprocket is at fault.
bmp01
-
Hi mate, I've backed it off as far as I'm comfortable with and get the same result. That is to the point that when I pull the chain away from the bottom of the bar I can just see the bottom of a drive link.
Sent from my SM-G930F using Arbtalk mobile app
Back off a bit more, you don't need to run it like that but let's see what happens, you might just have a chain with excessive tight spot ?
On another subject i had a cheap pole saw that was going tight and clicking, turned out 3 or 4 of the drive links were burred over at the edges. Was an Oregon chain, 90 % good links, and almost new. Needle file, burrs removed and all good....well, as good as it was going to be.
bmp01
-
I guess you've tried backing off the chain tension a fraction and got same result?
bmp01


 what about the nylon chain rubbing strips pressing on the chain? Have a look at the attached pictures. The nylon strips are pressed into the cover, but they are pretty loose. So easy to remove and easy for wood chips get behind them and move then out against the chain. ... I think that would cause a little bit of drag on the chain.


Hot, hot, hot!
in Chainsaws
Posted
You not planning a life in politics then ???