

bmp01
-
Posts
822 -
Joined
-
Last visited
Content Type
Profiles
Forums
Classifieds
Tip Site Directory
Blogs
Articles
News
Arborist Reviews
Arbtalk Knot Guide
Gallery
Store
Calendar
Freelancers directory
Posts posted by bmp01
-
-
[emoji23] [emoji23] it's a £200 saw and you want to put fuel at £3+ a litre in it to save potentially degrading a fuel line (which I don't believe in anyway as had saws last years on regular red stihl oil mix with no fuel line problems) that would cost under a tenner to replace!!
Sent from my SM-G930F using Arbtalk mobile app
neiln wants a 'turn key' saw, that's stored for long periods between minimal amounts of use. Classic carb killer. I'd hope long life fuel would protect more than just fuel hoses. He's not going to be using vast quantities of the stuff so yes it's expensive per litre but in the overall scheme of things it might save him some aggravation and a few repair bills. Just my thoughts.
-
I was going to suggest Aspen also but you were in first !
 .
.A bit surprised it hasn't been mentioned earlier .... too obvious maybe ???
-
Your requirement for a saw - with such little use per year - will be viewed as a little "off track" for most on here but i bet fairly typical for the home owner.
Stating the obvious, you're not going to wear any saw out in your proposed 10 years of use. Your most obvious problem is 'lack of use' and the implication on the fuel system. It's worth researching long life fuels eg Aspen if you want any saw to start after a year of non use. Even then you can imagine fuel evaporation leaving deposits in carb if you do this repeatedly. I suspect an older saw not running to the tight emission considerations of today will be more tolerant in this respect.
My second concern would be degredation of low quality plastics and hoses etc - it has little to do with the design origin of the saw and more about the quality of the materials. The evidence available for you to see is in the type of 20 - 30 year old saws out there. I can't imagine too many of the current day saws lasting that long.
Not sure that adds much to your quest.
bmp01
-
Thanks a lot, I have to admit I am new to all of this, and still learning.
I did not use any US but just carb cleaning spray. I did not take any screws out because I am not confident yet.
Will give it another clean, and will order another carb service kit, may be more expensive than the one I used.
Thanks everybody for helping me out.
Carb cleaning spray is a good start. But as others say you need to remove screws, spray through there too. You basically want to make sure the spray is coming of all the corresponding passageways and jets. The slow speed jets in the carb are typically the ones that get blocked (the ones around the butterfly throttle).
Regarding the screw positions - just record where the screws are to start with, then you can always put them back where you found them. To do this, get a good look at the screwhead or the screw driver. Turn the screw in (clockwise) until it stops, counting number and fraction of turns. Repeat for other screw. Now you can return them back to where they were after taking them out for cleaning and after having a play with carb tuning.
Take the time to learn to tune a carb, it's not difficult.
bmp01
-
Sure it is, but no promises it'll help...
Loosen the 2 coil screws, the holes in the coil are slotted, so now the coil can be moved closer / further from the flywheel. Gap should be set to approx 10 thou at the magnet, that will be where the coil gets sucked onto the flywheel. A business card is the typical tool of choice....
probably make no difference but worth trying for the effort it takes.
-
Presume you've checked the coil air gap. ...
-
Coils on these 171 181 and 211 are all the same and they do suffer from failure more than any other series of saw I know of. MS180 coil wont fit.
Anything to do with the PITA smaller spark plug do you think? Resistance measures different (from new) compared to the old faithful plugs, can't remember which way, just different.
bmp01
-
MS180 coil part no. 1130 400 1302
MS181 coil part no. 1139 400 1307
according to L and S engineering
That will explain why the freebie box of bits MS171 came to me with 2 coils in the box then.
bmp01
-
Hi Andrew,
Thanks for detailed reply. As much I'd like new bits for the PS410 i can't cope with the thought of doubling what i spent on the thing in the first place

I'll fix up the filter and look out for a secondhand cover i think.
Thanks again,
bmp01
-
Hello there,
I'm after a couple of parts for a PS410 I picked up recently. Am i in the right place, can you help ? Price, availability and overall p&p?
Air filter 028 173 041 or 141
Cover assy over air filter, 028 118 320
Cover fasteners
M5 x 60 908 205 605
M5 x 16 908 005 165
Thanks for reading.
bmp01
-
If the breather is blocked it will oil for a while before a vacuum is formed in the tank - seen it before and also seen the breather leak oil before now.
And if you take the oil cap off, release the vacuum it'll be fine again. ...for a while. Do both saws behave like that?
-
2 newish saws suffering same problem.
Brought back to being healthy after a thorough clean.
Sounds like "user induced problem" to me

Could be the breather but that's a big coincidence, or is the breather also getting cleaned as part of the general clean up?
Are you finding much junk in the oil tank when you clean them? Sounds like you might be filling with clean oil and when out in the field the saws get something different, from an old dirty oil can maybe. ...
bmp01
-
Hello Mr,
The 136 landed this afternoon. As described, that oil tank is proper fubarred. But i don't want that bit so quite happy at end. Thank you.

bmp1
-
Hi all. I've got an oil leak from the bottom of my MS260 (2002 model) seems to be coming from underneath, between the oil tank and the clutch plate.
I'm thinking that its probably a perished oil supply pipe, either the one between the oil tank and the oil pump or (less likely) between the oil pump and the oiler. Given that the saw is now 15 years old a perished pipe seems pretty feasible.
I'd like to replace both oil pipes but can only seem to find non-genuine parts and would prefer to use genuine. Does anyone know where I can get one or how I can find the part numbers? I can't find any exploded diagrams etc which tell me the part numbers.
Any help would be much appreciated.
Thanks
Toby
Huh ! Mine too. Thought it was the filler cap but I'll check this ....
bmp01
-
I think I'll be good

I'm not trick enough to dare to touch the transfers, and the gasket delete will have increase inlet duration already.
10-4 on what you said re. the CR, however at operating revs. the actual cranking pressure will be different.
I've done this stuff before like 25 years old on MX bikes, widening ports (in my humble opinion) is more contentious, since you can run into ring bulge issues. Experienced this myself, when I made my Yammy DT175's exh too wide. F**king blistering performance, but destroyed piston and rings every 400 miles!!!

I think it will be good too. Update when it's done please.
DT's, that brings back some memories. I had a secondhand125 air cooled that came with an aftermarket exhaust. On / off power band, noise, blue smoke, piston slap - come to mind. Happy days.
There a rule about exhaust port width vs cylinder diameter. I wonder whIch side of the line your DT was

bmp01
-
Well, the next job, is that given that I've lowered the cyl by 0.5mm by the gasket delete....the next thing is to raise the exhaust port roof by the corresponding value - I'm not after higher revs - just perfecting the specification of things as much as I can. And hopefully maximising the torque output.
That's a whole big can of worms you're about to open. ...
By the same logic you'd need to change inlet and transfers too, except with the inlet that would be adding material. And in raising the exhaust you are effectively undoing the compression ratio increase.
I think if you are contemplating that level of change, rather than blindly following the manufacturers spec you would be better to aim for a known tuning spec, which will be driven by opening and closing timing (angle in crankshaft degrees). Folded into that you need to look at port and passageway areas.......
My going in point (with out research) would be to leave timing as it falls with the lowered cylinder, 0.5 mm isn't going to equate to very many degrees. Go wider on the exhaust port would be the next consideration. Exhaust is pretty torturous on these though.
Also, consider modifying piston with chamfer to change timing - gives option of a 'u' turn as you can subsequently put std piston in.
bmp01
-
Ok, let me explain it again. .... don't use the hammer to flatten those lumps. Get-it?
Well, it looks shiny. Interested to see how it goes now.
Regarding the starting thing, it is worth labouring the point as it's a safety thing.
Its not the force needed to start the thing - I'm sure you will cope with that.
It IS about how much the saw reacts to the the pull cord force. In this respect a lighter saw and especially a top handle one is worse than a heavy one, we all know that. But adding in the higher compression on a small saw really makes things surprisingly jumpy.
bmp01
-
Blimey:confused1:
It's Shed tuning, Spud
 Not commercially viable granted, but fun for those that enjoy that sort of thing.
But in fairness if you can run the piston up close to the squish band it will reward you with a little bit of extra oomph but more importantly an all round nicer engine. The turbulence you can get from tight squish is underrated IMHO, a more dependable / reliable combustion process due to the extra gas movement, so even if the mixture isn't spot on (it never is, through the whole rev range) - combustion will be better. So hopefully a more crisp engine response. Just makes the saw nicer to use. Innit....
Starting it might need a bit more care though, especially a top handle saw like this one - you listening MattG?
bmp01
-
Mr Pierce, ye PM need a wee clear out too.... apparently.
Anyhow, payment sent.
bmp01
-
37's all yours
12quid postage looks like, not sure what bmp01 is doing about 136, will give him a wee while to decide. But flatyre is in before you on 136 anyways.
Sent from my C6603 using Arbtalk mobile app
No change, I'd still like the 136 please. I'll repair yours with bits from mine or repair mine with bits from yours. I have no desire to hord parts so I'll gladly pass on what i don't need after rebuild.
bmp01
-


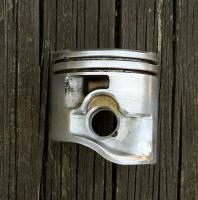
Piston looks well, but oil tank not great, heard you can fix just about anything with jb superweld though
Sent from my C6603 using Arbtalk mobile app
That piston looks good. The one i have was grey to black when viewed from exhaust. I recon it thought it was a "double acting piston" with combuston above and below
 The ring came out in three bits, broken either side of the locating pin. Don't think JB Weld was gonna fix that.
 Does yours feel like it has reasonable compression?
bmp01
-
Also appear to have husky 136 with a melted hole in oil tank, looks ok apart from that.
Sent from my C6603 using Arbtalk mobile app
ooooh, please, if it has a good piston i could make use of that. The one i have in bits has a broken ring, piston written off blar, blar.
PM inbound
Thanks
bmp01
-
That's a good idea. Any thoughts for holding the paper down though? I'm thinking superglue, since I'll probably want to start coarse and work down finer.
Do appreciate that those things you describe as "lumps" merely look that way when viewed on a screen, they actually protrude down no more than that thin ring, the very very outermost annulus - of about 2mm which you should be able to just make out by viewing my piccy. They are merely D-shaped bosses on the existing casting process artefact (for want of better terminology). The entirety of those things you refer to as lumps and that very very outermost ring on the dome, all do protrude down by about 0.15mm into the cylinder, repeating myself, into the available squish clearance space.
Sorry for waffle! But yeah, the paper idea is a good idea - and I'll keep you posted.
Matt
Got any double sided tape? You want the stuff that is just a bit thicker than normal sellotape. I've got some made by 3M and some used for carpet laying, both work. When you need to remove it, use heat.
The key here is a uniform thickness of what ever you use to hold the paper.
Yeah, i understood how little you need to remove. I don't think you even need to go very coarse (200 grit?) but cleaning the paper and cylinder regularly to stop it "plugging" will help.
And of course none of this is worth it if you make a mess of the cylinder bore so keep the bore and piston OD clean. And keep the paper away from the edge of the piston, say 1mm minimum in from the edge.
Just my 2 pence worth....
bmp01
-
Running weak causes more heat to be rejected into the cylinder, it doesn't affect the temperature of the exhaust gas which is maximised at full chat with over 500C at stoichiometric fuel:air ratio.
Emmm....not sure about that.
On a 4 stroke (what i know best) running lean definitely causes ext temp to go skyward. As you go lean, combustion slows down. Slow combustion means you get less energy converted into mechanical energy - imagine the extreme case where the bulk of combustion is taking place as the piston is way past tdc and travelling down the cylinder, you just dont get the cylinder pressure at the right time to do any good. And if you don't remove the energy from the gases they stay hot - so higher exhaust temps. Pistons and exhaust valves also get toasted.
It's got to be the same with a two stroke. Plus, and maybe more importantly the higher engine speed you get with a lean engine means 1) more combustion cycles so even if every thing else were equal that's more heat to get rid of and 2) combustion takes a finite time so at some point the engine is reving too fast for the engine to be efficient (just like the running lean logic above)... and that's more heat out the exhaust.
Conversely a bit of extra fuel - running rich - the extra mass of the fuel absorbs some of the combustion heat causing cooler combustion and a cooler engine.
I know which I'd rather have.
bmp01
 .
.


 Not commercially viable granted, but fun for those that enjoy that sort of thing.
 The ring came out in three bits, broken either side of the locating pin. Don't think JB Weld was gonna fix that.

Mccolloch CS50S experiences?
in Chainsaws
Posted
I don't know the answer to your questions. I think the third post probably gave the most applicable answer
I am a little confused though, because you sound like you are now prepared to do some work to keep your proposed saw alive and kicking, so why not go for a branded secondhand saw with decent parts backup ? You can get a very nice saw for 200 and you are clearly up for a bit of homework .