


cjdg
-
Posts
56 -
Joined
-
Last visited
cjdg's Achievements
")
Enthusiast (6/14)
-
 Rare
Rare
-

-

-

-

Recent Badges
-
Another Vanguard Briggs and Stratton 14 hp Diagnosis wanted by a Muppet (me)
cjdg replied to cjdg's topic in Maintenance help
-
Another Vanguard Briggs and Stratton 14 hp Diagnosis wanted by a Muppet (me)
cjdg replied to cjdg's topic in Maintenance help
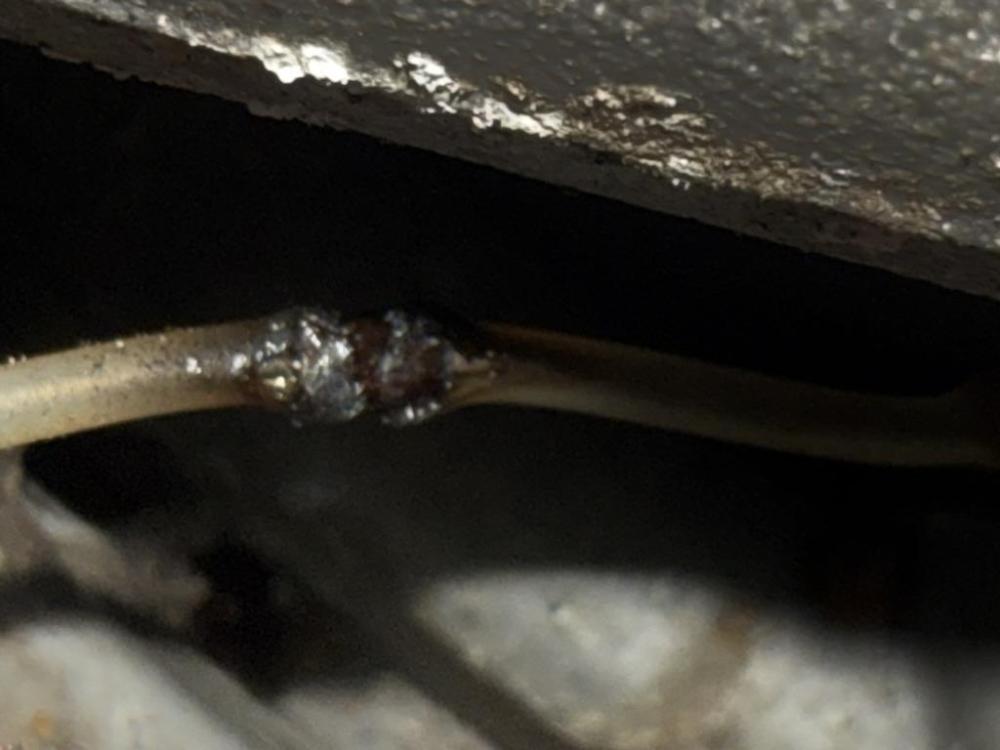
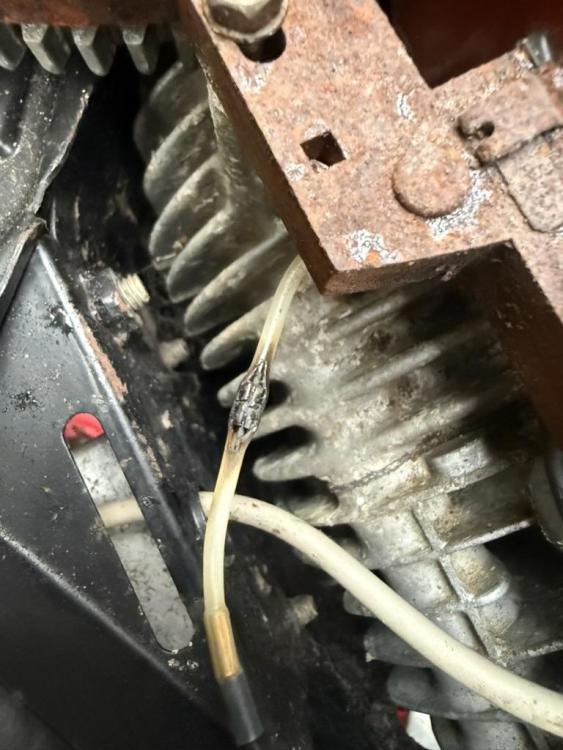
I have now identified the problem. It is the two resistors on the lead wires from the coil which have burned out. So I need Either two second hand coil and wires and just swap them over OR - subject to better knowledge on this forum - I cut the wires with the thermal insulation the coil side of the resistor Find out what the value of the resistor is and rig up two new wires and reisistors connecting with clamps (possibly supplemented by solder first??) and try it out. Thoughts? Any one out there breaking a Countax and can sell the coils or if new at a sensible price? Chris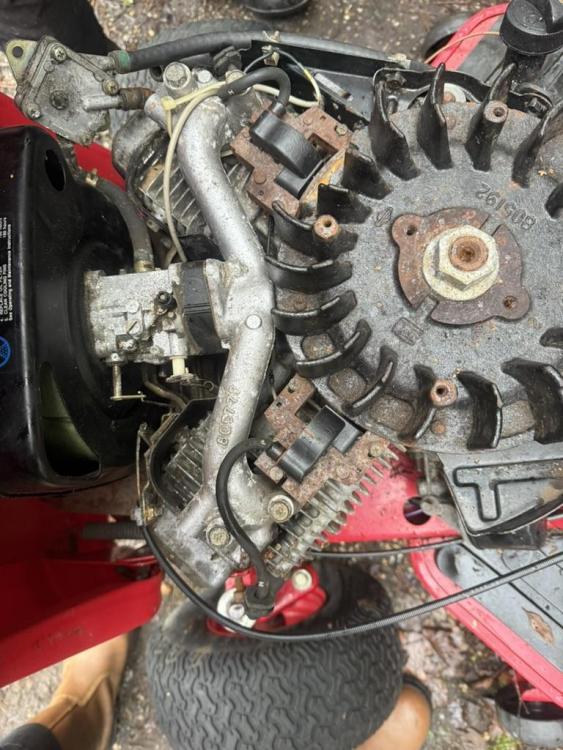
-
Another Vanguard Briggs and Stratton 14 hp Diagnosis wanted by a Muppet (me)
cjdg replied to cjdg's topic in Maintenance help
Really helpful Thanks guys. Makes sense. If weather is fine I will start to disassemble before going to Christmas lunch hosted for a change by offspring! Results to follow -
Another Vanguard Briggs and Stratton 14 hp Diagnosis wanted by a Muppet (me)
cjdg replied to cjdg's topic in Maintenance help
Thanks Steve, Its not a fuse as that would merely melt. What I saw was wreaths of smoke of something burning not melting. Vet Mem The other half would not know one end of a multimeter from the other, let alone buy me one. She is more into socks and underpants! I have three and a reasonable amateur understanding of how to use them. Can't see how that would help as when I eventually get to take it to bits I expect to find some charred electrical component Was hoping that the excellent forum would have an idea of what was likely to be burned out by 12 v shoved in the wrong spur of the key switch It has to be an electrical component or wire and affecting the starting process. My guess would be some thing that is associated with the spark generation.- 13 replies
-
- 1
-

-
- briggs and stratton
- smoke
- (and 1 more)
-
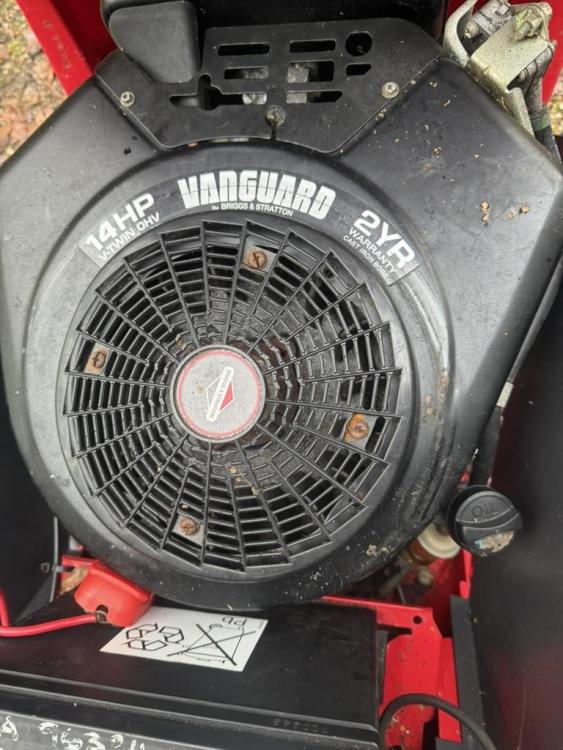
The background is that I have a Countrax ride on mower and lost the key. Improvised with a screw driver in desperation and finally got round to buying a new key holder. The new key holder was differently wired. To cut a long story short I managed to put the wrong wire on the wrong terminal with the result that I got smoke coming out of the top of the engine where the starter motor goes round. See photo. The smoke lasted for about at most 10 seconds probably less when the batter was quickly disconnected. Tried to start it again (more in hope than expectation) and not surprisingly it is dead as a dodo. Now I am an old motorcycle guy and am not familiar with a more modern engine that probably has PCBs and my suspicion is that I have blown something serious... but what? is it the insulation on a copper coil of some sort? (I think not) so what caused the smoke to stop the engine firing ? Where will I find a "Haines" type manual to work out how to take the cowling etc off and get to the working parts of the engine? Yrs aye. Chris George
-
What is the longest bar that 550 XP "sensibly" can use? I have 16” and 18” bars for my 3No XP550s already and wondered if I could get away with a longer one
-
Just had the chains referred to in a previous post repaired by a garden machinery specialist. the obvious to bent links have been fixed but the chap could not find the other defective ones despite my fixing tape on the links that were sticking in the bar round the sprocket Paid for them to be professionally sharpened Went back to put in the bar (now cleaned as advised on this forum) and Lo and Behold! still sticking. Aaaargh Took advice from a pro tree surgeon locally and he said when that happens to him he simply puts the chain in the saw and runs it hard to get it to fix itself ! There is a certain logic in this as the link has no VISIBLE bend or dink It may be that there is a machine that can measure this but for sure the operator will have to have good glasses! Any comments on what to do?
-
I must have been a muppet on dealing with a particularly large 5 stemmed sycamore and bent the bar which, unsurprisingly, now wanders on the cut. When I first measured the deformation it was about 2.5 mm and by judicious use of boot and a flat surface I have reduced this to "almost" straight BUT I am somewhat concerned as to how to get it fully straight and not overdo it and bend it the other way! To exceed Young's modulus by just the right amount I am thinking of using two plates of steel at each end about 2mm thick and pressing down on the centre with about 100 mm wide load eg a 4 x 2" timber and a lump hammer and see if that works. If not go up in 1 mm increments until it does Is there a professional way to do this in a better precision engineered way? Who would provide such a service? I am near Oxford See also the other post on sticky links 9C45F9A6-1BDB-409B-A945-8C894FFA4339.heic 5A596F21-F4AA-47D9-B968-16720F3DB433.heic 6948D16D-3A36-4D3D-94FB-2416454408BB.heic


-
Thanks all. I will stick with my eye and a flat file Chris
-
My mentor told me how to get the burrs off the sides of the chain bar with a flat file. He also showed how o level out the two sides at 90 degrees. I see on the many videos of maintaining a worn chainsaw bar that a tool is recommended. See the image below. Question 1 Is this what professionals use? I have never seen the three guys I know use one. Question 2 If so what is recommended model or make? Stihl, Husqi etc whack them out at over £30 but the one below is under £10 Seems a no brainer to go cheaper IF (and I suspect it is not) recommended by the professionals Chris

-
Apparently self seeded. What are they?


-
No ignition lights or starter connection on Countrax C400 H key change
cjdg replied to cjdg's topic in Maintenance help
The saga continues.... Got the new switch and fitted it BUT although the key operates the ignition LIGHTS turning it to the right to get the starter motor to turn does not work The supposed diagram supplied by the supplier of the switch has different colours to the colours on the actual switch The earth and the power are black and orange that is pretty clear The other three colours on the machine itsefl are respectively Red / Grey (sort of grey) Purple which the diagram says goes to the ignition cut out switch and a component I cannot fathom on the diagram Orange/green/blue The diagram has Blue / red and Red The actual wiring is on the photo and I have downloaded the diagram as a pdf. not sure if it will work! 1 - K C A (91-02).pdf1 - K C A 1 - K C A (91-02).pdf(91-02).pdfam So my question(s) Assuming the orange and black are right What are the other colours? What colour is equivalent to the missing colours or was the replacement switch the wrong one? It was sent on the recommendation of a Countax expert Chris


-
The chain came off within the saw because I had not put it on properly and as it fell apart it hit the saw. It pains me to admit this but as George Washinton said.....
-
I have managed to mildly mis align three of these and take out a complete half axle on four Oregons that still have lots of life Anyone able to recommend a local chainsaw doctor (or indeed forester) in the Oxford area I am told that local Garden centres provide this service but I am somewhat wary of such chaps having twice been mislead by the so called engineers I find at such places I am in OX1 Yours Chris George


-
Dear Member L I am intrigued by you making up chains... I am a late coming amateur old git Took up chainsawing when I bought some woodland well north of age of 65 but a reasonably competent motorbike engineer. I have managed to mangle four chains. Three of them have no easily visible defect but when you put them on the bar they stick round the sprocket and it appears that one of the links is slightly bent The fourth one has an obvious half in half out central axle where one end has popped half out of the link. On a push bike (I do a lot of that) you get a chain link tool that pushes out the axle on the link and shorten the chain or put in a link. Question. Is there a service available for repairs of such defects in chains or a tool for DIY or is this simply too dangerous ? Chris George


